20
13.7 Cleaning the milk container
Clean the milk container
each time you prepare milk
as described below:
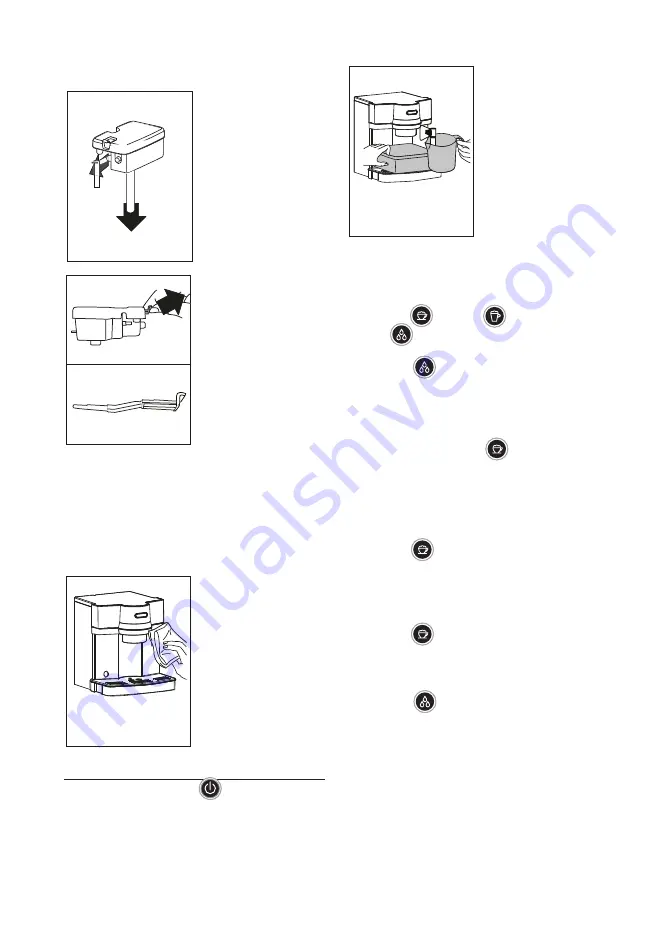
1. Remove the lid (D1);
2. Remove the milk spout
(D3) and intake tube
(D4) (fig. 33);
3. Remove the froth regula-
tor by pulling it out-
wards (fig. 34);
4. Wash all the compo-
nents thoroughly with
hot water and mild
washing-up liquid.
All components are
dishwasher safe,
but must be placed
in the top basket of
the dishwasher.
Make
sure there are no milk
residues left inside the
holes and the groove on
the fine end of the froth
regulator;
5. Check that the intake tube and spout are not clogged with
milk residues;
6. Replace the container pointer, milk spout and intake tube;
7. Place the lid back on the milk container.
13.8 Cleaning the milk container/water spout
connector
Each time you prepare a drink
with milk, clean the connec-
tor with a sponge to remove
milk residues from the gas-
kets (fig. 35).
14. DESCALING
Descale the appliance when the
light (B2) on the control
panel flashes.
Important!
•
Before use, read the instructions and the labelling on the descaler pack.
•
It is important to use De’Longhi descaler only. Using unsuitable descal-
ers — or failing to perform the descale procedure correctly — could lead to the
machine developing faults not covered by the manufacturer's guarantee.
1. Empty the water tank
(A8) completely and re-
move the water softener
filter (C10) (if present).
Fill the tank with the
descaler solution, ob-
tained by diluting the
descaler with water fol-
lowing the instructions
on the pack;
2. Remove the hot water
spout (C7) (fig. 6);
3. Place a container under the boiler outlet (A5) and another
under the hot water spout (fig. 36). Make sure the drip tray
(A10) is empty and inserted correctly;
4. Press the
(B9) and
(B11) buttons together.
The
(B8) light comes on (if the hot water spout is
not inserted, the light flashes);
5. Press the
(B7) button. The LEDs alternate in se-
quence to indicate descaling is underway. The descaling
programme automatically performs a series of deliveries
and pauses from the boiler outlet and hot water spout to
remove all the scale residues inside the coffee machine;
6. At the end of descaling, the
(B10) light comes on to
indicate the need to perform two rinses;
7. To eliminate residues of solution, extract the water tank,
empty, rinse under running water, fill with clean water up
to the MAX level, insert the filter (if removed previously)
and put the water tank back in the machine;
8. Press the
button. Rinsing begins and all the LEDs
flash in sequence;
9. When the tank is empty, perform a second rinse. Empty the
containers and put them back under the boiler outlet and
hot water spout;
10. Press the
button. Rinsing begins and all the LEDs
flash in sequence;
11. Rinsing ends when the tank is empty. Rinse and fill the
tank and put back in the appliance;
12. When the
light comes on, press the corresponding
button. Delivery begins, then stops automatically.
The appliance is ready for use.
Please note:
•
If the descaling cycle is not completed correctly (e.g. no electricity) we
recommend repeating the cycle;
•
Repair of damage to the coffee maker caused by scale is not covered by
the guarantee unless descaling is performed regularly as described above.
36
35
33
34


