background image

4.

Install the:
a) palmrest
b) keyboard
c) base cover
d) battery

5.

Follow the procedures in 

After Working Inside Your Computer

.

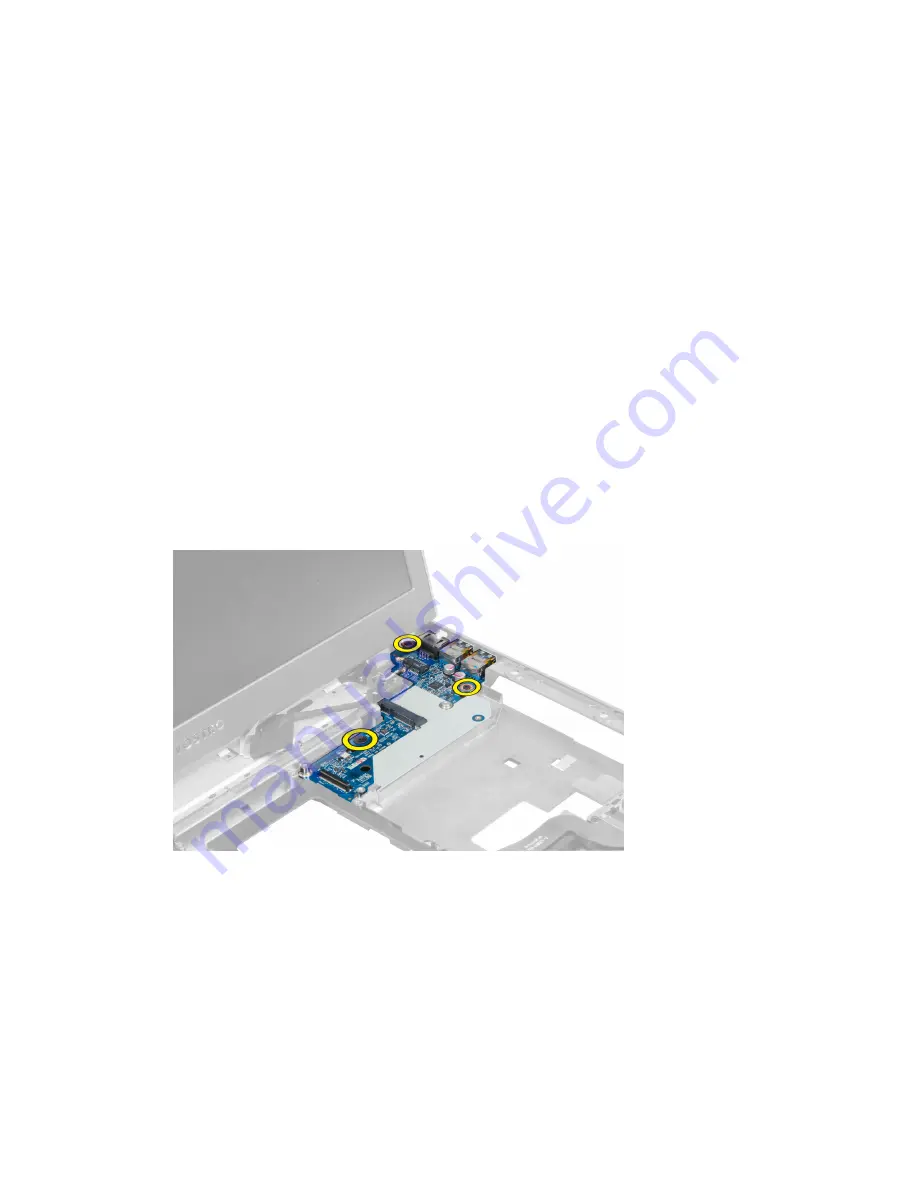
Removing the LAN Board

1.

Follow the procedures in 

Before Working Inside Your Computer.

2.

Remove the:
a) SD Card
b) express card
c) battery
d) base cover
e) optical drive
f) hard drive
g) keyboard
h) display hinge cover
i) palmrest
j) system board
k) WLAN card

3.

Remove the screws that secure LAN board in place.

4.

Lift up to remove the LAN board from the chassis.

37

Summary of Contents for Vostro 3560

Page 1: ...Dell Vostro 3560 Owner s Manual Regulatory Model P24F Regulatory Type P24F001 ...

Page 2: ...on are trademarks of Advanced Micro Devices Inc Microsoft Windows Windows Server Internet Explorer MS DOS Windows Vista and Active Directory are either trademarks or registered trademarks of Microsoft Corporation in the United States and or other countries Red Hat and Red Hat Enterprise Linux are registered trademarks of Red Hat Inc in the United States and or other countries Novell and SUSE are r...

Page 3: ...e Base Cover 10 Installing the Base Cover 12 Removing the Memory 12 Installing the Memory 12 Removing the Optical Drive 12 Installing the Optical Drive 14 Removing the Hard Drive 14 Installing the Hard Drive 16 Removing the Keyboard 16 Installing the Keyboard 18 Removing the Display Hinge Cover 18 Installing the Display Hinge Cover 19 Removing the Palmrest 19 Installing the Palmrest 24 Removing th...

Page 4: ...bly 43 Removing the Power Connector 44 Installing the Power Connector 44 Removing the Display Bezel 45 Installing the Display Bezel 46 Removing the Display Bracket 47 Installing the Display Bracket 49 Removing the Camera Module 50 Installing the Camera Module 50 3 System Setup 53 Boot Sequence 53 Navigation Keys 53 System Setup Options 54 Updating the BIOS 58 System and Setup Password 58 Assigning...

Page 5: ...ching an unpainted metal surface such as a connector on the back of the computer CAUTION Handle components and cards with care Do not touch the components or contacts on a card Hold a card by its edges or by its metal mounting bracket Hold a component such as a processor by its edges not by its pins CAUTION When you disconnect a cable pull on its connector or on its pull tab not on the cable itsel...

Page 6: ... from the appropriate slots Recommended Tools The procedures in this document may require the following tools Small flat blade screwdriver 0 Phillips screwdriver 1 Phillips screwdriver Small plastic scribe Flash BIOS update program CD Turning Off Your Computer CAUTION To avoid losing data save and close all open files and exit all open programs before you turn off your computer 1 Shut down the ope...

Page 7: ...ot use batteries designed for other Dell computers 1 Connect any external devices such as a port replicator battery slice or media base and replace any cards such as an ExpressCard 2 Connect any telephone or network cables to your computer CAUTION To connect a network cable first plug the cable into the network device and then plug it into the computer 3 Replace the battery 4 Connect your computer...

Page 8: ...8 ...

Page 9: ...puter 2 Press in on the SD card to release it from the computer Slide the SD card out of the computer Installing the Secure Digital Card 1 Push the SD card into the slot until it clicks into place 2 Follow the procedures in After Working Inside Your Computer Removing the Battery 1 Follow the procedures in Before Working On Your Computer 2 Slide the battery latches to release the battery 3 Lift and...

Page 10: ...ess in on the ExpressCard and release Pull the ExpressCard and remove out of the computer Installing the ExpressCard 1 Push in the ExpressCard into the slot until it clicks into place 2 Install the battery 3 Follow the procedures in After Working Inside Your Computer Removing the Base Cover 1 Follow the procedures in Before Working Inside Your Computer 2 Remove the battery 3 Remove the screw s tha...

Page 11: ...4 Slide the cover outwards to release it from the notches on the computer 5 Lift the cover upwards and away from the computer 11 ...

Page 12: ...r 2 Remove the a battery b base cover 3 Pry the retention clips away from the memory module until it pops up Lift and remove the memory module from its connector Installing the Memory 1 Insert and secure the memory module to the system board 2 Install the a base cover b battery 3 Follow the procedures in After Working Inside Your Computer Removing the Optical Drive 1 Follow the procedures in Befor...

Page 13: ...er to pry the optical drive out of the computer 5 Slide the optical drive outwards and remove it from the computer 6 Remove the screws that secure the optical drive bracket Remove the optical drive bracket from the optical drive 13 ...

Page 14: ...ten the screw to secure the optical drive to the computer 4 Install the a base cover b battery 5 Follow the procedures in After Working Inside Your Computer Removing the Hard Drive 1 Follow the procedures in Before Working Inside Your Computer 2 Remove the a battery b base cover 3 Remove the screws that secure the hard drive to the computer 4 Pull the tab to release the hard drive from the hard dr...

Page 15: ...5 Lift up the hard drive and remove from the computer 6 Remove the screws that secure the hard drive bracket to the hard drive 7 Lift up and remove the hard drive from the hard drive bracket 15 ...

Page 16: ...4 Tighten the screws that secure hard drive to the computer 5 Install the a battery b base cover 6 Follow the procedures in After Working Inside Your Computer Removing the Keyboard 1 Follow the procedures in Before Working Inside Your Computer 2 Remove the battery 3 Using of a flat head screwdriver release the latches that secures the keyboard to the computer 4 Flip the keyboard over and lay it on...

Page 17: ...5 Lift the clip to release the keyboard cable and disconnect it from the system board 6 Lift the clip to release the backlit cable and disconnect it from the system board 17 ...

Page 18: ...keyboard in its compartment 4 Press down until the keyboard clicks into place 5 Install the battery 6 Follow the procedures in After Working Inside Your Computer Removing the Display Hinge Cover 1 Follow the procedures in Before Working On Your Computer 2 Remove the battery 3 Remove the screws that secure the display hinge cover to the computer 18 ...

Page 19: ...y hinge cover back to the computer till the latches are fixed into place 2 Tighten the screws that secure the display hinge cover to the computer 3 Install the battery 4 Follow the procedures in After Working Inside Your Computer Removing the Palmrest 1 Follow the procedures in Before Working Inside Your Computer 2 Remove the a battery b base cover c memory d optical drive e hard drive 19 ...

Page 20: ...f keyboard g display hinge cover 3 Remove the rubber pads from the bottom of the computer 4 Remove the screws from the bottom of the computer 5 Disconnect the LEDs fingerprint cable 20 ...

Page 21: ...6 Remove the screws that secures palmrest assembly in place 7 Lift the latch and disconnect the power button fingerprint cable 21 ...

Page 22: ...8 Lift the tab and release the touchpad cable SD card reader cable and fingerprint scanner cable from the computer 9 Lift the tab and disconnect the functions button cable from the system 22 ...

Page 23: ...10 Carefully pry up the palmrest along the edges 11 Slide the palmrest outwards and lift to remove from the computer 23 ...

Page 24: ...m board 6 Tighten the screws to secure the palmrest to the back of the computer 7 Connect the LEDs fingerprint cable to the system board 8 Tighten the screws on the bottom of the computer that secure the palmrest in place 9 Push the rubber pads to cover the screws on the computer 10 Install the a display hinge cover b keyboard c hard drive d optical drive e memory f base cover g battery 11 Follow ...

Page 25: ...hinge cover g palmrest 3 Lift the tab and disconnect the express card reader cable 4 Remove the screws that secure the express card reader in place 5 Lift up and remove the express card reader from the system 25 ...

Page 26: ...almrest b display hinge cover c keyboard d base cover e battery f express card g SD card 5 Follow the procedures in After Working Inside Your Computer Removing the Speakers 1 Follow the procedures in Before Working Inside Your Computer 2 Remove the a SD card b express card c battery d base cover e optical drive f hard drive g keyboard h display hinge cover i palmrest j express card reader 3 Discon...

Page 27: ...4 Remove the screws that secure the speakers in place 5 Lift up the left speaker and remove 27 ...

Page 28: ... card reader b palmrest c display hinge cover d keyboard e hard drive f optical drive g base cover h battery i express card j SD card 5 Follow the procedures in After Working Inside Your Computer Removing the System Board 1 Follow the procedures in Before Working Inside Your Computer 2 Remove the a SD Card b express card c battery d base cover e optical drive f hard drive g keyboard h display hing...

Page 29: ...j SD card reader 3 Disconnect the system fan cable and the power cable 4 Disconnect the speaker cable 5 Disconnect the Express card reader fingerprint cable 6 Disconnect the touchpad cable 29 ...

Page 30: ...7 Peel off the tape and disconnect the LVDS and camera cable 8 Remove the screws that secure the system board to the chassis 30 ...

Page 31: ...9 Lift up the system board from the chassis 10 Slide the system board towards right and remove from the chassis 31 ...

Page 32: ...ct the express card reader cable 6 Connect the speaker cable 7 Connect the system fan cable and the power cable 8 Install the a SD card reader b palmrest c display hinge cover d keyboard e hard drive f optical drive g base cover h battery i express card j SD card 9 Follow the procedures in After Working Inside Your Computer Removing the Heat Sink 1 Follow the procedures in Before Working Inside Yo...

Page 33: ...e h keyboard i display hinge cover j palmrest k system board 3 Disconnect the system fan cable from the system board 4 Remove the screws that secure the heat sink to the system board 5 Lift up and remove the heat sink from the system board 33 ...

Page 34: ...y hinge cover d keyboard e hard drive f optical drive g memory h base cover i battery j express card k SD card 4 Follow the procedures in After Working Inside Your Computer Removing the Processor 1 Follow the procedures in Before Working Inside Your Computer 2 Remove the a battery b base cover c memory d optical drive e hard drive f keyboard g palmrest h WLAN card i ExpressCard reader 34 ...

Page 35: ...o the system board 3 Install the a heat sink b system board c ExpressCard reader d WLAN card e palmrest f keyboard g hard drive h optical drive i memory j base cover k battery 4 Follow the procedures in After Working Inside Your Computer Removing the Coin Cell Battery 1 Follow the procedures in Before Working Inside Your Computer 2 Remove the a battery b base cover c memory d optical drive e hard ...

Page 36: ...llow the procedures in After Working Inside Your Computer Removing the Wireless Local Area Network WLAN Card 1 Follow the procedures in Before Working Inside Your Computer 2 Remove the a battery b base cover c keyboard d palmrest 3 Disconnect the antenna cables connected to the WLAN card by pulling it upwards 4 Remove the screw that secures the WLAN card till it pops out 5 Remove the WLAN card fro...

Page 37: ...AN Board 1 Follow the procedures in Before Working Inside Your Computer 2 Remove the a SD Card b express card c battery d base cover e optical drive f hard drive g keyboard h display hinge cover i palmrest j system board k WLAN card 3 Remove the screws that secure LAN board in place 4 Lift up to remove the LAN board from the chassis 37 ...

Page 38: ...ard 1 Insert the LAN board into its compartment and align on to the chassis 2 Tighten the screws to secure the LAN board to the chassis 3 Install the a WLAN card b system board c palmrest d display hinge cover e keyboard f hard drive g optical drive h base cover i battery 38 ...

Page 39: ... board k WLAN board l LAN board 3 Remove the screw that secure the mini SATA card in place Slide and remove the mini SATA card Installing the mini SATA Card 1 Install the mini SATA card to the connector on the LAN board Tighten the screw to secure the mini SATA card on the LAN board 2 Install the a LAN board b WLAN card c system board d palmrest e display hinge cover f keyboard g hard drive h opti...

Page 40: ...in Before Working Inside Your Computer 2 Remove the a SD card b express card c battery d base cover e optical drive f hard drive g keyboard h display hinge cover i palmrest 3 Pull out the SD card reader cable 4 Remove the screw the secure the SD card reader in place 40 ...

Page 41: ... a palmrest b display hinge cover c keyboard d hard drive e optical drive f base cover g battery h express card i SD card 4 Follow the procedures in After Working Inside Your Computer Removing the Display Assembly 1 Follow the procedures in Before Working Inside Your Computer 2 Remove the a SD card b express card c battery d base cover e memory f optical drive g hard drive h keyboard i display hin...

Page 42: ...e the screws from the base of the system 4 Remove the screws present below the display hinge cover 5 Remove the left screw that secure the display assembly in place 6 Unthread the camera cable and remove the right screw that secure the display assembly to the system 42 ...

Page 43: ...mera cable and tighten the screw to secure the right hinge in place 3 Tighten the screw that secure the left hinge in place 4 Tighten the screws present below the hinge cover 5 Tighten the screws from the base of the computer that secures the display assembly in place 6 Install the a LAN board b WLAN card c system board d express card reader e palmrest 43 ...

Page 44: ... card b express card c battery d base cover e memory f optical drive g hard drive h keyboard i display hinge cover j palmrest k system board l display assembly 3 Push the ferrite bead through the notch and lift up to remove the power connector Installing the Power Connector 1 Place the power connector in its location on the base of the chassis 2 Install the a display assembly b system board c palm...

Page 45: ...Follow the procedures in Before Working Inside Your Computer 2 Remove the a SD card b express card c battery d base cover e optical drive f hard drive g keyboard h display hinge cover i palmrest j express card reader k system board l heat sink m LAN board n display assembly 3 Carefully pry the bezel off the display assembly 45 ...

Page 46: ... Installing the Display Bezel 1 Align the display bezel with the display assembly and gently snap it into place 2 Install the a display assembly b LAN board c heat sink d system board e express card reader f palmrest g display hinge cover h keyboard i hard drive 46 ...

Page 47: ...Follow the procedures in Before Working Inside Your Computer 2 Remove the a SD card b express card c battery d base cover e optical drive f hard drive g keyboard h display hinge cover i palmrest j express card reader k system board l LAN board m display assembly n display bezel o camera 3 Remove the screws that secure the display brackets to the display assembly 47 ...

Page 48: ...4 Lift up and remove the display panel with brackets and hinges 5 Peel off the tape and disconnect the display cable 48 ...

Page 49: ... display brackets and hinges to the display panel 2 Affix the tape and connect the display cable 3 Place the display panel with brackets and hinges onto the computer 4 Tighten the screws to secure the display brackets to the display assembly 5 Install the a camera b display bezel c display assembly d LAN board e system board f express card reader 49 ...

Page 50: ...e cover f keyboard g optical drive h palmrest i display assembly j display bezel k display hinges 3 Disconnect the LVDS and camera cable Remove the screw securing the camera module and pull out to remove the camera from the system Installing the Camera Module 1 Connect the LVDS and camera cable to the camera 2 Place the camera module to its original position and tighten the screw to secure it to t...

Page 51: ...h palmrest i hard drive j optical drive k keyboard l display hinge cover m base cover n battery o express card p SD card 4 Follow the procedures in After Working Inside Your Computer 51 ...

Page 52: ...52 ...

Page 53: ...ess System Setup by pressing F2 key Bring up the one time boot menu by pressing F12 key The one time boot menu displays the devices that you can boot from including the diagnostic option The boot menu options are Removable Drive if available STXXXX Drive NOTE XXX denotes the SATA drive number Optical Drive Diagnostics NOTE Choosing Diagnostics will display the ePSA diagnostics screen The boot sequ...

Page 54: ...puter model The Main tab lists out the primary hardware features of the computer The table below defines the function of each option Table 2 Main Options Main System Information Displays the computer model number System Time Allows you to reset the time on the computer s internal clock System Date Allows you to reset the date on the computer s internal calendar BIOS Version Displays the BIOS revis...

Page 55: ...ard Type Displays the type of keyboard The Advanced tab allows you to set various functions that affect the performance of the computer The table below defines the function of each option and its default value Table 3 Advanced Options Advanced Intel SpeedStep Enable or disable the Intel SpeedStep feature Default Enabled Virtualization Enable or disable the Intel Virtualization feature Default Enab...

Page 56: ... External USB Ports Enables or disables external USB ports Default Enabled Microphone Enables or disables microphone Default Enabled Camera Enables or disables camera Default Enabled Media Card Reader Enables or disables media card reader Default Enabled Optical Drive Enables or disables optical drive Default Enabled Fingerprint Reader Enables or disables fingerprint reader Default Enabled Boot Di...

Page 57: ...on for changing passwords Password Bypass Allows you to bypass the system password and the internal HDD password prompts during a system restart resume from hibernate state Default Disabled Computrace Enable or disable the Computrace feature on your computer The Boot tab allows you to change the boot sequence Table 5 Boot Options Boot Boot Priority Order Specifies the order of different devices in...

Page 58: ...le and click Download File 7 Select your preferred download method in the Please select your download method below window click Download Now The File Download window appears 8 Click Save to save the file on your computer 9 Click Run to install the updated BIOS settings on your computer Follow the instructions on the screen System and Setup Password You can create a system password and a setup pass...

Page 59: ... password that you entered earlier and click OK 7 Press Esc and a message prompts you to save the changes 8 Press Y to save the changes The computer reboots Deleting or Changing an Existing System and or Setup Password Ensure that the Password Status is Unlocked in the System Setup before attempting to delete or change the existing System and or Setup password You cannot delete or change an existi...

Page 60: ...60 ...

Page 61: ... are completed successfully View error messages that inform you of problems encountered during testing CAUTION Use the system diagnostics to test only your computer Using this program with other computers may cause invalid results or error messages NOTE Some tests for specific devices require user interaction Always ensure that you are present at the computer terminal when the diagnostic tests are...

Page 62: ... present Diagnostic Beep Codes The following table shows the possible beep codes that may be emitted by the computer when your computer is unable to complete a power on self test Table 7 Diagnostic Beep Codes Beep Description Possible Cause Troubleshooting Steps 1 BIOS ROM checksum in progress of failure System board failure covers BIOS corruption or ROM error 2 No RAM detected If no memory is det...

Page 63: ...sists issue with the memory connector 5 Real time clock power fail CMOS battery failure Reseat the battery If issue persists there can be an issue with the coin cell battery or the connector that will involve replacing the system board 6 Video BIOS Test Failure Video card failure 7 Processor Failure Processor failure 8 Display Display failure 63 ...

Page 64: ...64 ...

Page 65: ...idth 64 bit Flash EPROM Vostro 3360 Vostro 3460 SPI 8 MB Vostro 3560 SPI 6 MB Table 9 Processor Feature Description Types Intel Core i3 series Intel Core i5 series Intel Core i7 series L3 cache up to 6 MB Table 10 Memory Feature Description Memory connector two SODIMM slots Memory capacity 2 GB 4 GB 6 GB or 8 GB Memory type DDR3 SDRAM 1333 MHz and 1600 MHz Minimum memory 2 GB Maximum memory 8 GB T...

Page 66: ...scription Video type integrated on system board discrete Data bus UMA integrated video Discrete Vostro 3460 PCI E x16 Gen1 PCI E x16 Gen2 Vostro 3560 PCI E x8 Gen 2 Video controller UMA Intel HD Graphics 3000 Intel HD Graphics 4000 Discrete Vostro 3460 nVidia GeForce GT 630M Vostro 3560 AMD Radeon HD7670M Table 13 Camera Feature Description Camera Resolution HD 720P Video Resolution maximum 1280 x...

Page 67: ...bugging The ports are identified in the documentation shipped with your computer Media card reader one 8 in 1 Table 16 Display Feature Description Type HD WLED AG Size Vostro 3360 13 0 inches Vostro 3460 14 0 inches Vostro 3530 15 0 inches Dimensions Vostro 3360 Vostro 3460 Vostro 3560 Height 240 mm 9 44 inches 245 mm 9 64 inches 259 mm 10 19 inches Width 330 mm 12 99 inches 340 mm 13 38 inches 37...

Page 68: ...tive Area Vostro 3360 Vostro 3460 3560 X axis 82 00 mm 3 22 inches 90 00 mm 3 54 inches Y axis 45 00 mm 1 77 inches 49 00 mm 1 93 inches Table 19 Battery Feature Description Type Vostro 3360 4 cell lithium ion 3 4 Ahr cell or 49 Whr Vostro 3460 3560 6 cell lithium ion 2 2 Ahr cell or 48 Whr Dimensions Vostro 3360 Vostro 3460 Vostro 3560 Height 20 20 mm 0 80 inch 20 mm 0 79 inch 20 mm 0 79 inch Wid...

Page 69: ...ated video card 65 W Vostro 3460 with discrete video card 90 W Vostro 3560 with quad core 90 W Input voltage 100 VAC to 240 VAC Input current maximum 1 50 A 1 60 A 1 70 A Input frequency 50 Hz to 60 Hz Output power 65 W and 90 W Output current 65 W 3 34 A continuous 90 W 4 62 A Rated output voltage 19 50 VDC 1 0 VDC Dimensions Height 28 20 mm 1 11 inches Width 57 90 mm 2 28 inches Depth 137 16 mm ...

Page 70: ... 10 19 inches Weight with battery pack 1 66 kg 3 65 lb 2 23 kg 4 91 lb 2 57 kg 5 66 lb Table 22 Environmental Feature Description Temperature Operating 0 C to 35 C 32 F to 95 F Storage 40 C to 65 C 40 F to 149 F Relative humidity maximum Operating 10 to 90 noncondensing Storage 5 to 95 noncondensing Altitude maximum Operating 15 2 m to 3048 m 50 ft to 10 000 ft Non Operating 15 2 m to 10 668 m 50 ...

Page 71: ...nd service options Availability varies by country and product and some services may not be available in your area To contact Dell for sales technical support or customer service issues 1 Visit support dell com 2 Select your support category 3 If you are not a U S customer select your country code at the bottom of the support dell com page or select All to see more choices 4 Select the appropriate ...

Reviews: