background image

Installing the Stand

1.

Align the stand on the computer, and tighten the screws to secure the stand to the computer.

2.

Place and press the panel on the computer until it clicks into place.

3.

Follow the procedures in 

After Working Inside Your Computer

.

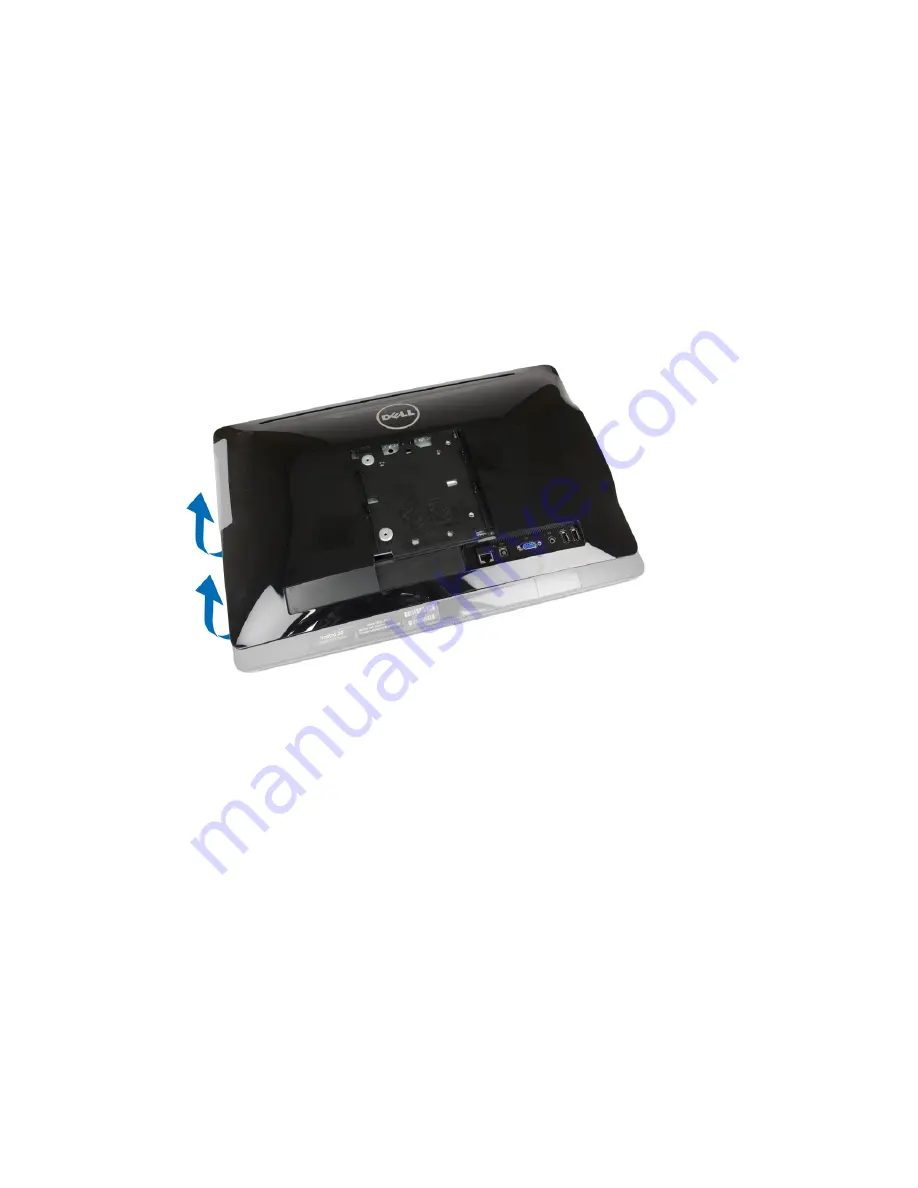
Removing the Back Cover

1.

Follow the procedures in 

Before Working Inside Your Computer

.

2.

Remove the stand.

3.

Pry up along the edges to release the back cover from the computer.

11

Summary of Contents for Vostro 3015

Page 1: ...Dell Vostro 3015 Owner s Manual Regulatory Model W09B Regulatory Type W09B003 ...

Page 2: ...problem WARNING A WARNING indicates a potential for property damage personal injury or death Copyright 2014 Dell Inc All rights reserved This product is protected by U S and international copyright and intellectual property laws Dell and the Dell logo are trademarks of Dell Inc in the United States and or other jurisdictions All other marks and names mentioned herein may be trademarks of their res...

Page 3: ...simple repairs as authorized in your product documentation or as directed by the online or telephone service and support team Damage due to servicing that is not authorized by Dell is not covered by your warranty Read and follow the safety instructions that came with the product CAUTION To avoid electrostatic discharge ground yourself by using a wrist grounding strap or by periodically touching an...

Page 4: ...uter 4 Disconnect your computer and all attached devices from their electrical outlets 5 Press and hold the power button while the computer is unplugged to ground the system board 6 Remove the cover CAUTION Before touching anything inside your computer ground yourself by touching an unpainted metal surface such as the metal at the back of the computer While you work periodically touch an unpainted...

Page 5: ...ck Shut Down 2 Ensure that the computer and all attached devices are turned off If your computer and attached devices did not automatically turn off when you shut down your operating system press and hold the power button for about 6 seconds to turn them off After Working Inside Your Computer After you complete any replacement procedure ensure you connect any external devices cards and cables befo...

Page 6: ...ystem Overview Figure 1 Features 1 Microphone 2 Camera 3 Camera status light 4 Camera privacy latch 5 Optical drive 6 On Screen Display OSD buttons 7 Hard drive activity light 8 Power button Power light 6 ...

Page 7: ...Power connector 14 Network connector 15 Audio connector 16 USB 2 0 connector 17 USB 3 0 connector 18 Memory card reader Figure 2 Inside View 1 1 Memory shield 2 System board shield 3 Speaker cover 4 VESA bracket 5 Power switch board 6 Hard Drive 7 Convertor board 8 Optical drive 7 ...

Page 8: ... Inside View 2 1 Memory module 2 Coin cell battery 3 System board 4 Heatsink 5 Display bracket 6 System fan 7 WLAN card System Board Layout The following image displays the system board layout of the computer 8 ...

Page 9: ... 0 connectors 8 line out connector 9 VGA connector 10 Power connector 11 Network connector 12 Power switch connector 13 Hard drive connector 14 Optical drive connector 15 Hard drive Optical drive power connector 16 Convertor board connector 17 System fan connector 18 WLAN card connector 19 LVDS connector 20 Camera connector 9 ...

Page 10: ...mponents from your computer Removing the Stand 1 Follow the procedures in Before Working Inside Your Computer 2 Place the computer on a flat surface display side facing downwards 3 Pry and remove the panel from the computer 4 Remove the screws that secure the stand to the computer and remove it from the computer 10 ...

Page 11: ...er 2 Place and press the panel on the computer until it clicks into place 3 Follow the procedures in After Working Inside Your Computer Removing the Back Cover 1 Follow the procedures in Before Working Inside Your Computer 2 Remove the stand 3 Pry up along the edges to release the back cover from the computer 11 ...

Page 12: ...ign and press the back cover until it clicks into place 2 Install the stand 3 Follow the procedures in After Working Inside Your Computer Removing the Optical Drive 1 Follow the procedures in Before Working Inside Your Computer 2 Remove the stand 3 Remove the back cover 12 ...

Page 13: ...ews that secure the optical drive bracket and remove it from the optical drive Installing the Optical Drive 1 Tighten the screws to secure the optical drive bracket to the optical drive 2 Insert the optical drive into its slot 3 Tighten the screw to secure the optical drive to the computer 4 Install a back cover b stand 13 ...

Page 14: ...Before Working Inside Your Computer 2 Remove the stand 3 Remove the back cover 4 Push the hard drive bracket to release it from its lock and lift the hard drive from one edge Slide and remove it to access the hard drive cable 5 Disconnect the hard drive cable from the hard drive and remove it from the computer 14 ...

Page 15: ... into the hard drive bracket 2 Connect the hard drive cable to the hard drive and align the hard drive to its slot on the computer 3 Install a back cover b stand 4 Follow the procedures in After Working Inside Your Computer Removing the Convertor Board 1 Follow the procedures in Before Working Inside Your Computer 2 Remove the stand 3 Remove the back cover 15 ...

Page 16: ...r Board 1 Tighten the screws to secure the convertor board to the computer Connect the cables to the convertor board 2 Install a back cover b stand 3 Follow the procedures in After Working Inside Your Computer Removing the Memory 1 Follow the procedures in Before Working Inside Your Computer 2 Remove the stand 3 Remove the back cover 16 ...

Page 17: ... module available 1 Align the notch on the memory card with the tab in the system board connector 2 Press down on the memory module until the release tabs spring back to secure them in place 3 Place the memory cage back into its place 4 Install a back cover b stand 5 Follow the procedures in After Working Inside Your Computer Removing the System Board Shield 1 Follow the procedures in Before Worki...

Page 18: ...on the system board Tighten the screws to secure it to the computer 2 Install a back cover b stand 3 Follow the procedures in After Working Inside Your Computer Removing the Coin Cell Battery 1 Follow the procedures in Before Working Inside Your Computer 2 Remove the a stand b back cover c system board shield 3 Press the release latch away from the battery the battery pops out from the socket 18 ...

Page 19: ...nside Your Computer Removing the Heatsink 1 Follow the procedures in Before Working Inside Your Computer 2 Remove a stand b back cover c system board shield 3 Remove the screws that secure the heatsink to the computer Lift and remove the heatsink from the computer Installing the Heatsink 1 Align the heatsink on the system board Tighten the screws to secure it to the computer 2 Install a system boa...

Page 20: ...in Before Working Inside Your Computer 2 Remove a stand b back cover c system board shield 3 Remove the screws that secure the speaker cover to the computer Release the speaker cover from the computer 4 Remove the speaker cover from the computer 20 ...

Page 21: ...ling the Speakers 1 Align the speakers on the computer Tighten the screws to secure them to the computer 2 Align the speaker cables through their tabs on the computer and connect the speaker cable to the system board 3 Align the speaker cover on the computer and tighten the screws to secure it 4 Install a system board shield b back cover c stand 5 Follow the procedures in After Working Inside Your...

Page 22: ...move it from the computer Installing the VESA Bracket 1 Align the VESA bracket on the computer Tighten the screws to secure it to the computer 2 Install a back cover b stand 3 Follow the procedures in After Working Inside Your Computer Removing the System Fan 1 Follow the procedures in Before Working Inside Your Computer 2 Remove a stand b back cover c System board shield d VESA bracket 22 ...

Page 23: ...the heatsink on the computer and tighten the screws to secure it to the computer 2 Connect the system fan cable to the system board 3 Install a VESA bracket b system board shield c back cover d stand 4 Follow the procedures in After Working Inside Your Computer Removing the Power Switch Board 1 Follow the procedures in Before Working Inside Your Computer 2 Remove a stand b back cover 23 ...

Page 24: ...h cable from the power switch board to remove it from the computer Installing the Power Switch Board 1 Insert the power switch board into its slot on the computer and fix the tape to secure it Connect the power switch cable to the power switch board 2 Install a back cover b stand 3 Follow the procedures in After Working Inside Your Computer 24 ...

Page 25: ...cover c memory d VESA bracket e system board shield f heatsink g WLAN card 3 Disconnect the following from the system board a camera cable b LVDS cable c system fan cable d hard drive optical drive power cable e optical drive cable f hard drive cable g convertor board cable h power switch cable i speaker cable 25 ...

Page 26: ... to the computer 3 Connect the following cables to the system board a camera cable b LVDS cable c system fan cable d optical drive cable e hard drive cable f hard drive optical drive power cable g convertor board cable h touch cable if available i power switch cable j speaker cable 4 Install a WLAN card b heatsink c system board shield d VESA bracket e memory f back cover g stand 5 Follow the proc...

Page 27: ...Computer 2 Remove a stand b back cover c optical drive d hard drive e memory f VESA bracket g system board shield h speakers i heatsink j system fan k WLAN card l convertor board m system board 3 Release the LVDS camera convertor board cables from their tabs on the display bracket 27 ...

Page 28: ...ghten the screws to secure the display bracket to the computer 3 Align the LVDS camera convertor board cables through their tabs on the display bracket 4 Install a system board b convertor board c WLAN card d system fan e heatsink f speakers g system board shield h VESA bracket i memory j hard drive k optical drive l back cover m stand 5 Follow the procedures in After Working Inside Your Computer ...

Page 29: ...k cover c optical drive d hard drive e memory f VESA bracket g system board shield h speakers i heatsink j system fan k WLAN card l convertor board m system board n display bracket 3 Remove the screws that secure the camera to the computer and release the camera from its slot to access the camera cable 29 ...

Page 30: ...ecure it to the computer 3 Install a display bracket b system board c convertor board d WLAN card e system fan f heatsink g speakers h system board shield i VESA bracket j memory k hard drive l optical drive m back cover n stand 4 Follow the procedures in After Working Inside Your Computer Removing the Microphone 1 Follow the procedures in Before Working Inside Your Computer 2 Remove a stand b bac...

Page 31: ...e c Remove the microphone from the computer Installing the Microphone 1 Connect the microphone cable to the microphone 2 Align the microphone into its slot and tighten the screws to secure it to the computer 3 Install a back cover b stand 4 Follow the procedures in After Working Inside Your Computer 31 ...

Page 32: ...on Self Test POST when the Dell logo appears you can Access System Setup by pressing F2 key Bring up the one time boot menu by pressing F12 key The one time boot menu displays the devices that you can boot from including the diagnostic option The boot menu options are Removable Drive if available STXXXX Drive NOTE XXX denotes the SATA drive number Optical Drive Diagnostics NOTE Choosing Diagnostic...

Page 33: ...b lists out the primary hardware features of the computer The table below defines the function of each option System Information BIOS Revision Displays the BIOS revision BIOS Build Date Displays the date the BIOS was last updated System Name Displays the computer model number System Time Resets the time on the computer s internal clock System Date Resets the date on the computer s internal calenda...

Page 34: ...able or disable Intel SpeedStep Technology Default Enabled Intel Virtualization Technology Enable or disable Intel Virtualization Technology Default Enabled CPU XD Support Enable or disable CPU XD Support Default Enabled Limit CPUID Value Enable or disable Limit CPUID Value Default Disabled Multi Core Support Enable or disable Multi Core Support Default Enabled USB Configuration USB 3 0 Port Compa...

Page 35: ...port USB Boot Support Enable or disable booting from USB devices Default Enabled Boot Meu Security Enable or disable the boot menu security Default Disabled Load Legacy OPROM This option control whether CSM should be loaded during POST Default Disabled Boot Mode Allows you to select the boot mode Default UEFI 1st Boot Device Allows you to select the 1st boot device preference Default Internal HDD ...

Page 36: ...ard and custom modes Default Standard Power The Power tab allows you to configure auto power modes Wake Up by Integrated LAN WLAN Enable or disable wake on PME Default Disabled AC Recovery Allows you to select the power state of the computer after an AC power loss Default Power Off Auto Wake on S5 Enable or disable auto wake on S5 Default Disabled Security The Security tab displays the security st...

Page 37: ...Product Proceed with the instructions on screen 4 If you are unable to locate or find the Service Tag click the Product Category of your computer 5 Choose the Product Type from the list 6 Select your computer model and the Product Support page of your computer appears 7 Click Get drivers and click View All Drivers The Drivers and Downloads page opens 8 On the Drivers and Downloads screen under the...

Page 38: ...ystem Setup screen select System Security and press Enter The System Security screen appears 2 In the System Security screen verify that Password Status is Unlocked 3 Select System Password enter your system password and press Enter or Tab Use the following guidelines to assign the system password A password can have up to 32 characters The password can contain the numbers 0 through 9 Only lower c...

Page 39: ... Password alter or delete the existing system password and press Enter or Tab 4 Select Setup Password alter or delete the existing setup password and press Enter or Tab NOTE If you change the System and or Setup password re enter the new password when promoted If you delete the System and or Setup password confirm the deletion when promoted 5 Press Esc and a message prompts you to save the changes...

Page 40: ...uter Table 2 System Information Feature Specification Processor type Intel Celeron J1900 Intel Celeron J1800 Intel Pentium J2900 Total cache Up to 2 MB cache depending on processor type Table 3 Memory Feature Specification Type up to 1333 DDR3L Connectors one DIMM slot Capacity 2 GB 4 GB and 8 GB Minimum Memory 2 GB Maximum Memory 8 GB Table 4 Video Feature Specification Video Controller Integrate...

Page 41: ...nal Table 7 Displays Feature Specification Type 19 5 inch HD WLED Maximum resolution 1600 x 900 Refresh rate 60 Hz Brightness Brightness up down buttons Operating angle 178 horizontal 178 vertical Pixel pitch 0 2652 mm Controls on screen controls Dimensions Height 249 08 mm 9 81 inches Width 442 80 mm 17 43 inches Diagonal 508 00 mm 20 00 inches Table 8 Drives Feature Specification Hard drive one ...

Page 42: ...nches Width 52 00 mm 2 05 inches Depth 128 00 mm 5 04 inches Coin cell battery 3 V CR2032 lithium coin cell Table 11 Camera optional Feature Specification Image resolution 2 0 Megapixel Video resolution HD 720P 0 92 Megapixels 1280 x 720 pixels Diagonal viewing angle 66 2 degrees Table 12 Stand Feature Specification Tilt 5 degrees to 30 degrees Table 13 Physical Dimensions Feature Without Stand Wi...

Page 43: ...te light Blinking white light indicates that the computer is reading data from or writing data to the hard drive Camera LED White light solid while light indicates that the camera is on Back panel Link integrity light on integrated network adapter Green a good 10 Mbps connection exists between the network and the computer Green a good 100 Mbps connection exists between the network and the computer...

Page 44: ...y maximum Operating 10 to 90 non condensing Storage 10 to 95 non condensing Maximum vibration Operating 0 66 GRMS Storage 1 30 GRMS Maximum shock Operating 110 G Storage 160 G Altitude Operating 15 2 m to 3048 m 50 to 10 000 ft Storage 15 20 m to 10 668 m 50 ft to 35 000 ft Airborne contaminant level G2 or lower as defined by ANSI ISA S71 04 1985 44 ...

Page 45: ...hone based support and service options Availability varies by country and product and some services may not be available in your area To contact Dell for sales technical support or customer service issues 1 Visit dell com support 2 Select your support category 3 Verify your country or region in the Choose a Country Region drop down menu at the top of page 4 Select the appropriate service or suppor...

Reviews: