background image


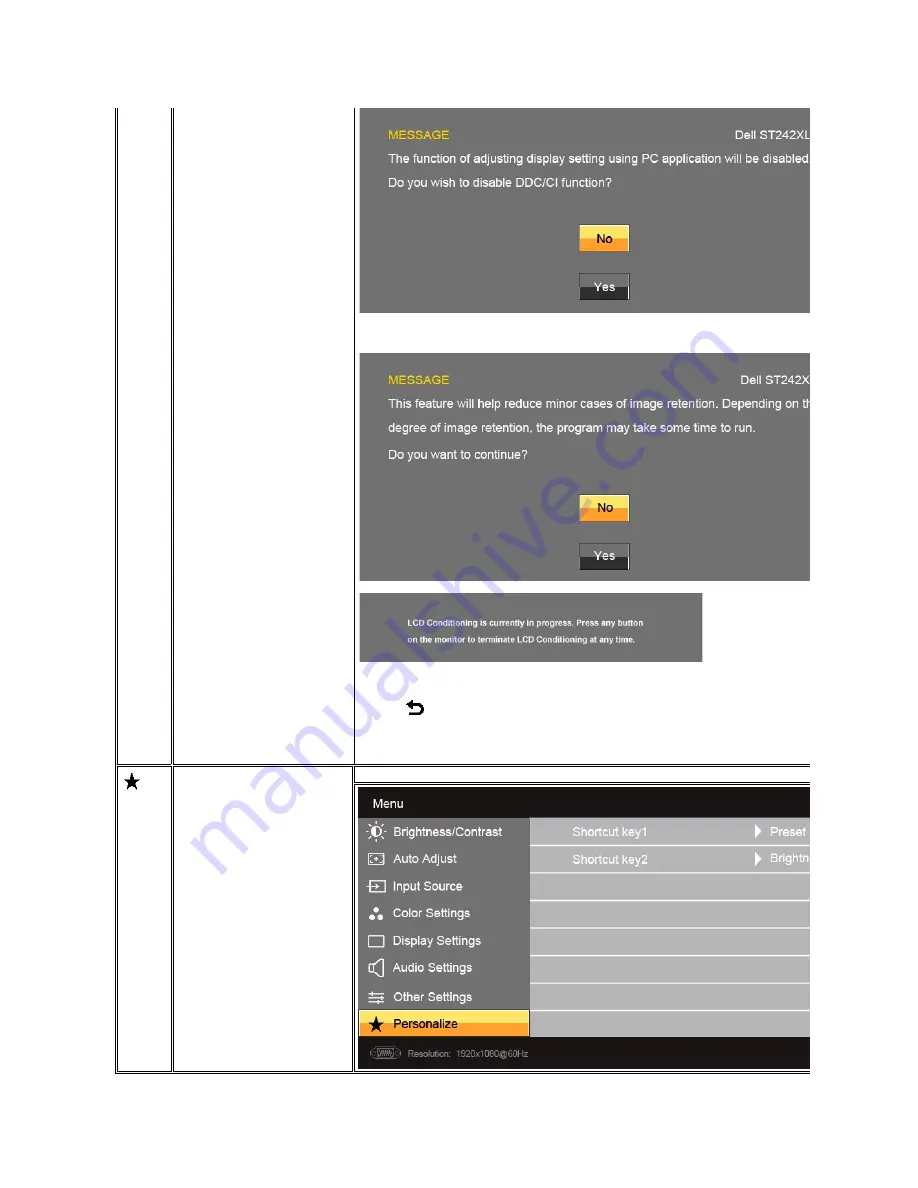
LCD Conditioning


Factory Reset 

Back


If an image appears to be retained on the monitor, select

 LCD Conditioning

 to help eliminate any image retention. Using the LCD Conditioning feature may take several hours. Severe cases of image retention are known as burn

does not remove burn-in. 


Reset all OSD settings to the factory default settings.

Press the 

 button to go back to or exit the main menu.


Personalize


There are 2 shortcut keys on the front panel. Select one control menu for each shortcut key to allow direct access.

Summary of Contents for ST2420LB

Page 1: ...gency As an ENERGY STAR partner Dell Inc has determined that this product meets the ENERGY STAR guidelines for energy efficiency Other trademarks and trade names may be used in this document to refer to either the entities claiming the marks and names or their products Dell Inc disclaims any proprietary interest in trademarks and trade names other than its own ST2420Lb ST2421Lb August 2010 Rev A00...

Page 2: ...tor Quality Pixel Policy Maintenance Guidelines Package Contents Your monitor ships with the components shown below Ensure that you have received all the components and contact Dell if something is missing NOTE Some items may be optional and may not ship with your Monitor Some features or media may not be available in certain countries l Monitor with Stand l Power Cable l DVI Cable optional l VGA ...

Page 3: ...and screen optimization Software and documentation CD which includes an information file INF Image Color Matching File ICM and product documentation Energy Saver feature for Energy Star compliance Security lock slot Identifying Parts and Features Front View Back View l Safety Information l Drivers and Documentation media l Quick Setup Guide Front View Front Panel Controls Label Description 1 2 Sho...

Page 4: ...To contact Dell for technical support 2 Security lock slot To help secure your monitor 3 Dell Soundbar mounting brackets To attach the optional Dell Soundbar 4 Regulatory rating label Lists the regulatory approvals 5 Stand release button To release stand assembly from monitor Left Side ...

Page 5: ... saving feature ST2420L ST2421L Pin Assignments VGA Connector Bottom view Label Description 1 AC power cord connector 2 DVI connector 3 HDMI connector 4 VGA connector 5 Audio Line in 6 Audio Line out VESA Modes Horizontal Sync Vertical Sync Video Power Indicator Power Consumption Normal operation Active Active Active White 30 W maximum 20 W typical Active off mode Inactive Inactive Blanked Amber L...

Page 6: ...5 DDC clock Pin Number 24 pin Side of the Connected Signal Cable 1 TMDS RX2 2 TMDS RX2 3 TMDS Ground 4 Floating 5 Floating 6 DDC Clock 7 DDC Data 8 Floating 9 TMDS RX1 10 TMDS RX1 11 TMDS Ground 12 Floating 13 Floating 14 5V power 15 Self test 16 Hot Plug Detect 17 TMDS RX0 18 TMDS RX0 19 TMDS Ground 20 Floating 21 Floating 22 TMDS Ground 23 TMDS Clock 24 TMDS Clock ...

Page 7: ... DATA SDA 17 DDC CEC Ground 18 5V POWER 19 HOT PLUG DETECT Model ST2420L ST2421L Screen type Active matrix TFT LCD Panel type TN Screen dimensions 60 97cm 24 inches 24 inch viewable image size Preset display area Horizontal Vertical 531 36 mm 20 92 inches 298 89 mm 11 77 inches Pixel pitch 0 277 mm Viewing angle 160 vertical typical 170 horizontal typical Luminance output 250 CD m typical Contrast...

Page 8: ...23 75 029 78 8 VESA 1152 x 864 67 500 75 000 108 0 VESA 1280 x 1024 64 000 60 000 108 0 VESA 1280 x 1024 79 976 75 025 135 0 VESA 1920 x 1080 67 500 60 000 148 5 Model ST2420L ST2421L Video input signals Analog RGB 0 7 Volts 5 positive polarity at 75 ohm input impedance Digital DVI D TMDS 600mV for each differential line positive polarity at 50 ohm input impedance HDMI 600mV for each differential ...

Page 9: ...with 1 to 5 fixed pixels is considered normal and within competitive standards For more information see Dell Support site at support dell com Maintenance Guidelines Dimensions with stand Height 418 24 mm 16 47 inches Width 574 96 mm 22 64 inches Depth 203 68 mm 8 02 inches Dimensions without stand Height 356 43 mm 14 03 inches Width 574 96 mm 22 64 inches Depth 59 72 mm 2 35 inches Stand dimension...

Page 10: ... monitor Avoid using detergent of any kind as some detergents leave a milky film on the monitor l If you notice a white powder when you unpack your monitor wipe it off with a cloth l Handle your monitor with care as dark colored monitors may scratch and show white scuff marks more than lighter colored monitors l To help maintain the best image quality on your monitor use a dynamically changing scr...

Page 11: ...s Availability varies by country and product and some services may not be available in your area To contact Dell for sales technical support or customer service issues 1 Visit support dell com 2 Verify your country or region in the Choose A Country Region drop down menu at the bottom of the page 3 Click Contact Us on the left side of the page 4 Select the appropriate service or support link based ...

Page 12: ...upport dell com enter your service tag and download the latest driver for your graphics card 2 After installing the drivers for your Graphics Adapter attempt to set the resolution to 1920x1080 again Back to Contents Page NOTE If you are unable to set the resolution to 1920x1080 please contact Dell to inquire about a Graphics Adapter that supports these resolutions ...

Page 13: ...t to set the resolution to 1920x1080 again In Windows Vista or Windows 7 1 Right click on the desktop and click Personalization 2 Click Change Display Settings 3 Click Advanced Settings 4 Identify your graphics controller supplier from the description at the top of the window e g NVIDIA ATI Intel etc 5 Please refer to the graphics card provider website for updated driver for example http www ATI c...

Page 14: ...direct access to the control menu that you define in the personalize menu The default settings are Preset Modes Select and Brightness Contrast Select 1 Preset Modes Select Use this button for different display preset modes on your monitor 2 Brightness Contrast Use this button to access the Brightness Contrast control menu 3 OSD Menu Use this button to open the On Screen Display OSD See Using the O...

Page 15: ...plete list of all the options available for the monitor 3 Press the button once to activate the highlighted option 4 Press the and buttons to select the desired parameter 5 Press the button to enter the slide bar and then use the and buttons according to the indicators on the menu to make your changes 6 Press the button to return to the main menu or exit the OSD menu Icon Menu and Submenus Descrip...

Page 16: ...Contrast function adjusts the degree of difference between the darkest and lightest areas on the monitor screen Press the button to go back to or exit the main menu Auto Adjust Even though your computer recognizes your monitor on startup the Auto Adjustment function optimizes the display settings for u NOTE In most cases Auto Adjust produces the best image for your configuration Input Source Auto ...

Page 17: ...r settings to adjust the Image mode and color format Allows you to set the color format Allows you to set the display mode to Graphics or Video If your computer is connected to your monitor choose Graphics If a DVD Mode suitable for desktop applications Mode for multimedia applications e g video playback Mode suitable for gaming applications Select warm mode to obtain a red tint This color setting...

Page 18: ... adjustment is only available for video input Allows you to adjust the color saturation of the video image Use or buttons to adjust the saturation from 0 to 100 makes video image looks monochrome makes video image looks colorful NOTE Saturation adjustment is only available for video input Vertically splits the screen into two segments The left half of the screen in the normal mode and the right ha...

Page 19: ...e can make the image look sharper or softer Use or to adjust the sharpness from 0 to 100 The Phase and Pixel Clock adjustments allow you to adjust your monitor to your preference These settings are accessed through Use the and buttons to adjust for best image quality If satisfactory results are not obtained using the Phase adjustment use the Pixel Clock coarse adjustment and then use Phase Allows ...

Page 20: ...d Time Sets the amount of time the OSD will remain active after the last time you pressed a button Use the and buttons to adjust the slider in 5 second increments from 5 to 60 seconds Controls user access to adjustments When selected no user adjustments are allowed All buttons are locked except the NOTE Lock function Either soft lock through OSD menu or hard lock Press and hold the button above po...

Page 21: ... to help eliminate any image retention Using the LCD does not remove burn in Reset all OSD settings to the factory default settings Press the button to go back to or exit the main menu Personalize There are 2 shortcut keys on the front panel Select one control menu for each shortcut key to allow direct access ...

Page 22: ... it is receiving from the computer See Monitor Specifications for the Horizontal and Vertical frequency ranges address monitor The recommended mode is 1920x1080 When monitor enters Power Save mode the following message appears or Activate the computer and wake up the monitor to gain access to the OSD If you press any button other than the power button the following message will appear or ...

Page 23: ...one of the following procedures If you have a Dell desktop or portable computer Go to support dell com enter your service tag and download the latest driver for your graphics card If you are using a non Dell computer portable or desktop Go to the support site for your computer and download the latest graphic drivers Go to your graphics card website and download the latest graphic drivers Using the...

Page 24: ... tilt the monitor for the most comfortable viewing angle Back to Contents Page 1 Attach mechanism 2 Headphone connectors 3 Power indicator 4 Power Volume control NOTE The stand riser and stand base are detached when the monitor is shipped from the factory ...

Page 25: ... and adjust the screen resolution to 1920x1080 4 Click OK In Windows Vista or Windows 7 1 Right click on the desktop and click Personalization 2 Click Change Display Settings 3 Move the slider bar to the right by pressing and holding the left mouse button and adjust the screen resolution to 1920x1080 4 Click OK If you do not see 1920x1080 as an option you may need to update your graphics driver Pl...

Page 26: ...orporation in the United States and or other countries ENERGY STAR is a registered trademark of the U S Environmental Protection Agency As an ENERGY STAR partner Dell Inc has determined that this product meets the ENERGY STAR guidelines for energy efficiency Other trademarks and trade names may be used in this document to refer to either the entities claiming the marks and names or their products ...

Page 27: ... the stand base Slide the stand riser horizontally until the tabs are fully inserted into the stand base grooves b Tighten the thumbscrew below the stand base 2 Attach the stand assembly to the monitor a Place the monitor on a soft cloth or cushion near the edge of desk b Align the stand assembly bracket to the monitor groove c Insert the bracket towards monitor until it locked in place NOTE The s...

Page 28: ...o different computers with appropriate video systems Connecting the blue VGA cable Connecting the White DVI Cable Connecting the HDMI Cable After you have completed connecting the VGA DVI HDMI cable follow the procedure below to complete your monitor setup 1 Plug the power cables for your computer and monitor into a nearby outlet CAUTION Before you begin any of the procedures in this section follo...

Page 29: ...cated in a hole just above the stand 2 Once the latch is released remove the base away from the monitor Back to Contents Page 1 Working from the rear of the monitor attach the Soundbar by aligning the two slots with the two tabs along the bottom rear of the monitor 2 Slide the Soundbar to the left until it snaps into place 3 Connect the Soundbar with the DC power connector 4 Insert the mini stereo...

Page 30: ...monitor screen remains blank after you have performed Step 5 check your video controller and computer system Built in Diagnostics Your monitor has a built in diagnostic tool that helps you determine if the screen abnormality you are experiencing is an inherent problem with your monitor or with your computer and video card To run the built in diagnostics 1 Ensure that the screen is clean no dust pa...

Page 31: ... check l Check for bent or broken pins in the video cable connector l Run the built in diagnostics Poor Focus Picture is fuzzy blurry or ghosting l Perform Auto Adjust via OSD l Adjust the Phase and Pixel Clock controls via OSD l Eliminate video extension cables l Reset the monitor to Factory Settings l Change the video resolution to the correct aspect ratio 16 9 Shaky Jittery Video Wavy picture o...

Page 32: ...t shadow from the static image displayed appears on the screen l Use the Power Management feature to turn off the monitor at all times when not in use information see Power Management Modes l Alternatively use a dynamically changing screensaver SPECIFIC SYMPTOMS WHAT YOU EXPERIENCE POSSIBLE SOLUTIONS Screen image is too small Image is centered on screen but does not fill entire viewing area l Perf...

Page 33: ...put Sound from only one side of Soundbar l Clear any obstructions between the Soundbar and the user l Confirm that the audio line in plug is completely inserted into the jack of the sound card or audio source l Set all Windows audio balance controls L R to their midpoints l Clean and reseat the audio line in plug l Troubleshoot the computer s sound card l Test the Soundbar using another audio sour...

Reviews: