background image

Dell SonicWALL TZ Series

TZ400 / TZ400 W front and 
rear panels

Rear Panel

Front Panel

power

security

on / act

SonicWALL TZ400 W

1000

X0

W0

lan

wlan

on / act

security

wan

1000/act

10/100/act

X1

X2

X3

X4

X5

X6

U0

ss

wan

X0

X1

X2

X3

X4

X5

X6

lan

console

Test LED

Ethernet Port Status (X0-X6) 

Top - Provides 10/100 Mbps Ethernet port status
Bottom - Provides 1 Gbps Ethernet port status

Wireless (W0) LED

(TZ 400 W only)

 Indicates 

802.11 b/g/n/ac security 
status

USB / SSD port

External USB and SSD hard 
drive support

Power LED

Fast blinking - Initializing

Slow blinking - SafeMode

For future use

Service LED

Indicates Power Supply status

Wireless LAN LED

(TZ 400 W only) 

Indicates 802.11 

b/g/n/ac activity

Antenna Screws (3)

Center Antenna Screw

(TZ 400 W only)

 Provides wireless capabilities

 to the Dell SonicWALL appliance

(TZ 400 W only)

 The center antenna screw is only 

compatible with the enclosed center antenna

Reset Button

Press and hold for several 
seconds to set the appliance 
into Safe Mode

Power Supply

Provides power to 
the Dell SonicWALL 
appliance

X1 Port

X0 Port

For WAN access

For LAN access

X2 - X4 Ports

Console Port

Access the SonicOS Command 

Line Interface (CLI) using a 

compatible CLI cable

Configurable ports

     1 

Check package contents

Verify that your package has the following contents:

Dell SonicWALL appliance

Antennas (3) 

(TZ400 W appliance only)

Ethernet cable 

Standard power adaptor

Standard power cord

Quick Start Guide

NOTE: 

The included power cord is approved for use 

only in specific countries or regions. Before using a 
power cord, verify that it is rated and approved for 
use in your location.

SonicWALL TZ400 W

1000

X0

W0

lan

wlan

wan

1000/act

10/100/act

X1

X2

X3

X4

X5

X6

U0

ss

     2 

Power on

Connect the antennas to the appliance. Note that 
the center antenna is labeled and is only 
compatible with the center antenna screw. 

(TZ400 W appliance only)

Connect the power adaptor to the appliance and to 
the power cable. Plug the power cable into an 
appropriate outlet (1

0

0-240 volts). 

The TZ appliance powers on and the Test LED 
blinks during the boot sequence. 


120V AC 
(U.S.)

SonicWALL TZ400 W

ss

U0

1000

X0

lan

wan

1000/act

10/100/act

X1

X2

X3

X4

X5

X6

W0

security

on / act

wlan

W

W

CAUTION: 

Only use the included power adapter 

with this appliance. Do not use a power adapter 
that is damaged or from another appliance.
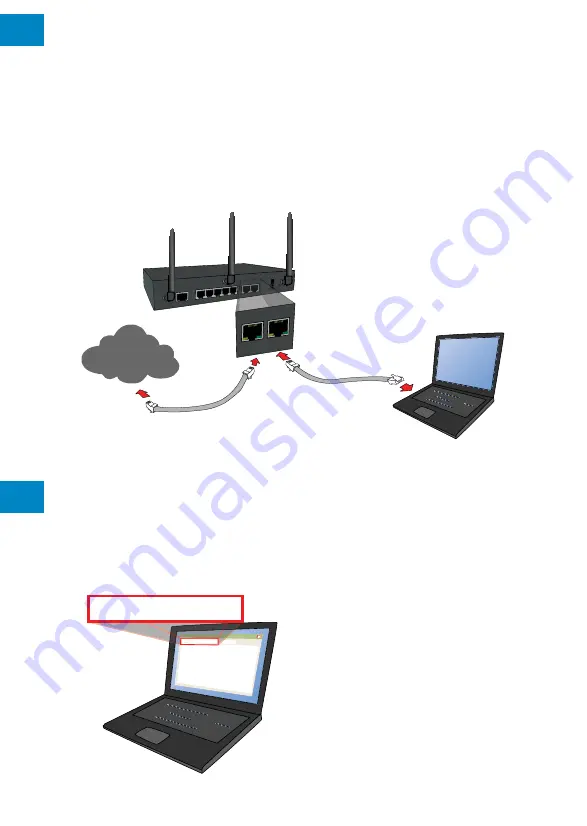
     3 

Connect the interfaces

Connect the WAN interface (X1) to your Internet 
connection using a standard Ethernet cable.

Connect the LAN interface (X0) to your computer 
using a standard Ethernet cable.

     4 

Run the Setup Wizard

Navigate to https://192.168.168.168 on your Web 
browser.

wan

X1

lan

X0

Internet

http://192.168.168.168/

http://192.168.168.168/

Click on the link in “To launch the Dell SonicWALL 
Setup Wizard, click 

here

.” 

The SonicOS Startup Guide opens. 

Click 

Next

 and follow the prompts in the Startup 

Guide pages that follow. 

TIP: 

Your computer should be using DHCP IP 

addressing.

Enter the TZ appliance administrator credentials 
to change the password, if you wish. Click 

Next

.

The automatic WAN IP settings are displayed. 
Click 

Next

.

The new IP Configuration is displayed. Click 

Done

NOTE: 

The default administrator credentials are 

Username

admin Password

password

NOTE: 

For manual configuration, refer to the latest 

SonicOS Administration Guide

.

Configuring Wireless LAN settings

Log in to your TZ appliance and click the 

Wizards


icon. 

Select the radio button for the 

Wireless Guide


wizard.

Click 

Next

 and follow the prompts in the Wireless 

Guide wizard. 

For more information and complete procedures, 
refer to the latest 

SonicOS Administration Guide

Dell SonicWALL™ TZ400 / 
TZ400 W

Quick Start Guide (Beta Version)


TZ400 = Regulatory Model Number: APL28-0B4
TZ400W = Regulatory Model Number: APL28-0B5

Summary of Contents for SonicWALL TZ400

Page 1: ...Dell SonicWALL TZ Series Dell SonicWALL TZ400 TZ400 W Quick Start Guide Beta Version TZ400 Regulatory Model Number APL28 0B4 TZ400W Regulatory Model Number APL28 0B5 ...

Page 2: ...st blinking Initializing Slow blinking SafeMode For future use Service LED Indicates Power Supply status Wireless LAN LED TZ 400 W only Indicates 802 11 b g n ac activity Antenna Screws 3 Center Antenna Screw TZ 400 W only Provides wireless capabilities to the Dell SonicWALL appliance TZ 400 W only The center antenna screw is only compatible with the enclosed center antenna Reset Button Press and ...

Page 3: ... Ethernet cable Standard power adaptor Standard power cord Quick Start Guide NOTE The included power cord is approved for use only in specific countries or regions Before using a power cord verify that it is rated and approved for use in your location SonicWALL TZ400 W 1000 X0 W0 lan wlan wan 1000 act 10 100 act X1 X2 X3 X4 X5 X6 U0 ss ...

Page 4: ...nd to the power cable Plug the power cable into an appropriate outlet 100 240 volts The TZ appliance powers on and the Test LED blinks during the boot sequence 120V AC U S SonicWALL TZ400 W ss U0 1000 X0 lan wan 1000 act 10 100 act X1 X2 X3 X4 X5 X6 W0 security on act wlan W W CAUTION Only use the included power adapter with this appliance Do not use a power adapter that is damaged or from another...

Page 5: ...rnet connection using a standard Ethernet cable Connect the LAN interface X0 to your computer using a standard Ethernet cable 4 Run the Setup Wizard Navigate to https 192 168 168 168 on your Web browser wan X1 lan X0 Internet http 192 168 168 168 http 192 168 168 168 ...

Page 6: ...ink in To launch the Dell SonicWALL Setup Wizard click here The SonicOS Startup Guide opens Click Next and follow the prompts in the Startup Guide pages that follow TIP Your computer should be using DHCP IP addressing ...

Page 7: ...u wish Click Next The automatic WAN IP settings are displayed Click Next The new IP Configuration is displayed Click Done NOTE The default administrator credentials are Username admin Password password NOTE For manual configuration refer to the latest SonicOS Administration Guide ...

Page 8: ...TZ appliance and click the Wizards icon Select the radio button for the Wireless Guide wizard Click Next and follow the prompts in the Wireless Guide wizard For more information and complete procedures refer to the latest SonicOS Administration Guide ...

Page 9: ...ddress default https 192 168 168 168 and log in using the administrator credentials Click Register on the System Status page under Security Services TIP Registering the appliance from SonicOS requires that DNS Server settings are configured on the WAN X1 interface ...

Page 10: ...click the Create MySonicWALL account link to create an account MySonicWALL directly obtains the necessary information from the TZ appliance When finished you will see a message that registration has been completed Click Continue NOTE Your appliance must be registered to download the latest firmware ...

Page 11: ... for the firmware you want and save the file to a location on your computer On the TZ appliance navigate to the System Settings page Click the Upload New Firmware button Click the Browse button to navigate to and select the firmware you just downloaded Click Upload and wait for the upload to complete In the Firmware Management Table click the Boot icon for your new firmware ...

Page 12: ...appliance on the wall 1 Drill two holes 4 5 inches 11 5 cm apart in the wall where you want to mount the appliance 2 If using wall anchors insert a wall anchor into each hole 3 Insert a screw into each wall anchor into each hole if not using wall anchors leaving 3 16 inches 0 45 cm of the screws exposed including screw head 4 Position the appliance mounting slots over the screws and press in and d...

Page 13: ...nce for workplaces with visual display units To avoid incommoding reflections at visual display workplaces this device must not be placed in the direct field of view Lithium battery warning The Lithium Battery used in the Dell SonicWALL security appliance may not be replaced by the user Return the Dell SonicWALL security appliance to a Dell SonicWALL authorized service center for replacement with ...

Page 14: ...n Anschluss des Gerà ts an die Stromversorgung damit der Ãœberstromschutz sowie die elektrische Leitung nicht von einer eventuellen Ãœberlastung der Stromversorgung beeinflusst werden Prà fen Sie dabei sorgfà ltig die Angaben auf dem Aufkleber des Gerà ts Ãœberlasten Sie nicht den Stromkreis Dieses Gerät ist nicht zur Verwendung an Arbeitsplätzen mit visuellen Anzeigegeräten gemäß 2 der deutschen ...

Page 15: ...lt wenden Dell den Technischen Support unter https support software dell com manage service request Dieses Produkt sollte nur mit einem für den Europäischen Markt genehmigten Netzteil mit dem Logo I T E LPS und einer Ausgangsleistung von12 VDC mind 2 0 A Tma mind 40 Grad C betrieben werden ...

Page 16: ...NT SHALL DELL BE LIABLE FOR ANY DIRECT INDIRECT CONSEQUENTIAL PUNITIVE SPECIAL OR INCIDENTAL DAMAGES INCLUDING WITHOUT LIMITATION DAMAGES FOR LOSS OF PROFITS BUSINESS INTERRUPTION OR LOSS OF INFORMATION ARISING OUT OF THE USE OR INABILITY TO USE THIS DOCUMENT EVEN IF DELL HAS BEEN ADVISED OF THE POSSIBILITY OF SUCH DAMAGES Dell makes no representations or warranties with respect to the accuracy or...

Reviews: