16
| Configuring Provisioning Profiles
Configuring Provisioning Profiles
SonicPoint profiles make it easy to apply basic settings to
multiple SonicPoints within a wireless zone. If a SonicPoint is
connected to a zone that does not have a custom profile
assigned to it, a default profile is used.
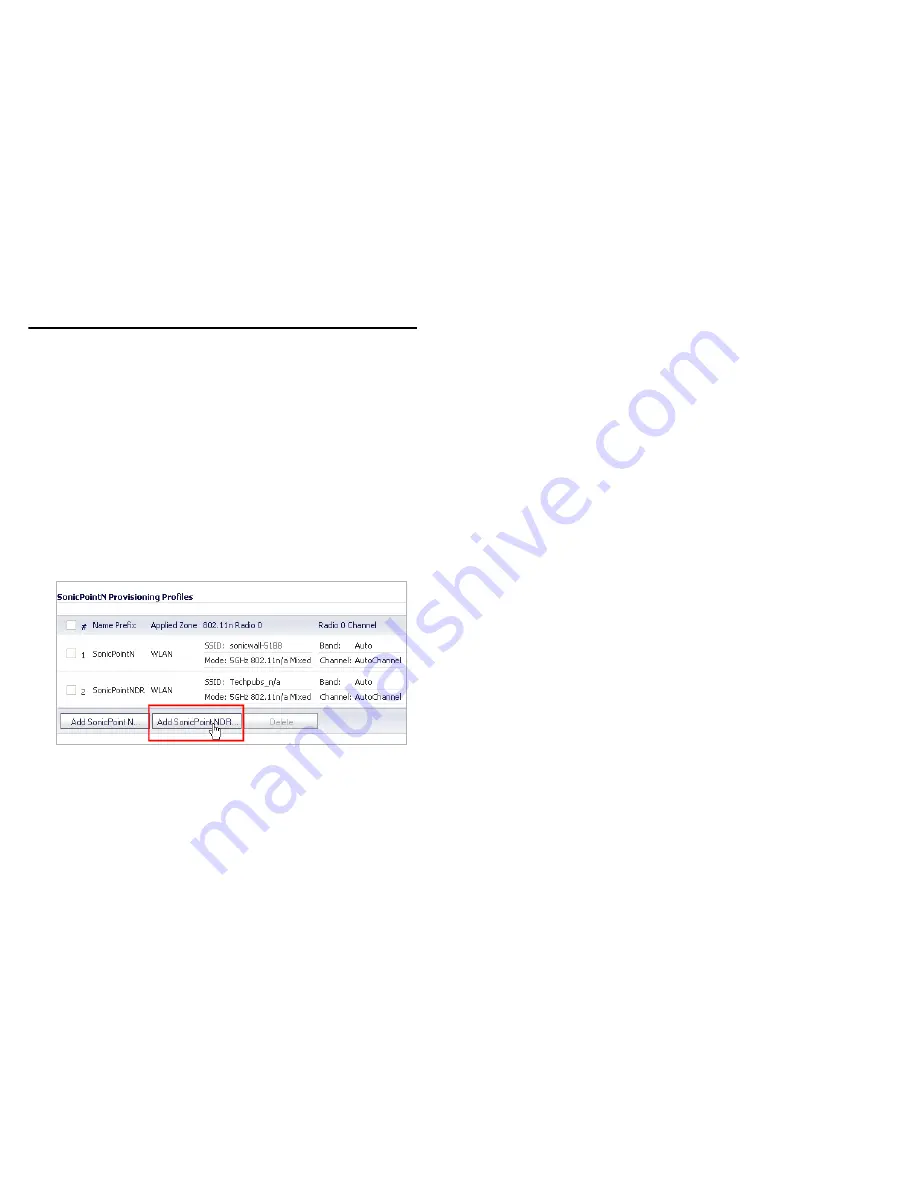
To add a new profile:
1.
Navigate to the
SonicPoint > SonicPoints
page in the
SonicOS interface.
2.
Click
Add SonicPoint NDR
below the list of SonicPoint
provisioning profiles. The Add/Edit SonicPoint Profile
window displays.
General Tab
1.
Select
Enable SonicPoint
.
2.
Enter a
Name Prefix
. This prefix is used as an internal
reference to identify each SonicPoint provisioned, but is
not a part of the public SSID, which is configured later.
3.
Select the
Country Code
for the area of operation (
for
countries outside of North America only.
)
4.
Choose the desired
EAPOL Version
. Version 2 of the
protocol is more secure, but less compatible with older
network devices.
802.11n Radio 0/1 Tabs (5GHz Radio / 2.4 GHz Radio)
Radios are configured in their respective tabs. To configure
both Radio 0 and Radio 1:
1.
Select
Enable Radio
.
2.
Optionally, select a schedule for the radio to be enabled
from the drop-down list.
3.
Select a
Radio Mode
to dictate the radio frequency
band(s). The default setting for Radio 0 is
5GHz 802.11
n/g/b Mixed
, the default for Radio 1 is
2.4GHz 802.11n/g/b
Mixed
.
4.
Enter an
SSID
to identify this network to wireless clients.
5.
Select a
Radio Band
for this radio. You may choose to
keep the default setting, Auto, unless you have reason to
manually select a Band.
6.
Select a
Primary Channel
and
Secondary Channel
. You
may choose to keep the default setting, Auto, unless you
have a reason to use or avoid specific channels.
Summary of Contents for SonicPoint-N Dual Radio
Page 15: ...14 Using Dell SonicWALL Security Services for Wireless Clients ...
Page 21: ...20 Configuring the Network Interface ...
Page 29: ...28 Onboard Help System ...
Page 49: ...48 Copyright Notice ...
Page 50: ......


