Dell SE178WFP User Manual Download Page 14

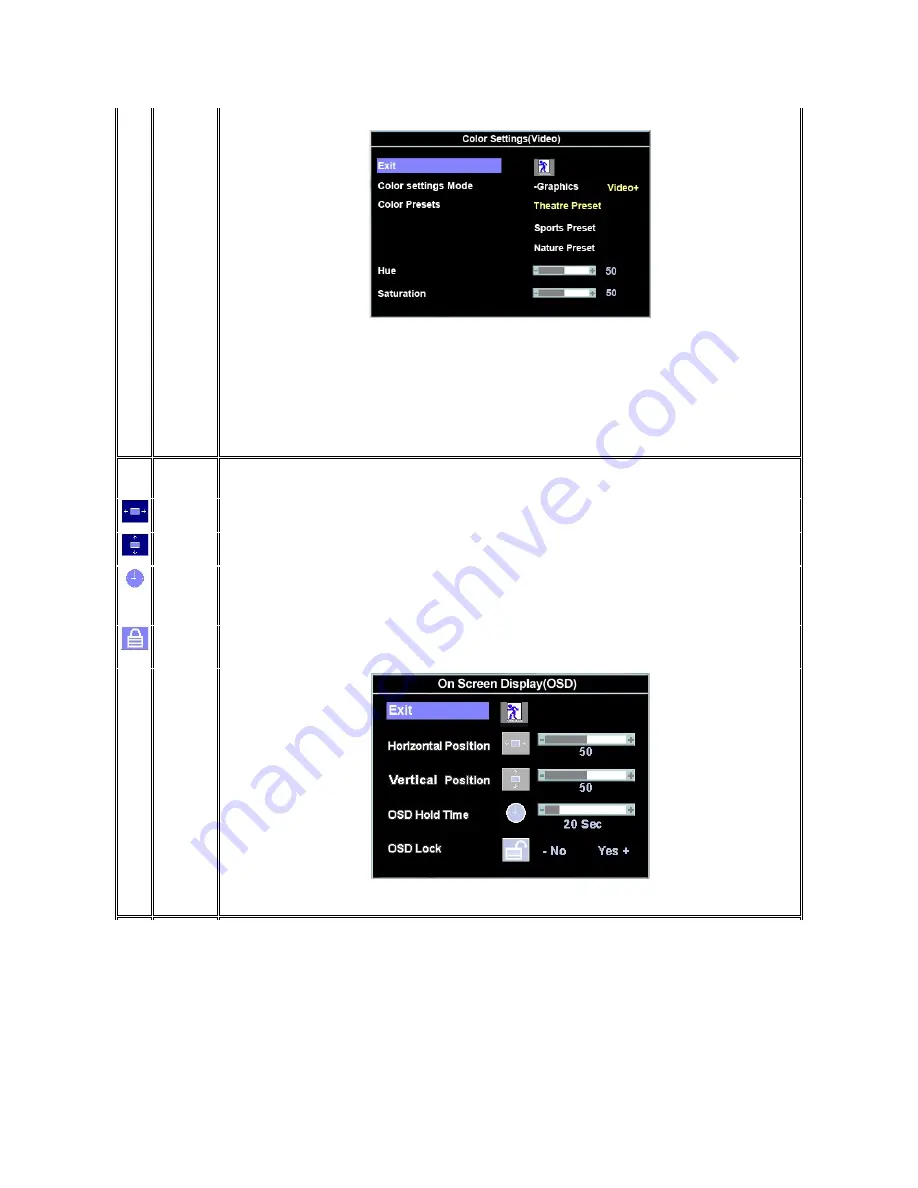
There are three video modes:Theater Preset ,Sports Preset, Nature Preset. 


Select Theater Preset for playing a movie.  

Select Sports Preset for viewing sports.  

Select Nature Preset for general viewing. For general picture or web or watch TV, choose Nature Preset.  

User can adjust the Hue(Tint)/Saturation based on the preference.  

NOTE

: 'Color temperature' is a measure of the 'warmth' of the image colors (red/green/blue). The two available presets ('Blue' and 

'Red') favor blue and red accordingly. Select each one to see how each range suits your eye; or utilize the 'User Preset' option to 
customize the color settings to your exact choice. 


OSD 
Settings:


Each time the OSD opens, it displays in the same location on the screen. 'OSD Settings' (horizontal/vertical) provides control over this 
location. 


Horizontal 

Position

-

 and + buttons move OSD to the left and right. 


Vertical 

Position

-

 and + buttons move OSD down and up. 


OSD Hold 

Time:

The OSD stays active for as long as it is in use. 
'OSD Hold Time': Sets the length of time the OSD will remain active after the last time you pressed a button. 
Use the 

-

 and + buttons to adjust the slider in 5 second increments, from 5 to 60 seconds. 

NOTE

: Default 'OSD hold time' is 20 seconds. 


OSD Lock

Controls user access to adjustments. When 'Yes' (+) is selected, no user adjustments are allowed. All buttons, except Menu, are 
locked. 

All buttons can be locked or unlocked. Press the 'Menu' button for over 15 seconds to unlock the OSD menu.  


NOTE

: When the OSD is locked, pressing the 'Menu' button will take the user directly to the 'OSD settings' menu, with 'OSD Lock' 

preselected on entry. Select 'No'(-) to unlock and allow user access to all applicable settings. 

Summary of Contents for SE178WFP

Page 1: ...Dell Inc has determined that this product meets the ENERGY STAR guidelines for energy efficiency Other trademarks and trade names may be used in this document to refer to either the entities claiming the marks and names or their products Dell Inc disclaims any proprietary interest in trademarks and trade names other than its own April 2007 Rev A00 About Your Monitor Front View Back View Side View ...

Page 2: ... Panel Monitor User s Guide Front View Back View Side View Bottom View Monitor Specifications Caring for your Monitor Front View Back View 1 Menu selection button 2 Brightness Contrast Down button 3 Auto Adjust Up button 4 Power On Off button with LED indicator ...

Page 3: ...code serial number label Refer to this label if you need to contact Dell for technical support 4 Regulatory rating label List the regulatory approvals 5 Stand removal button Press to release the stand 6 VESA mounting holes 100mm behind attached stand Use to mount monitor 7 Cable holder Help organize cables by passing them through the holder ...

Page 4: ...Right side Left side Bottom View Monitor Specifications 1 AC power cord connector 2 VGA connector General ...

Page 5: ...cal scan range 50 Hz to 75 Hz Optimal preset resolution 1440 x 900 at 60 Hz Highest preset resolution 1440 x 900 at 60 Hz Preset Display Modes The following table lists the preset modes for which Dell guarantees image size and centering Display Mode Horizontal Frequency kHz Vertical Frequency Hz Pixel Clock MHz Sync Polarity Horizontal Vertical VGA 720 x 400 31 5 70 1 28 3 VGA 640 x 480 31 5 60 0 ...

Page 6: ... the monitor Dimensions with stand Height 339 2 mm 13 35 inches Width 403 2 mm 15 87 inches Depth 126 2 mm 4 97 inches Weight Monitor Stand and Head 3 86 kg 8 49 lb Monitor Flat panel only VESA Mode 2 70 kg 5 95 lb Weight with packaging 5 31 kg 11 68 lb Environmental The following table lists the environmental limitation Temperature Operating 5 to 35 C 41 to 95 F Nonoperating Storage 0 to 60 C 32 ...

Page 7: ...n assignments in the VGA connector Power Management Definition VESA s Mode Video H sync V sync Power Used Power Saving LED color ON Active Yes Yes maximum 40W typical 34W 0 Blue Power Saving Blanked No Yes 2W 80 Amber Blanked Yes No 2W 80 Amber Blanked No No 2W 80 Amber Switch Off Blanked 1W 80 Off NOTE The OSD functions only in the normal operation mode Otherwise one of the following messages wil...

Page 8: ...ormation see Dell Support site at support dell com Caring for your Monitor l To clean your antistatic screen slightly dampen a soft clean cloth with water If possible use a special screen cleaning tissue or solution suitable for the antistatic coating Do not use benzene thinner ammonia abrasive cleaners or compressed air l Use a slightly dampened warm cloth to clean the plastics Avoid using deterg...

Page 9: ... 999 3355 Dell provides several online and telephone based support and service options Availability varies by country and product and some services may not be available in your area To contact Dell for sales technical support or customer service issues 1 Visit support dell com 2 Verify your country or region in the Choose A Country Region drop down menu at the bottom of the page 3 Click Contact Us...

Page 10: ...display into a nearby outlet Your monitor is equipped with an automatic power supply for a voltage range from 100 to 240 Volt at a frequency of 50 60 Hz Be sure that your local power is within the supported range If you are unsure ask your electricity supplier 5 Turn on your display and computer If your monitor displays an image installation is complete If it does not display an image see Troubles...

Page 11: ...nput signals or attached cables D Power Button Indicator The Blue LED indicates the monitor is on and fully functional An amber LED indicates DPMS power save mode The Power button turns the monitor on and off Function Adjustment Method Auto adjustment Use this button to activate automatic setup and adjustment The following dialog will appear on screen as the monitor self adjusts to the current inp...

Page 12: ... menu to select another function or press the MENU button two or three times to exit from the OSD A Function icons B Main Menu C Menu icon D Sub Menu name E Resolution Icon Menu Name and Sub menus Description EXIT This is used to exit out of the Main Menu Positioning Horizontal Vertical Positioning moves the viewing area around on the monitor screen When making changes to either the Horizontal or ...

Page 13: ...deo mode If your computer is connected to your monitor choose Video Color Presets You can choose different color presets for different viewing modes As soon as choose Graphics you can choose Normal Preset Red Preset Blue Preset or User Preset Select Red Preset for a warm color Select Blue Preset for a cool color You can adjust the monitor color using User Preset R G B Normal Preset mean color temp...

Page 14: ... horizontal vertical provides control over this location Horizontal Position and buttons move OSD to the left and right Vertical Position and buttons move OSD down and up OSD Hold Time The OSD stays active for as long as it is in use OSD Hold Time Sets the length of time the OSD will remain active after the last time you pressed a button Use the and buttons to adjust the slider in 5 second increme...

Page 15: ...ge appears to be stuck on the monitor select LCD Conditioning to help eliminate any image retention Using the LCD Conditioning feature may take several hours Severe cases of image retention are known as burn in the LCD Conditioning feature does not remove burn in Below warning message appears when you select Enable LCD Conditioning DDC CI Display Data Channel Command Interface allows you to adjust...

Page 16: ...ssable by this monitor Recommended mode is 1440 X 900 60Hz Occasionally no warning message appears but the screen is blank This could also indicate that the monitor is not synchronizing with the computer See Troubleshooting for more information Using the Dell Soundbar Optional The Dell Soundbar is a stereo two channel system adaptable to mount on Dell Flat Panel Displays The Soundbar has a rotary ...

Page 17: ...tom rear of the monitor 2 Slide the Soundbar to the left until it snaps into place 3 Connect the Soundbar with the power brick 4 Plug the power cable of the power brick into a nearby outlet 5 Insert the lime green mini stereo plug from the rear of the Soundbar into the computer s audio output jack NOTICE Do not use with any device other than Dell Soundbar NOTE Soundbar Power Connector 12V DC outpu...

Page 18: ...sages For OSD related issues see OSD Warning Messages Common Problems The following table contains general information about common monitor problems you might encounter CAUTION Before you begin any of the procedures in this section follow the Safety Instructions The floating Dell Self Test Feature Check dialog box should appear on screen against a black background if the monitor cannot sense a vid...

Page 19: ... of smoke or sparks l Do not perform any troubleshooting steps l Monitor needs to be replaced Intermittent Problems Monitor malfunctions on off l Ensure monitor is in proper video mode l Ensure video cable connection to computer and to the flat panel is secure l Perform monitor reset on All Settings l Perform monitor self test feature check to determine if the intermittent problem occurs in self t...

Page 20: ...e sure the Computer is not in power saving by moving mouse or pressing any key on the keyboard l Check whether the signal cable is plugged in and seated properly Re plug the signal cable if necessary l Re boot the computer or video player OSD Lock All buttons are locked except the menu button No user adjustments are allowed l Press the menu button for over 15 seconds to unlock the OSD menu ...

Page 21: ...it the groove on the back of the monitor onto the two tabs of the upper stand 3 Lower the monitor so that the monitor mounting area snaps on locks to the stand Organizing Your Cables After attaching all necessary cables to your monitor and computer See Connecting Your Monitor for cable attachment use the cable holder to neatly organize all cables as shown above NOTE Stand is detached when the moni...

Page 22: ... Removing the Stand After placing the monitor panel on a soft cloth or cushion press and hold the stand removal button and then remove the stand Back to Contents Page NOTE To prevent scratches on the LCD screen while removing the stand ensure that the monitor is placed on a clean surface ...

Reviews: