background image

Connecting to Host Servers with iSCSI HBAs or 

Network Adapters

A storage system with iSCSI front-end ports connects to one or more Ethernet switches, which connect to one or more host servers with 
iSCSI HBAs or network adapters.

Cable the Storage System with 2–Port iSCSI IO Cards

Connect the iSCSI ports on the storage controllers to host servers with iSCSI HBAs. The iSCSI ports of the storage controllers connect to 
the host servers through the Ethernet switches in the SAN.

About this task

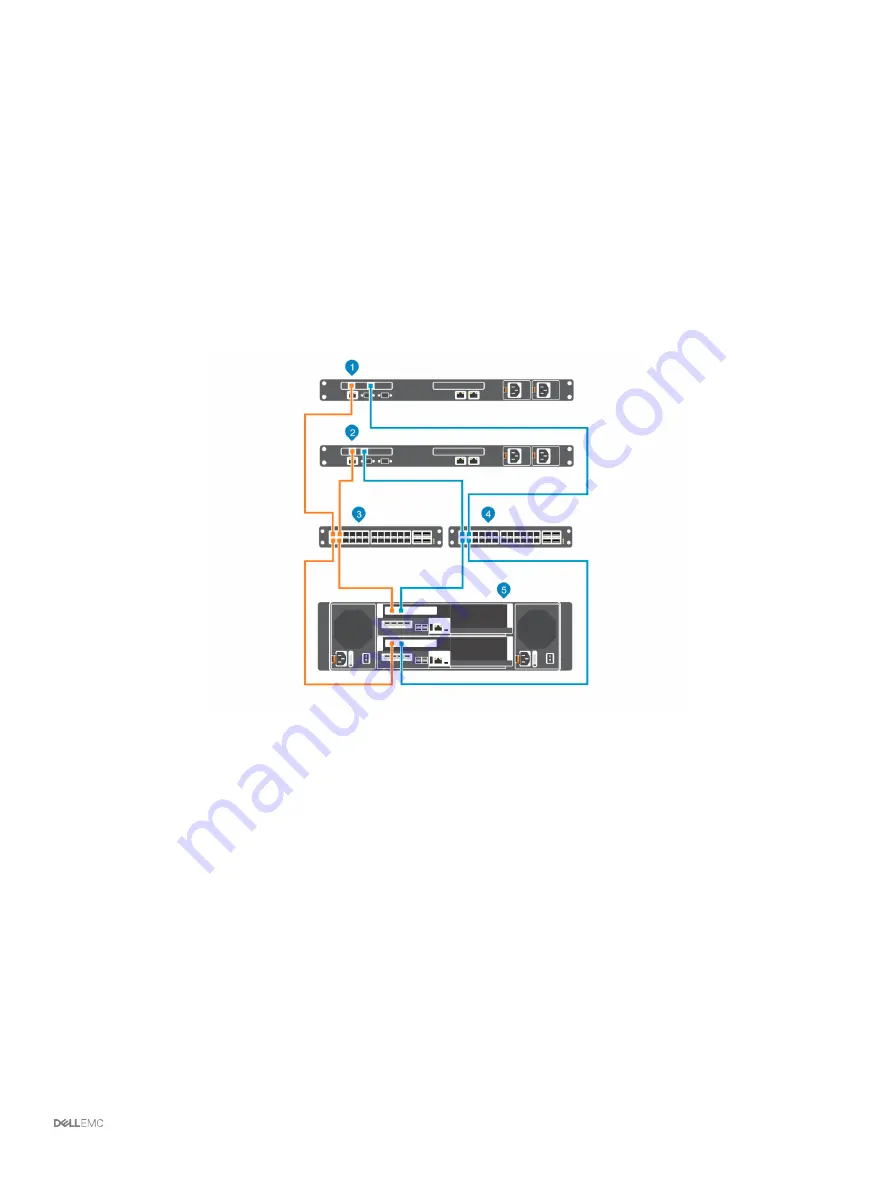
Figure 34. Connect the Storage System to Host Servers with iSCSI HBAs

1

Host server

2

Host server

3

Ethernet switch 1 (fault domain 1)

4

Ethernet switch 2 (fault domain 2)

5

SCv3000 and SCv3020 storage system

Steps

Connect each host server to both iSCSI networks.

Connect fault domain 1 (shown in orange) to iSCSI network 1.

Connect port 1 of the iSCSI HBA in the top storage controller to switch 1.

Connect port 1 of the iSCSI HBA in the bottom storage controller to switch 1.

Connect iSCSI fault domain 2 (shown in blue) to iSCSI network 2.

Connect port 2 of the iSCSI HBA in the top storage controller to switch 2.

Connect port 2 of the iSCSI HBA in the bottom storage controller to switch 2.

Connect the Front-End Cabling

41

Summary of Contents for SCv3000

Page 1: ...SCv3000 and SCv3020 Storage System Deployment Guide ...

Page 2: ...e to hardware or loss of data and tells you how to avoid the problem WARNING A WARNING indicates a potential for property damage personal injury or death Copyright 2018 Dell Inc or its subsidiaries All rights reserved Dell EMC and other trademarks are trademarks of Dell Inc or its subsidiaries Other trademarks may be trademarks of their respective owners 2018 04 Rev D ...

Page 3: ...king Storage Center Equipment 31 Safety Precautions 31 Installation Safety Precautions 31 Electrical Safety Precautions 32 Electrostatic Discharge Precautions 32 General Safety Precautions 33 Prepare the Installation Environment 33 Install the Storage System in a Rack 33 3 Connect the Front End Cabling 36 Types of Redundancy for Front End Connections 36 Port Redundancy 36 Storage Controller Redund...

Page 4: ...360 Expansion Enclosure 54 SCv3000 and SCv3020 Storage System and Two SCv360 Expansion Enclosures 54 Label the Back End Cables 55 5 Discover and Configure the Storage Center 57 Connect Power Cables and Turn On the Storage System 57 Locate Your Service Tag 59 Record System Information 59 Supported Operating Systems for Storage Center Automated Setup 59 Install and Use the Storage Manager Client 59 ...

Page 5: ...Chain Currently in Service 78 Check the Drive Count 79 Add an SCv300 and SCv320 Expansion Enclosure to the A Side of the Chain 79 Add an SCv300 and SCv320 Expansion Enclosure to the B Side of the Chain 80 Add an SCv360 Expansion Enclosure to the A Side of the Chain 82 Add an SCv360 Expansion Enclosure to the B Side of the Chain 83 Removing an Expansion Enclosure from a Chain Currently in Service 8...

Page 6: ...D HBA Server Settings 102 Settings by HBA Manufacturer 102 Dell 12 Gb SAS HBAs 102 Cisco Fibre Channel HBAs 102 Emulex HBAs 102 QLogic HBAs 103 Settings by Server Operating System 104 Citrix XenServer 104 Microsoft Windows Server 105 Novell Netware 106 Red Hat Enterprise Linux 106 E iSCSI Settings 108 Flow Control Settings 108 Ethernet Flow Control 108 Switch Ports and Flow Control 108 Flow Contro...

Page 7: ...tions The following documentation provides additional information about the SCv3000 and SCv3020 storage system SCv3000 and SCv3020 Storage System Getting Started Guide Provides information about an SCv3000 and SCv3020 storage system such as installation instructions and technical specifications SCv3000 and SCv3020 Storage System Owner s Manual Provides information about an SCv3000 and SCv3020 stor...

Page 8: ...ects that interact with the Storage Center using the PowerShell interactive shell scripts and PowerShell hosting applications Help for individual cmdlets is available online Storage Manager Installation Guide Contains installation and setup information Storage Manager Administrator s Guide Contains in depth feature configuration and usage information Storage Manager Release Notes Provides informat...

Page 9: ...he cabling between the storage system and expansion enclosures is referred to as back end connectivity SCv3000 and SCv3020 Storage System The SCv3000 and SCv3020 storage systems contain two redundant power supply cooling fan modules and two storage controllers with multiple I O ports The I O ports provide communication with host servers and expansion enclosures The SCv3000 storage system contains ...

Page 10: ...tions Storage Center communication is classified into three types front end back end and system administration Front End Connectivity Front end connectivity provides I O paths from servers to a storage system and replication paths from one Storage Center to another Storage Center The SCv3000 and SCv3020 storage system provides the following types of front end connectivity Fibre Channel Hosts serve...

Page 11: ...connected via Fibre Channel for replication 8 Gbps or 16 Gbps Front End 3 Fibre Channel switch A pair of Fibre Channel switches are recommended for optimal redundancy and connectivity 8 Gbps or 16 Gbps Front End 4 Ethernet switch for the management network 1 Gbps System Administration 5 SCv3000 and SCv3020 with FC front end connectivity 8 Gbps or 16 Gbps Front End 6 Storage Manager Installed on a ...

Page 12: ...enter connected via iSCSI for replication 1 GbE or 10 GbE Front End 3 Ethernet switch A pair of Ethernet switches is recommended for optimal redundancy and connectivity 1 GbE or 10 GbE Front End 4 Ethernet switch for the management network 1 Gbps System Administration 5 SCv3000 and SCv3020 with iSCSI front end connectivity 1 GbE or 10 GbE Front End 6 Storage Manager Installed on a computer connect...

Page 13: ...connected via iSCSI for replication 1 GbE or 10 GbE Front End 3 Ethernet switch A pair of Ethernet switches is recommended for optimal redundancy and connectivity 1 GbE or 10 GbE Front End 4 Ethernet switch for the management network Up to 1 GbE System Administration 5 SCv3000 and SCv3020 with front end SAS connectivity 12 Gbps per channel Front End 6 Storage Manager Installed on a computer connec...

Page 14: ...when inserting an SFP transceiver module into a Fibre Channel port Forcing the SFP transceiver module into a port could damage the transceiver module or the port The SFP transceiver module must be installed into a port before you connect the fiber optic cable The fiber optic cable must be removed from the SFP transceiver module before you remove the transceiver module from the port Install an SFP ...

Page 15: ...eiver Module Complete the following steps to remove an SFP transceiver module from a storage controller Prerequisite Use failover testing to make sure that the connection between host servers and the Storage Center remains up if the port is disconnected About this task Read the following cautions and information before beginning the removal and replacement procedures WARNING To reduce the risk of ...

Page 16: ...icates with computers using the Ethernet management MGMT port on the storage controllers The Ethernet management port is used for Storage Center configuration administration and management Storage Center Replication Storage Center sites can be collocated or remotely connected and data can be replicated between sites Storage Center replication can duplicate volume data to another site in support of...

Page 17: ...one power supply is providing power to the storage system 2 Status indicator Lights when the startup process for both storage controllers is complete with no faults detected NOTE The startup process can take 5 10 minutes or more Off One or both storage controllers are running startup routines or a fault has been detected during startup On steady blue Both storage controllers have completed the sta...

Page 18: ...indicator Steady green Normal operation Blinking green A command was sent to the drive to make the LED blink so that you can identify the drive in the rack Blinking amber Hardware or firmware fault SCv3000 and SCv3020 Storage System Drive Numbering The storage system holds up to 16 or 30 drives which are numbered from left to right in rows starting from 0 at the top left drive Drive numbers increm...

Page 19: ...r Supply 1 and power supply cooling fan module on the right side of the back panel is Power Supply 2 2 Storage controller 2 Each storage controller contains Optional 10 GbE iSCSI mezzanine card with four SFP ports or four RJ45 10GBASE T ports One expansion slot for a front end I O card Fibre Channel iSCSI SAS SAS expansion ports Two 12 Gbps SAS ports for back end connectivity to expansion enclosur...

Page 20: ...eparately If one power supply cooling fan module fails the second module continues to provide power to the storage system NOTE When a power supply cooling fan module fails the cooling fan speed in the remaining module increases significantly to provide adequate cooling The cooling fan speed decreases gradually when a new power supply cooling fan module is installed CAUTION A single power supply co...

Page 21: ...SI ports have the following meanings Off No power Steady Amber Link Blinking Green Activity SAS I O card Ports are numbered 1 to 4 from left to right The SAS ports on SAS I O cards do not have LEDs 2 Identification LED Blinking blue continuously A command was sent to the storage system to make the LED blink so that you can identify the storage system in the rack The identification LED blinks on th...

Page 22: ...orts indicate connectivity information between the storage controller and the expansion enclosure Steady green indicates the SAS connection is working properly Steady yellow indicates the SAS connection is not working properly 9 Mezzanine card The iSCSI ports on the mezzanine card are either 10 GbE SFP ports or 1 GbE 10 GbE RJ45 ports The LEDs on the iSCSI ports have the following meanings Off No ...

Page 23: ...wer LED lights when at least one power supply unit is supplying power to the expansion enclosure 3 Expansion enclosure status LED The expansion enclosure status LED lights when the expansion enclosure power is on Solid blue during normal operation Blinks blue when a host server is identifying the expansion enclosure or when the system identification button is pressed Blinks amber or remains solid ...

Page 24: ...ndicator Blinking green Drive activity Steady green Drive is detected and has no faults 2 Drive status indicator Steady green Normal operation Blinking green on 1 sec off 1 sec Drive identification is enabled Steady amber Drive is safe to remove Off No power to the drive SCv300 and SCv320 Expansion Enclosure Drive Numbering The Storage Center identifies drives as XX YY where XX is the unit ID of t...

Page 25: ... The EMM provides a data path between the expansion enclosure and the storage controllers The EMM also provides the management functions for the expansion enclosure 3 Enclosure management module EMM 1 The EMM provides a data path between the expansion enclosure and the storage controllers The EMM also provides the management functions for the expansion enclosure 4 Information tag A slide out label...

Page 26: ...nclosure did not boot or is not properly configured Blinking green Automatic update in progress Blinking amber two times per sequence Expansion enclosure is unable to communicate with other expansion enclosures Blinking amber four times per sequence Firmware update failed Blinking amber five times per sequence Firmware versions are different between the two EMMs 3 SAS ports 1 4 Input or Output Pro...

Page 27: ...hen a host server is identifying the expansion enclosure or when the system identification button is pressed Remains solid blue when the expansion enclosure is in the fault state SCv360 Expansion Enclosure Drives Dell Enterprise Plus drives are the only drives that can be installed in SCv360 expansion enclosures If a non Dell Enterprise Plus drive is installed the Storage Center prevents the drive...

Page 28: ...ering The Storage Center identifies drives as XX YY where XX is the unit ID of the expansion enclosure that contains the drive and YY is the drive position inside the expansion enclosure An SCv360 holds up to 60 drives which are numbered from left to right in rows starting from 0 Figure 23 SCv360 Drive Numbering 28 About the SCv3000 and SCv3020 Storage System ...

Page 29: ... 2 AC power indicators Green Normal operation The power supply module is supplying AC power to the expansion enclosure Off Power switch is off the power supply is not connected to AC power or has a fault condition Flashing Green AC power is applied but is out of spec Power supply cooling fan indicator Amber Power supply cooling fan fault is detected Off Normal operation 3 Power supply unit and coo...

Page 30: ...mware update failed Blinking amber five times per sequence Firmware versions are different between the two EMMs 2 SAS port status indicator Blue All the links to the port are connected Blinking blue One or more links are not connected Off Expansion enclosure is not connected 3 Unit ID display Displays the expansion enclosure ID 4 EMM power indicator Blue Normal operation Off Power is not connected...

Page 31: ...nt bezel Safety Precautions Always follow these safety precautions to avoid injury and damage to Storage Center equipment If equipment described in this section is used in a manner not specified by Dell the protection provided by the equipment could be impaired For your safety and protection observe the rules described in the following sections NOTE See the safety and regulatory information that s...

Page 32: ... as the main disconnect device Make sure that the socket outlets are located near the equipment and are easily accessible Know the locations of the equipment power switches and the room s emergency power off switch disconnection switch or electrical outlet Do not work alone when working with high voltage components Use rubber mats specifically designed as electrical insulators Do not remove covers...

Page 33: ... slot that is not occupied Prepare the Installation Environment Make sure that the environment is ready for installing the Storage Center Rack Space The rack must have enough space to accommodate the storage system chassis expansion enclosures and switches Power Power must be available in the rack and the power delivery system must meet the requirements of the Storage Center AC input to the power ...

Page 34: ...ge the front end of the rail until it fully seats and the latch locks into place 5 Align the system with the rails and slide the storage system into the rack Figure 28 Slide the Storage System Onto the Rails 6 Lift the latches on each side of the front panel and tighten the screws to the rack 34 Install the Storage Center Hardware ...

Page 35: ...crews If the Storage Center system includes expansion enclosures mount the expansion enclosures in the rack See the instructions included with the expansion enclosure for detailed steps Install the Storage Center Hardware 35 ...

Page 36: ... Depending on how the Storage Center is cabled and configured the following types of redundancy are available Port Redundancy If a port becomes unavailable because it is disconnected or a hardware failure has occurred the port moves over to another port in the same fault domain Storage Controller Redundancy To allow for storage controller redundancy a front end port on each storage controller must...

Page 37: ...ell Storage Center Microsoft Multipath IO Best Practices Connecting to Host Servers with Fibre Channel HBAs A storage system with Fibre Channel front end ports connects to one or more FC switches which connect to one or more host servers with Fibre Channel HBAs Fibre Channel Zoning When using Fibre Channel for front end connectivity zones must be established to ensure that storage is visible to th...

Page 38: ...WPNs of system B and the virtual WWPNs of system A on the particular fabric NOTE Some ports may not be used or dedicated for replication however ports that are used must be in these zones Cable the Storage System with 2 Port Fibre Channel IO Cards Connect the Fibre Channel ports on the storage controllers to host servers with Fibre Channel HBAs The Fibre Channel ports of the storage controllers co...

Page 39: ...ain 1 4 Fibre Channel switch 2 member of fault domain 2 5 SCv3000 and SCv3020 storage system Steps 1 Connect each host server to both Fibre Channel fabrics 2 Connect fault domain 1 shown in orange to fabric 1 Connect port 1 of the Fibre Channel HBA in the top storage controller to switch 1 Connect port 3 of the Fibre Channel HBA in the top storage controller to switch 1 Connect port 1 of the Fibre...

Page 40: ...connects a storage controller to a front end fabric or network or directly to host servers Steps 1 Starting with the top edge of the label attach the label to the cable near the connector Figure 32 Attach Label to Cable 2 Wrap the label around the cable until it fully encircles the cable The bottom of each label is clear so that it does not obscure the text Figure 33 Wrap Label Around Cable 3 Appl...

Page 41: ...nect the Storage System to Host Servers with iSCSI HBAs 1 Host server 2 Host server 3 Ethernet switch 1 fault domain 1 4 Ethernet switch 2 fault domain 2 5 SCv3000 and SCv3020 storage system Steps 1 Connect each host server to both iSCSI networks 2 Connect fault domain 1 shown in orange to iSCSI network 1 Connect port 1 of the iSCSI HBA in the top storage controller to switch 1 Connect port 1 of t...

Page 42: ...t fault domain 1 shown in orange to iSCSI network 1 Connect port 1 of the iSCSI HBA in the top storage controller to switch 1 Connect port 3 of the iSCSI HBA in the top storage controller to switch 1 Connect port 1 of the iSCSI HBA in the bottom storage controller to switch 1 Connect port 3 of the iSCSI HBA in the bottom storage controller to switch 1 3 Connect iSCSI fault domain 2 shown in blue t...

Page 43: ...SCSI host server to both iSCSI networks 2 Connect fault domain 1 shown in orange to iSCSI network 1 Connect port 1 of the mezzanine card in the top storage controller to switch 1 Connect port 3 of the mezzanine card in the top storage controller to switch 1 Connect port 1 of the mezzanine card in the bottom storage controller to switch 1 Connect port 3 of the mezzanine card in the bottom storage c...

Page 44: ...that connects a storage controller to a front end fabric or network or directly to host servers Steps 1 Starting with the top edge of the label attach the label to the cable near the connector Figure 37 Attach Label to Cable 2 Wrap the label around the cable until it fully encircles the cable The bottom of each label is clear so that it does not obscure the text Figure 38 Wrap Label Around Cable 3...

Page 45: ...ain 1 shown in orange to host server 1 a Connect a SAS cable from storage controller 1 port 1 to the SAS HBA on host server 1 b Connect a SAS cable from storage controller 2 port 1 to the SAS HBA on host server 1 2 Connect fault domain 2 shown in blue to host server 2 a Connect a SAS cable from storage controller 1 port 2 to the SAS HBA on host server 2 b Connect a SAS cable from storage controlle...

Page 46: ...techcenter storage Labeling the Front End Cables Label the front end cables to indicate the storage controller and port to which they are connected Prerequisite Locate the pre made front end cable labels that shipped with the storage system About this task Apply cable labels to both ends of each cable that connects a storage controller to a front end fabric or network or directly to host servers S...

Page 47: ...annel HBAs Refer to the Dell EMC Compatibility Matrix for SC PS and FS Series Arrays for a list of supported Fibre Channel HBAs Refer to the Appendix A HBA Server Settings for a list of HBA server settings to be used when configuring servers Steps 1 Install Fibre Channel HBAs in the host servers NOTE Do not install Fibre Channel HBAs from different vendors in the same server 2 Install supported dr...

Page 48: ...he host servers b Install supported drivers for the HBAs or network adapters and make sure that the HBAs or network adapter have the latest supported firmware c If the host uses network adapters for iSCSI traffic create a VMkernel port for each network adapter 1 VMkernel per vSwitch d Use the host operating system to assign IP addresses for each iSCSI port The IP addresses must match the subnets f...

Page 49: ...s to the Ethernet switch Connect the management port on the top storage controller to the Ethernet switch Connect the management port on the bottom storage controller to the Ethernet switch Labeling the Ethernet Management Cables Label the Ethernet management cables that connect each storage controller to an Ethernet switch Prerequisite Locate the Ethernet management cable labels that shipped with...

Page 50: ...el around the cable until it fully encircles the cable The bottom of each label is clear so that it does not obscure the text Figure 44 Wrap Label Around Cable 3 Apply a matching label to the other end of the cable 50 Connect the Front End Cabling ...

Page 51: ...tiple expansion enclosures to an SCv3000 and SCv3020 by cabling the expansion enclosures in series However the SCv3000 and SCv3020 do not support the cabling of SCv300 and SCv320 expansion enclosures on the same SAS chain as SCv360 expansion enclosures Back End SAS Redundancy Use redundant SAS cabling to make sure that an unavailable I O port or storage controller does not cause a Storage Center o...

Page 52: ...ack end SAS connections from an SCv3000 and SCv3020 storage system to one SCv300 and SCv320 expansion enclosure Table 2 SCv3000 and SCv3020 Connected to One SCv300 and SCv320 Expansion Enclosure Path Connections Chain 1 Side A orange 1 Storage controller 1 port 1 to the expansion enclosure top EMM port 1 2 Expansion enclosure top EMM port 2 to storage controller 2 port 2 Chain 1 Side B blue 1 Stor...

Page 53: ...o two SCv300 and SCv320 expansion enclosures Table 3 SCv3000 and SCv3020 Connected to Two SCv300 and SCv320 Expansion Enclosures Path Connections Chain 1 Side A orange 1 Storage controller 1 port 1 to expansion enclosure 1 top EMM port 1 2 Expansion enclosure 1 top EMM port 2 to expansion enclosure 2 top EMM port 1 3 Expansion enclosure 2 top EMM port 2 to storage controller 2 port 2 Chain 1 Side ...

Page 54: ...60 expansion enclosure Table 4 SCv3000 and SCv3020 and One SCv360 Expansion Enclosure Path Connections Chain 1 Side A orange 1 Storage controller 1 port 1 to the expansion enclosure left EMM port 1 2 Expansion enclosure left EMM port 3 to storage controller 2 port 2 Chain 1 Side B blue 1 Storage controller 2 port 1 to the expansion enclosure right EMM port 1 2 Expansion enclosure right EMM port 3 ...

Page 55: ... left EMM port 3 to storage controller 2 port 2 Chain 1 Side B blue 1 Storage controller 2 port 1 to expansion enclosure 1 right EMM port 1 2 Expansion enclosure 1 right EMM port 3 to expansion enclosure 2 right EMM port 1 3 Expansion enclosure 2 right EMM port 3 to storage controller 1 port 2 Label the Back End Cables Label the back end cables that interconnect the storage controllers or label th...

Page 56: ...bel around the cable until it fully encircles the cable The bottom of each label is clear so that it does not obscure the text Figure 50 Wrap Label Around Cable 3 Apply a matching label to the other end of the cable 56 Connect the Back End Cabling ...

Page 57: ...n Set Administrator Information Confirm the Storage Center Configuration Initialize the Storage Center Configure Key Management Server Settings Create a Storage Type Configure Ports Configure Time Settings Configure SMTP Server Settings Using SupportAssist Update the Storage Center Complete the Configuration and Continue With Setup Connect Power Cables and Turn On the Storage System Connect power ...

Page 58: ...o not power off the storage system until it is discovered by Storage Manager During the initial power up the storage system might take up to twenty minutes to boot completely Figure 52 Turn On the Storage System NOTE If the LEDs on a storage controller do not turn on the storage controller might not be fully seated in the storage system chassis If this issue occurs press both power buttons to turn...

Page 59: ...tall and Use the Storage Manager Client You must start the Storage Manager Client as an Administrator to run the Discover and Configure Uninitialized Storage Centers wizard 1 Install the Storage Manager Client on a host server To discover and configure a Storage Center the software must be installed on a host server that is on the same subnet as the storage system 2 To start the Storage Manager Cl...

Page 60: ...t Connect Method Use the direct connect method to manually deploy the Storage Center when it is not discoverable 1 Use an Ethernet cable to connect the computer running the Dell Storage Manager to the management port of the top controller 2 Cable the bottom controller to the management network switch 3 Click Discover and Configure Uninitialized Storage Centers The Discover and Configure Uninitiali...

Page 61: ...o set a new password and an email address for the Admin user 1 Type a new password for the default Storage Center administrator user in the New Admin Password and Confirm Password fields 2 Type the email address of the default Storage Center administrator user in the Admin Email Address field 3 Click Next For a storage system with Fibre Channel ports the Confirm Configuration page opens For a stor...

Page 62: ...s with high performance needs or in environments in which snapshots are taken frequently under heavy IO Selecting this size increases overhead and reduces the maximum available space in the Storage Type Flash Optimized storage types use 512 KB by default High Density 4 MB Datapage Size Appropriate for systems that use a large amount of disk space and take snapshots infrequently 2 Modify the redund...

Page 63: ... network information for the fault domain and its ports Then click Next NOTE Make sure that all the IP addresses for iSCSI Fault Domain 2 are in the same subnet 4 Click Next 5 Review the fault domain information 6 Optional Click Copy to clipboard to copy the fault domain information 7 Optional Review the information on the Hardware and Cabling Diagram tabs 8 Click Next Configure SAS Ports For a St...

Page 64: ...o authenticate before sending email select the Use Authorized Login AUTH LOGIN checkbox then type a user name and password in the Login ID and Password fields 3 Click Next Using SupportAssist As an integral part of Dell s ability to provide best of class support for your Enterprise class products SupportAssist proactively provides the information required to diagnose support issues enabling the mo...

Page 65: ...ation 2 To receive SupportAssist email messages select Yes I would like to receive emails from SupportAssist when issues arise including hardware failure notifications 3 Select the preferred contact method language and available times 4 Type a shipping address where replacement Storage Center components can be sent 5 Click Next Update the Storage Center The Storage Center attempts to contact the S...

Page 66: ... the iDRAC select DHCP 4 If you selected to specify a static IP address specify the iDRAC IP address for the bottom storage controller and the top storage controller a In the BMC IP Address field type an IP address for the iDRAC b In the BMC Net Mask field type the network mask c In the BMC Gateway IP Address field type the default route for the iDRAC 5 Click OK 6 Log in to the iDRAC and configure...

Page 67: ... the latest version 4 If the update fails click Retry Update to try to update again a The Setup SupportAssist Proxy Settings dialog box opens if the Storage Center cannot connect to the SupportAssist Update Server If the site does not have direct access to the Internet but uses a web proxy configure the proxy settings Select Enabled Specify the proxy settings Click OK The Storage Center attempts t...

Page 68: ...torage Center create one or more test volumes and map them to the server to prepare for connectivity and failover testing Prerequisite NOTE The localhost must have network connection to both the iSCSI connection and Data Collector host IP Steps 1 Configure a localhost to access the Storage Center using the Set up localhost on Storage Center wizard a In the Storage view select a Storage Center b Cl...

Page 69: ...r with Fibre Channel or iSCSI front end connectivity if the network environment and servers are configured for MPIO 1 Create a Test folder on the server and copy at least 2 GB of data into it 2 Make sure that the server is configured to use load balancing MPIO round robin 3 Manually disconnect a path while copying data to TestVol1 to verify that MPIO is functioning correctly a Copy the Test folder...

Page 70: ...ht pane click Empty Recycle Bin The Empty Recycle Bin dialog box opens 10 Click OK to confirm that you want to permanently delete all volumes in the Recycle Bin Send Diagnostic Data Using SupportAssist After replacing components use SupportAssist to send diagnostic data to technical support 1 Use Storage Managerto connect to the Storage Center 2 In the Summary tab click Send SupportAssist Informat...

Page 71: ...enclosures in a rack but do not connect the expansion enclosures to the storage system For more information see the SCv300 and SCv320 Expansion Enclosure Getting Started Guide Steps 1 Cable the expansion enclosures together to form a chain a Connect a SAS cable from expansion enclosure 1 top port 2 to expansion enclosure 2 top port 1 b Connect a SAS cable from expansion enclosure 1 bottom port 2 t...

Page 72: ...de chain Click Next to validate the cabling g Add the expansion enclosure to the B side chain Click Next to validate the cabling h Click Finish 6 To manually manage new unassigned drives a Click the Storage tab b In the Storage tab navigation pane select the Disks node c Click Manage Unassigned Disks The Manage Unassigned Disks dialog box opens d From the Disk Folder drop down menu select the driv...

Page 73: ...on Enclosures to the B Side of the Chain Connect the expansion enclosures to one side of the chain at a time to maintain drive availability 1 Cable the expansion enclosures to the B side of the chain a Connect a SAS cable from storage controller 1 port 2 to expansion enclosure 2 bottom EMM port 2 b Connect a SAS cable from storage controller 2 port 1 to expansion enclosure 1 bottom EMM port 1 Addi...

Page 74: ...pansion enclosures to the storage system For more information see the SCv360 Expansion Enclosure Getting Started Guide About this task Steps 1 Cable the expansion enclosures together to form a chain a Connect a SAS cable from expansion enclosure 1 left port 3 to expansion enclosure 2 left port 1 b Connect a SAS cable from expansion enclosure 1 right port 3 to expansion enclosure 2 right port 1 c R...

Page 75: ...dd Enclosure The Add New Enclosure wizard starts a Click Next to validate the existing cabling b Select the expansion enclosure type and click Next c If the drives are not installed install the drives in the expansion enclosures d Turn on the expansion enclosure When the drives spin up make sure that the front panel and power status LEDs show normal operation e Click Next f Add the expansion enclo...

Page 76: ...nsion enclosure in the chain left EMM port 3 Figure 57 Connect the A Side Cables to the Expansion Enclosures 1 Storage system 2 Storage controller 1 3 Storage controller 2 4 Expansion enclosure 1 5 Expansion enclosure 2 2 Label the back end cables Add an SCv360 Expansion Enclosure to the B Side of the Chain Connect the expansion enclosure to one side of the chain at a time to maintain drive availa...

Page 77: ...ler 2 4 Expansion enclosure 1 5 New expansion enclosure 2 2 Use a new SAS cable to connect expansion enclosure 1 right EMM port 3 to the new expansion enclosure 2 right EMM port 1 3 Connect the B side cable that was disconnected in step 1 to the new expansion enclosure 2 right EMM port 3 Adding or Removing Expansion Enclosures 77 ...

Page 78: ...nect the expansion enclosure to the end of the chain Steps 1 Connect to the Storage Center using the Dell Storage Manager 2 Check the drive count of the Storage Center system before adding the expansion enclosure 3 Click the Hardware tab and select Enclosures in the Hardware tab navigation pane 4 Click Add Enclosure The Add New Enclosure wizard starts a Confirm the details of your current installa...

Page 79: ...nsion enclosure to the storage system Add an SCv300 and SCv320 Expansion Enclosure to the A Side of the Chain Connect the expansion enclosure to one side of the chain at a time to maintain drive availability 1 Turn on the expansion enclosure being added When the drives spin up make sure that the front panel and power status LEDs show normal operation 2 Disconnect the A side cable shown in orange f...

Page 80: ...back end cables Add an SCv300 and SCv320 Expansion Enclosure to the B Side of the Chain Connect the expansion enclosure to one side of the chain at a time to maintain drive availability 1 Disconnect the B side cable shown in blue from the expansion enclosure bottom EMM port B The A side cables continue to carry I O while the B side is disconnected 80 Adding or Removing Expansion Enclosures ...

Page 81: ...re 2 2 Use a new SAS cable to connect expansion enclosure 1 bottom EMM port 2 to the new expansion enclosure 2 bottom EMM port 1 3 Connect the B side cable that was disconnected in step 1 to the new expansion enclosure 2 bottom EMM port 2 Figure 63 Connect B Side Cables to the New Expansion Enclosure 1 Storage system 2 Storage controller 1 Adding or Removing Expansion Enclosures 81 ...

Page 82: ...onnect the A side cable shown in orange from the expansion enclosure left EMM port 3 The B side cables continue to carry I O while the A side is disconnected Figure 64 Disconnect A Side Cable from the Existing Expansion Enclosure 1 Storage system 2 Storage controller 1 3 Storage controller 2 4 Expansion enclosure 1 3 Use a new SAS cable to connect expansion enclosure 1 left EMM port 3 to the new e...

Page 83: ...l the back end cables Add an SCv360 Expansion Enclosure to the B Side of the Chain Connect the expansion enclosure to one side of the chain at a time to maintain drive availability 1 Disconnect the B side cable shown in blue from the expansion enclosure right EMM port 3 The A side cables continue to carry I O while the B side is disconnected Adding or Removing Expansion Enclosures 83 ...

Page 84: ...ler 2 4 Expansion enclosure 1 5 New expansion enclosure 2 2 Use a new SAS cable to connect expansion enclosure 1 right EMM port 3 to the new expansion enclosure 2 right EMM port 1 3 Connect the B side cable that was disconnected in step 1 to the new expansion enclosure 2 right EMM port 3 84 Adding or Removing Expansion Enclosures ...

Page 85: ... drives in the expansion enclosure are managed by the Storage Center software Steps 1 Use Storage Manager to connect to the Storage Center 2 Use Storage Manager to release the drives in the expansion enclosure 3 Select the expansion enclosure to remove and click Remove Enclosure The Remove Enclosure wizard starts 4 Confirm the details of your current installation and click Next to validate the cab...

Page 86: ...o remove 4 Select the Disks node 5 Select all of the drives in the expansion enclosure 6 Right click on the selected drives and select Release Disk The Release Disk dialog box opens 7 Select Perform RAID rebalance immediately 8 Click OK When all of the drives in the expansion enclosure are in the Unassigned drive folder the expansion enclosure is safe to remove Disconnect the SCv300 and SCv320 Exp...

Page 87: ...oller 1 3 Storage controller 2 4 Expansion enclosure 1 5 Expansion enclosure 2 3 Connect the A side cable to expansion enclosure 2 top EMM port 1 Figure 69 Reconnecting the A Side Cable to the Remaining Expansion Enclosure 1 Storage system 2 Storage controller 1 Adding or Removing Expansion Enclosures 87 ...

Page 88: ...cables continue to carry I O while the B side is disconnected 2 Remove the B side cable between expansion enclosure 1 bottom EMM port 2 and expansion enclosure 2 bottom EMM port 1 Figure 70 Disconnecting the B Side Cables from the Expansion Enclosure 1 Storage system 2 Storage controller 1 3 Storage controller 2 4 Expansion enclosure 1 5 Expansion enclosure 2 3 Connect the B side cable to expansio...

Page 89: ...losure from the A Side of the Chain Disconnect the A side cables from the expansion enclosure that you want to remove 1 Disconnect the A side cable shown in orange from expansion enclosure 1 left EMM port 1 The B side cables continue to carry I O while the A side is disconnected 2 Remove the A side cable between expansion enclosure 1 left EMM port 3 and expansion enclosure 2 left EMM port 1 Adding...

Page 90: ...om the Expansion Enclosure 1 Storage system 2 Storage controller 1 3 Storage controller 2 4 Expansion enclosure 1 5 Expansion enclosure 2 3 Connect the A side cable to expansion enclosure left EMM port 1 90 Adding or Removing Expansion Enclosures ...

Page 91: ... from the B Side of the Chain Disconnect the B side cables from the expansion enclosure that you want to remove 1 Disconnect the B side cable shown in blue from expansion enclosure 1 right EMM port 1 The A side cables continue to carry I O while the B side is disconnected 2 Remove the B side cable between expansion enclosure 1 right EMM port 3 and expansion enclosure 2 right EMM port 1 Adding or R...

Page 92: ...ntroller 2 4 Expansion enclosure 3 Connect the B side cable to expansion enclosure 2 right EMM port 1 The expansion enclosure is now disconnected and can be removed Figure 75 Reconnecting the B Side Cable to the Remaining Expansion Enclosure 1 Storage system 2 Storage controller 1 92 Adding or Removing Expansion Enclosures ...

Page 93: ...3 Storage controller 2 4 Expansion enclosure 1 5 Expansion enclosure 2 Adding or Removing Expansion Enclosures 93 ...

Page 94: ...2 Determine the status of the hard drive indicators If the hard drive status indicator blinks amber ON for two seconds and OFF for one second the hard drive has failed If the hard drive status indicator is not lit proceed to the next step 3 Check the connectors and reseat the hard drive CAUTION Perform this step only on unmanaged drives or after you confirm that the particular drive contains no us...

Page 95: ...rage Center for the connected and partially connected initiators 3 The Host Setup Successful page displays the best practices that were set by the wizard and best practices that were not set Make a note of any best practices that were not set It is recommended that these updates be applied manually before starting I O to the Storage Center 4 Optional Select Create a Volume for this host to create ...

Page 96: ... procedure Steps 1 On the Configuration Complete page of the Discover and Configure Storage Center wizard click Configure VMware vSphere to access a Storage Center The Set up VMware Host on Storage Center wizard opens 2 Type the vCenter IP address or host name user name and password Then click Next If the Storage Center has iSCSI ports and the host is not connected to any interface the Log into St...

Page 97: ...omputer to identify the USB serial port 3 Install the serial port driver If the Windows operating system opens a hardware wizard follow the instructions to install the USB serial port driver If a hardware wizard does not open 1 Log in to the Dell Digital Locker at www dell com support software and download the FTDI D2XX driver zip file 2 Extract the content of the FTDI D2XX driver zip file to a fo...

Page 98: ...e controller The login is __setup__ NOTE The login contains two underscore characters before the word setup and two underscore characters after the word setup The password is StorageCenterSetup The Setup Utility tool discovers the uninitialized Storage Center 2 Type Y and press Enter to continue 3 Type the system information controller information and user information in the prompts that are displ...

Page 99: ...y DNS server address ___ ___ ___ ___ Table 8 Storage Center Administrator Password for the default Storage Center Admin user ________________ Email address of the default Storage Center Admin user ________________ iSCSI Fault Domain Information For a storage system with iSCSI front end ports gather and record network information for the iSCSI fault domains This information is needed to complete th...

Page 100: ...itialized Storage Centers wizard Table 11 NTP SMTP and Proxy Servers NTP server IPv4 address ___ ___ ___ ___ SMTP server IPv4 address ___ ___ ___ ___ Backup SMTP server IPv4 address ___ ___ ___ ___ SMTP server login ID ________________ SMTP server password ________________ Proxy server IPv4 address ___ ___ ___ ___ Fibre Channel Zoning Information For a storage system with Fibre Channel front end p...

Page 101: ...ort 2 ________________ Physical WWN of storage controller 2 port 2 ________________ 4 port HBA only Physical WWN of storage controller 1 port 4 ________________ 4 port HBA only Physical WWN of storage controller 2 port 4 ________________ Table 15 Virtual WWNs in Fault Domain 2 Virtual WWN of storage controller 1 port 2 ________________ Virtual WWN of storage controller 2 port 2 ________________ 4 ...

Page 102: ...co Fibre Channel HBAs Cisco manufactures Fibre Channel HBAs that are compatible with Storage Centers NOTE For more information regarding the compatibility of a Cisco Fibre Channel HBA see the Dell EMC Compatibility Matrix for SC PS and FS Series Arrays Configure a Cisco Fibre Channel HBA with the following settings Field Setting FCP Error Recovery Disabled default Flogi Retries 60 Flogi Timeout 40...

Page 103: ...lity Matrix for SC PS and FS Series Arrays For more information about QLogic see www qlogic com Configure QLogic HBA Settings Configure QLogic HBA settings to enable the HBA to communicate more effectively with the Storage Center The following settings can be configured on any of the compatible QLogic HBAs from the QLogic Fast UTIL BIOS or the QLogic SANsurfer After configuring the settings based ...

Page 104: ... XenServer volumes will persist after a Storage Center controller failover apply the following timeout values These settings are located in the mpathHBA file located in the opt xensource sm directory When finished save the file and reboot the server Table 19 Citrix XenServer HBA Settings for Versions 5 x to 6 2 Field Setting DEFAULT_TIMEOUT 60 MPATH_TIMEOUT 60 Version 6 5 For Citrix XenServer vers...

Page 105: ...commended for Microsoft Windows Servers with MPIO installed Recommended MPIO Registry Settings Configure the MPIO registry settings in the following registry location HKEY_LOCAL_MACHINE SYSTEM CurrentControlSet services mpio Parameters Table 21 MPIO Registry Settings Field Setting PDORemovePeriod 120 PathRecoveryInterval 25 UseCustomPathRecoveryInterval 1 Recommended iSCSI Initiator Settings Confi...

Page 106: ...version 5 x The settings vary based on the manufacturer of the HBA card Add one of these settings to the end of the file etc modprobe conf based on the manufacturer of the HBA card Qlogic HBA Settings Path Configuration Timeout Setting Single Path options qla2xxx qlport_down_retry 60 Multipath options qla2xxx qlport_down_retry 5 Emulex HBA Settings Path Configuration Timeout Setting Single Path op...

Page 107: ...Emulex HBA Settings Path Configuration Timeout Setting Single Path options lpfc lpfc_devloss_tmo 60 Multipath options lpfc lpfc_devloss_tmo 5 HBA Server Settings 107 ...

Page 108: ...o ON Flow Control Dell recommends the following settings as best practice when enabling flow control A minimum of receive RX flow control should be enabled for all switch interfaces used by servers or storage systems for iSCSI traffic Symmetric flow control should be enabled for all server interfaces used for iSCSI traffic Storage Center automatically enables this feature NOTE To find best practic...

Page 109: ... or 10 GbE If a switch cannot correctly auto negotiate at full duplex or at the maximum speed of the connection it should be hard set at full duplex and at the maximum speed of the connected port 1 GbE or 10 GbE MTU Verify the optimal MTU setting for replications The default is 1500 but sometimes WAN circuits or VPNs create additional overhead that can cause packet fragmentation This fragmentation...

Reviews: