background image

26

  |  Operating 

your 

monitor

2

Shortcut key/Input 

Source

Use the buttons to adjust the volume. Minimum is ‘0’ 
(-). Maximum is ‘100’ (+). 

3

Menu

Use the Menu button to launch the On-Screen Display 
(OSD) and select the OSD Menu. See 

Accessing the 

OSD menu

.

4

Exit

Use this button to go back to the main menu or exit 
the OSD main menu.

Power On/Off button 

(with LED indicator)

Use the Power button to turn the monitor on and off.

Solid white light indicates the monitor is On and fully 
functional. Blinking white light indicates the power 
save mode.

OSD controls

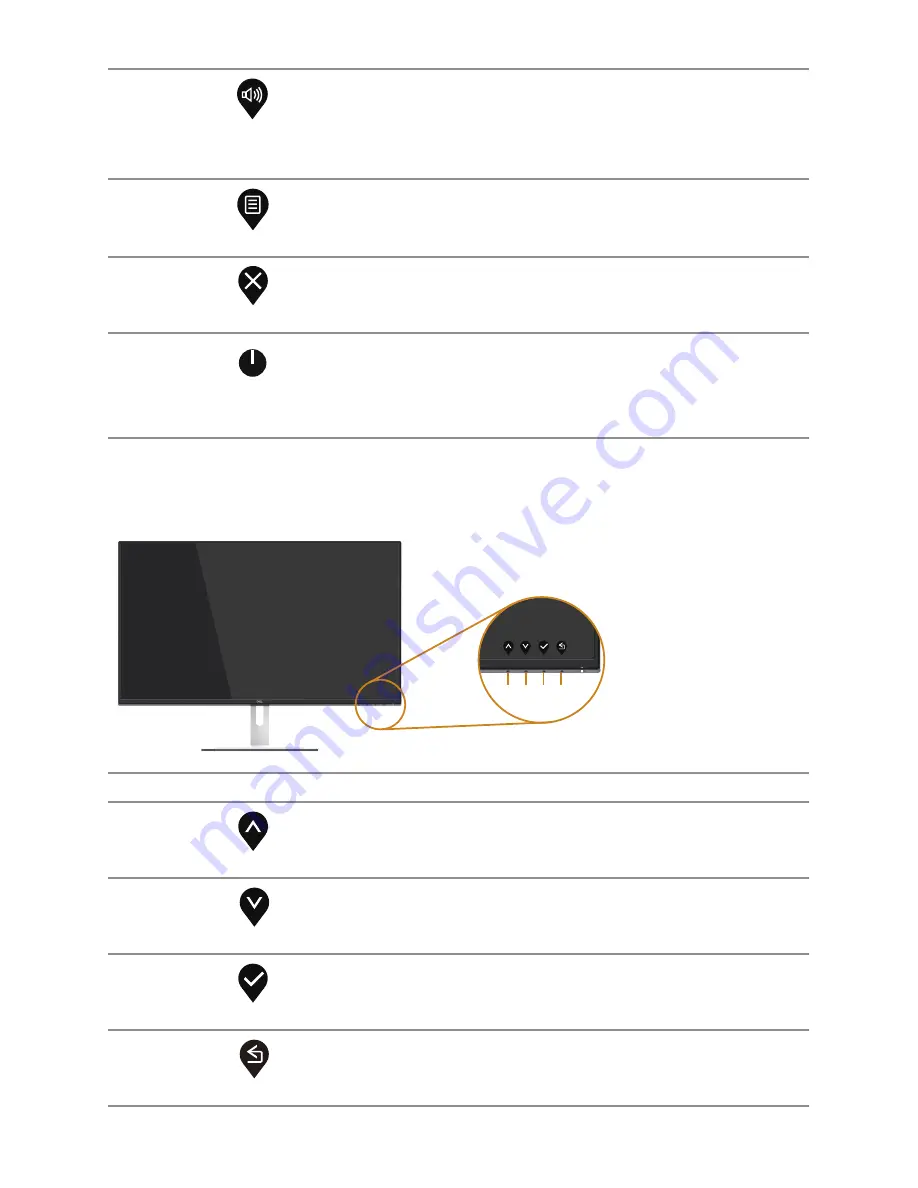
Use the buttons on the bottom of the monitor to adjust the image settings.

1 2 3 4

Contorl Buttons

Description

1

Up

Use the 

Up

 button to increase values or move up in a 

menu.

2

Down

Use the 

Down

 button to decrease values or move 

down in a menu.

3

OK

Use the 

OK

 button to confirm your selection in a 

menu.

4

Back

Use the 

Back

 button to go back to the previous menu.

Summary of Contents for S2419H

Page 1: ...Model No S2419H S2419HN S2419NX S2719H S2719HN S2719NX Regulatory model S2419Hc S2419Nc S2719Hc S2719Nc User s Guide Dell S2419H S2419HN S2419NX S2719H S2719HN S2719NX ...

Page 2: ...text Dell and the DELL logo are trademarks of Dell Inc Microsoft and Windows are either trademarks or registered trademarks of Microsoft Corporation in the United States and or other countries Intel is a registered trademark of Intel Corporation in the U S and other countries and ATI is a trademark of Advanced Micro Devices Inc ENERGY STAR is a registered trademark of the U S Environmental Protect...

Page 3: ...ability 19 LCD monitor quality and pixel policy 19 Maintenance guidelines 19 Setting up the monitor 20 Connecting the stand 20 Connecting your monitor 22 Organizing cables 23 Removing the stand 23 Operating your monitor 25 Power on the monitor 25 Using the control buttons 25 Using the on screen display OSD menu 27 Setting up your monitor 36 Using tilt 38 ...

Page 4: ...4 Troubleshooting 39 Self Test 39 Built in diagnostics 40 Common problems 41 Product specific problems 43 Appendix 44 FCC notices U S Only and other regulatory information 44 Contacting Dell 44 ...

Page 5: ...cting Dell for more information if something is missing NOTE Some items may be optional and may not ship with your monitor Some features or media may not be available in certain countries NOTE To set up with any other stand please refer to the respective stand setup guide for setup instructions Monitor Stand riser Stand base Power Cable Varies by Countries Power Adapter ...

Page 6: ...viewing angle to allow viewing from a sitting or standing position or while moving from side to side HDMI connectivity makes it simple and easy to connect with legacy and new systems S2419H S2719H Build in Speaker 5 W x2 Plug and play capability if supported by your system On Screen Display OSD adjustments for ease of set up and screen optimization Energy Saver feature for Energy Star compliance S...

Page 7: ...About your monitor 7 Identifying parts and controls Front view Control buttons 1 2 Label Description 1 Function buttons For more information see Operating your monitor 2 Power On Off button ...

Page 8: ...ая мощность рабочего режима X XXX Вт см Потребляемая мощность изделием в режиме ожидания X X Вт Потребляемая мощность изделием в выключенном режиме X XВт S N CN 12MWY TV100 7B1 001L A00 SVC Tag 1234567 Express Service Code 123 456 789 0 Date of Mfg ӝᰛᵕ ᰛᵕ Nov 2017 12V 3 33A S2419H MSIP REM TPF S2419Hc 㐔㷡㢬 ڊ 㥐㦤㣄 ڕ TPV Electronics Fujian Co Ltd 080 200 3800 XXXXX Back View with monitor stand Label D...

Page 9: ...S2719NX Label Description Use 1 Speakers Speakers 2 Power adapter port To connect the monitor power cable using a 12V DC adapter 3 HDMI1 port Connect your computer with HDMI cable 4 HDMI2 port Connect your computer with HDMI cable 5 Audio Line out port Connect to external speakers Optional Purchase Headphone usage is not supported for the audio line out port ...

Page 10: ...horizontal typical 178 vertical typical 178 horizontal typical Brightness 250 cd m typical 250 cd m typical Contrast ratio 1000 to 1 typical 8 000 000 to 1 Dynamic Contrast 1000 to 1 typical 8 000 000 to 1 Dynamic Contrast Faceplate coating Low Haze with 3H hardness Backlight LED edgelight system Response time 5 ms typical G to G Color depth 16 7 million colors Color gamut CIE 1976 84 CIE 1931 72 ...

Page 11: ...ay capabilities HDMI 480p 480i 576p 720p 1080p 576i 1080i 480p 480i 576p 720p 1080p 576i 1080i Preset display modes S2419H S2419HN S2419NX S2719H S2719HN S2719NX Display Mode Horizontal Frequency kHz Vertical Frequency Hz Pixel Clock MHz Sync Polarity Horizontal Vertical VESA 720 x 400 31 5 70 1 28 3 VESA 640 x 480 31 5 60 0 25 2 VESA 640 x 480 37 5 75 0 31 5 VESA 800 x 600 37 9 60 3 40 0 VESA 800...

Page 12: ...sical characteristics Model S2419H S2419HN S2419NX Signal cable type Digital detachable HDMI 19 pins Front frame gloss minimum Black frame 85 gloss units Dimensions with stand Height 413 4 mm 16 28 in Width 539 0 mm 21 22 in Depth 152 8 mm 6 01 in Dimensions without stand Height 315 2 mm 12 41 in Width 539 0 mm 21 22 in Depth 47 4 mm 1 87 in Stand dimensions Height 171 6 mm 6 76 in Width 249 0 mm ...

Page 13: ... without stand Height 356 5 mm 14 04 in Width 612 7 mm 24 12 in Depth 45 8 mm 1 8 in Stand dimensions Height 176 7 mm 6 96 in Width 257 2 mm 10 13 in Depth 186 7 mm 7 35 in Weight S2719H S2719HN S2719NX Weight with packaging 7 86 kg 17 33 lb 7 65 kg 16 87 lb Weight with stand assembly and cables 5 17 kg 11 40 lb 4 96 kg 10 93 lb Weight without stand assembly no cables 4 05 kg 8 93 lb 3 84 kg 8 47 ...

Page 14: ...4 F to 140 F Humidity Operating 10 to 80 non condensing Non operating Storage 5 to 90 non condensing Shipping 5 to 90 non condensing Altitude Operating maximum 5 000 m 16 400 ft Non operating maximum 12 192 m 40 000 ft Thermal dissipation 112 60 BTU hour maximum 81 89 BTU hour typical 71 65 BTU hour maximum 61 42 BTU hour typical 122 84 BTU hour maximum 88 72 BTU hour typical 81 89 BTU hour maximu...

Page 15: ...nly be achieved by disconnecting the power cable from the monitor S2419H VESA Modes Horizontal Sync Vertical Sync Video Power Indicator Power Consumption Normal operation Active Active Active White 33 W maximum 24 W typical Active off mode Inactive Inactive Blanked White Glowing Less than 0 3 W Switch off Off Less than 0 3 W Energy Star Power Consumption PON 17 W ETEC 53 83 Kwh S2419HN S2419NX VES...

Page 16: ... Less than 0 3 W Energy Star Power Consumption PON 20 W ETEC 63 03 Kwh NOTE PON Power consumption of on mode as defined in Energy Star 7 0 version ETEC Total energy consumption in KWh as defined in Energy Star 7 0 version This document is informational only and reflects laboratory performance Your product may perform differently depending on the software components and peripherals you ordered and ...

Page 17: ...he monitor button again to select the correct input source Dell P2418HZ Dell 27 Monitor No HDMI1 signal from your device Press any key on the keyboard or move the mouse to wake it up S2719H If there is no display press the monitor button again to select the correct input source Activate the computer and the monitor to gain access to the OSD NOTE This monitor is ENERGY STAR certified ...

Page 18: ... TMDS DATA 2 2 TMDS DATA 2 SHIELD 3 TMDS DATA 2 4 TMDS DATA 1 5 TMDS DATA 1 SHIELD 6 TMDS DATA 1 7 TMDS DATA 0 8 TMDS DATA 0 SHIELD 9 TMDS DATA 0 10 TMDS CLOCK 11 TMDS CLOCK SHIELD 12 TMDS CLOCK 13 CEC 14 Reserved N C on device 15 DDC CLOCK SCL 16 DDC DATA SDA 17 DDC CEC Ground 18 5V POWER 19 HOT PLUG DETECT ...

Page 19: ...support monitors Maintenance guidelines Cleaning your monitor WARNING Before cleaning the monitor unplug the monitor power cable from the electrical outlet CAUTION Read and follow the Safety Instructions before cleaning the monitor For best practices follow the instructions in the list below while unpacking cleaning or handling your monitor To clean your screen lightly dampen a soft clean cloth wi...

Page 20: ... any other stand is bought please refer to the respective stand setup guide for the set up instructions To attach the monitor stand 1 Place the monitor on a soft cloth or cushion 2 Fit the stand riser and stand base together and then turn the screw in the stand base 3 Fit the two tabs on the upper part of the stand to the groove on the back of the monitor Press the stand until it snaps into place ...

Page 21: ...Setting up the monitor 21 4 Inserting the stand until the snap locked ...

Page 22: ...not connect all cables to the computer at the same time It is recommend to route the cables through the cable management slot before you connect them to the monitor To connect your monitor to the computer 1 Turn Off your computer and disconnect the power cable 2 Connect the audio or HDMI cable from your monitor to the computer Connecting the HDMI cable ...

Page 23: ... while removing the stand ensure that the monitor is placed on a soft and clean surface NOTE This is applicable for a monitor with a stand When any other stand is bought please refer to the respective stand setup guide for the set up instructions To remove the stand 1 Place the monitor on a soft cloth or cushion along the desk 2 Tilt the stand downwards to access to the release button ...

Page 24: ...24 Setting up the monitor 3 Use a long screwdriver to press on the release button 4 While pressing on the release button pull the stand out ...

Page 25: ...r Using the control buttons Use the control buttons on the bottom of the monitor to adjust the image being displayed Control buttons 1 5 2 3 4 1 2 3 4 The following table describes the control buttons Control Buttons Description 1 Shortcut key Preset Modes Use this button to choose from a list of preset modes ...

Page 26: ...ator Use the Power button to turn the monitor on and off Solid white light indicates the monitor is On and fully functional Blinking white light indicates the power save mode OSD controls Use the buttons on the bottom of the monitor to adjust the image settings 1 2 3 4 Contorl Buttons Description 1 Up Use the Up button to increase values or move up in a menu 2 Down Use the Down button to decrease ...

Page 27: ...nalize Menu Audio Brightness Contrast Dell 27 Monitor 75 75 Input Source Color Display Others Personalize Menu Audio 2 Press the and buttons to move between the setting options As you move from one icon to another the option name is highlighted See the following table for a complete list of all the options available for the monitor 3 Press the button once to activate the highlighted option 4 Press...

Page 28: ... contrast and press the button to decrease the contrast min 0 max 100 The contrast function adjusts the degree of difference between darkness and lightness on the monitor screen Input Source Use the input source menu to select between the different video signals that may be connected to your monitor Brightness Contrast Dell 24 Monitor Input Source Color Display Others Personalize Menu Audio HDMI 1...

Page 29: ... make viewing more comfortable for your eyes Movie Loads color settings ideal for movies Game Loads color settings ideal for most gaming applications Warm Increases the color temperature The screen appears warmer with a red yellow tint Cool Decreases the color temperature The screen appears cooler with a blue tint Custom Color Allows you to manually adjust the color settings Press the and buttons ...

Page 30: ...Hue This feature can shift the color of the video image to green or purple This is used to adjust the desired flesh tone color Use or to adjust the hue from 0 to 100 Press to increase the green shade of the video image Press to increase the purple shade of the video image NOTE Hue adjustment is available only when you select Movie or Game preset mode Saturation This feature can adjust the color sa...

Page 31: ...uality Press the button to select the dynamic contrast on or off NOTE Dynamic contrast provides higher contrast if you select game or movie preset mode Response Time User can select between Normal Fast or Super fast Reset Display Select this option to restore default display settings Audio Brightness Contrast Dell 24 Monitor Input Source Color Display Others Personalize Menu Audio Volume Speaker M...

Page 32: ... seconds Reset Menu Reset all OSD settings to the factory preset values Personalize Users can choose a feature from Shortcut key 1 Shortcut key 2 Power Button LED or Reset Personalization Preset Modes or Volume and set it as a shortcut key Brightness Contrast Dell 24 Monitor Input Source Color Display Others Personalize Menu Audio Shortcut Key 1 Shortcut Key 2 Power Button LED Reset Personalizatio...

Page 33: ...r You can disable this feature by selecting disable Enable this feature for best user experience and optimum performance of your monitor Brightness Contrast Dell 24 Monitor Input Source Color Display Menu Audio Display Info DDC CI LCD Conditioning Firmware Off Service Tag Reset Others Factory Reset On Personalize Others Brightness Contrast Dell 27 Monitor Input Source Color Display Menu Audio Displ...

Page 34: ...itched off Do you want to continue Dell 24 Monitor S2419H To allow manual adjustment of brightness the Dynamic Contrast will be Yes No switched off Do you want to continue Dell 27 Monitor S2719H Before the DDC CI function is disabled the following message is displayed The function of adjusting display setting using PC application will be disabled Do you wish to disable DDC CI function Yes No Dell 24...

Page 35: ... not connected a floating dialog box as shown below appears The monitor will enter Power Save Mode after 4 minutes if left at this state Dell P2418HZ Dell 24 Monitor No HDMI1 Cable The display will go into Power Save Mode in 4 minutes www dell com support monitors S2419H Dell Dell 27 Monitor No HDMI1 Cable The display will go into Power Save Mode in 4 minutes www dell com support monitors S2719H S...

Page 36: ...tion and select 1920 x 1080 4 Click OK If you do not see 1920 x 1080 as an option you may need to update your graphics driver Depending on your computer complete one of the following procedures If you have a Dell desktop or portable computer Go to www dell com support enter your computer s Service Tag and download the latest driver for your graphics card If you are using a non Dell computer portab...

Page 37: ...ions If you have a non Dell desktop portable computer or graphics card In Windows 7 Windows 8 Windows 8 1 and Windows 10 1 For Windows 8 and Windows 8 1 only select the Desktop tile to switch to classic desktop 2 Right click on the desktop and click Personalization 3 Click Change Display Settings 4 Click Advanced Settings 5 Identify your graphics controller supplier from the description at the top...

Page 38: ...38 Operating your monitor Using tilt NOTE The stand is detached when the monitor is shipped from the factory 5 21 ...

Page 39: ...n on the monitor If the monitor is working correctly it detects that there is no signal and one of the following message appears While in self test mode the power LED remains white Dell P2418HZ Dell 24 Monitor No HDMI1 Cable The display will go into Power Save Mode in 4 minutes www dell com support monitors S2419H Dell Dell 27 Monitor No HDMI1 Cable The display will go into Power Save Mode in 4 mi...

Page 40: ...ug the video cable s from the back of the computer or monitor The monitor then goes into the self test mode 3 Press and hold Button 1 for 5 seconds A gray screen appears 4 Carefully inspect the screen for abnormalities 5 Press Button 1 on the bottom of the monitor again The color of the screen changes to red 6 Inspect the display for any abnormalities 7 Repeat steps 5 and 6 to inspect the display ...

Page 41: ...the correct aspect ratio Shaky Jittery Video Reset the monitor to Factory Settings Factory Reset Check environmental factors Relocate the monitor and test in another room Missing Pixels Cycle power On Off Pixel that is permanently Off is a natural defect that can occur in LCD technology For more information on Dell Monitor Quality and Pixel Policy see Dell Support site at www dell com support moni...

Page 42: ...st feature check Ensure that the video cable connecting the monitor to the computer is connected properly and is secure Check for bent or broken pins in the video cable connector Wrong Color Change the Color Setting Mode in the Color Settings OSD to Graphics or Video depending on the application Try different Preset Modes in Color settings OSD Adjust R G B value in Custom Color in Color settings O...

Page 43: ...SD menu is locked If yes press and hold the menu button for 10 seconds to unlock For more information see Lock No Input Signal when user controls are pressed Check the signal source Ensure the computer is not in standby or sleep mode by moving the mouse or pressing any key on the keyboard Check if the video cable is plugged in properly Disconnect and reconnect the video cable if necessary Reset th...

Page 44: ...se invoice packing slip bill or Dell product catalog Dell provides several online and telephone based support and service options Availability varies by country and product and some services may not be available in your area To get online Monitor support content 1 Visit www dell com support monitors To contact Dell for sales technical support or customer service issues 1 Visit www dell com support...

Reviews: