background image


E

Power Button and

Indicator

Use the Power button to turn the monitor on and off.

The white light indicates the monitor is

on, and fully functional. An amber light indicates power save mode.


Using the OSD Menu

NOTE:

 If you change the settings and then either proceed to another menu, or exit the OSD menu, the monitor automatically saves those changes. The changes are also saved if you

change the settings and then wait for the OSD menu to disappear.

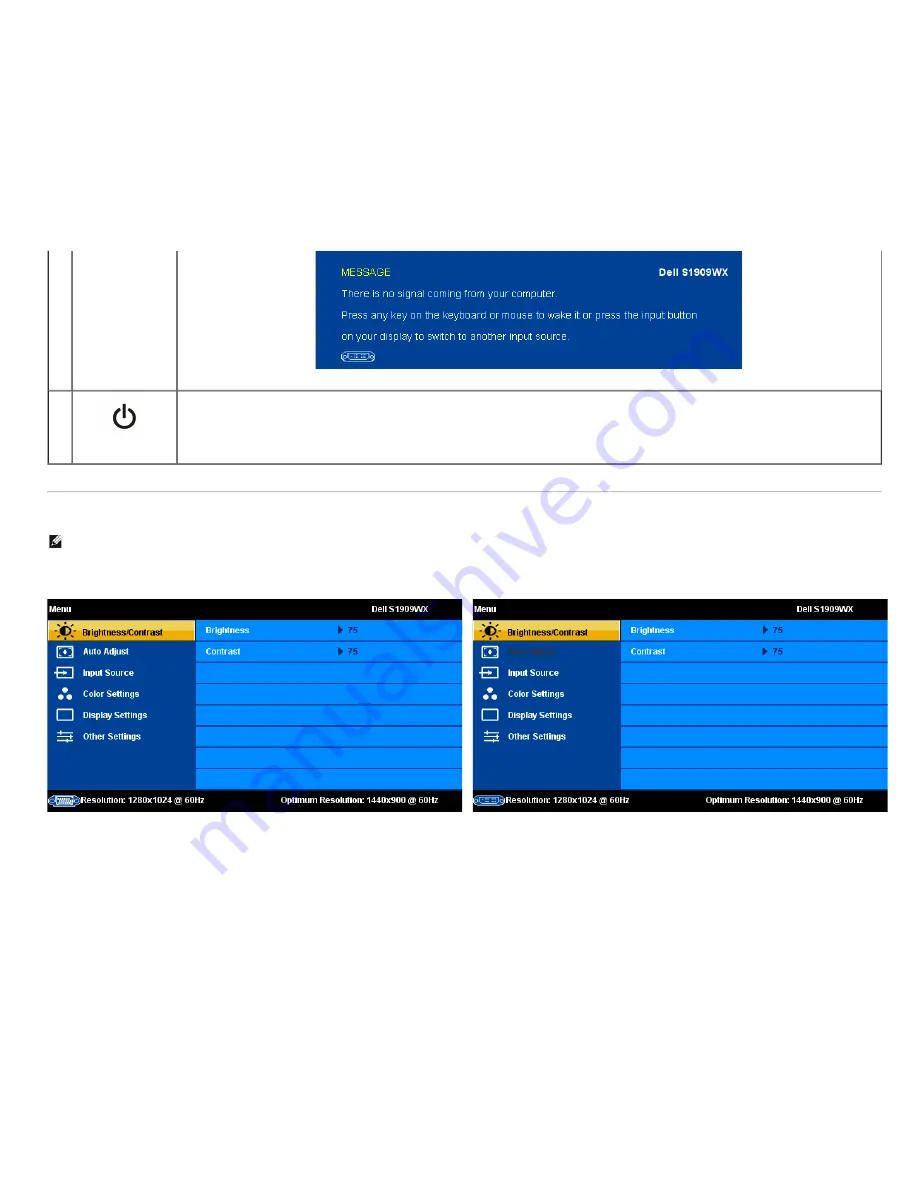
1.  Press the Menu button to open the OSD menu and display the main menu.

Main Menu for Analog (VGA) Input


Main Menu for Digital (DVI) Input

or

or

Summary of Contents for S1909WX

Page 1: ...als in any manner whatsoever without the written permission of Dell Inc is strictly forbidden Trademarks used in this text Dell and the DELL logo are trademarks of Dell Inc Microsoft and Windows are either trademarks or registered trademarks of Microsoft Corporation in the United States and or other countries ENERGY STAR is a registered trademark of the U S Environmental Protection Agency As an EN...

Page 2: ...ty LCD Monitor Quality and Pixel Policy Maintenance Guidelines Package Contents Your monitor comes with all the items shown below Ensure that you have all the items contact Dell if anything is missing NOTE Some items may be optional and may not ship with your Monitor Some features or media may not be available in certain countries Monitor with stand Power Cable VGA Cable attached to the monitor ...

Page 3: ... viewing from a sitting or standing position or while moving from side to side Tilt capability Removable pedestal and Video Electronics Standards Association VESA 100mm mounting holes for flexible mounting solutions Plug and play capability if supported by your system On Screen Display OSD adjustments for ease of set up and screen optimization Software and documentation media which includes an inf...

Page 4: ...Front view 1 OSD menu button 2 Brightness and Contrast Up button 3 Auto adjust Down button 4 Input select Enter button 5 Power On Off button with LED indicator Back View ...

Page 5: ...ck with the slot to help secure your monitor 3 Cable holder Helps organize cables by placing them through the holder 4 Regulatory rating label Lists the regulatory approvals 5 Dell Soundbar mounting brackets Use to attach the optional Dell Soundbar 6 VESA mounting holes 100mm Behind attached base plate Use to mount the monitor Bottom View ...

Page 6: ...1 Power connector Insert the power cable 2 DVI connector Connect the DVI cable of your computer 3 VGA connector Connect the VGA cable of your computer Side View ...

Page 7: ...nitor automatically resumes functioning when the system detects input from the keyboard mouse or other input devices The following table shows the power consumption and signaling of this automatic power saving feature VESA Modes Horizontal Sync Vertical Sync Video Power Indicator Power Consumption Normal operation Active Active Active White 37 W maximun Active off mode Inactive Inactive Blanked Am...

Page 8: ...nly be achieved by disconnecting the main cable from the monitor Pin Assignments 15 pin D Sub connector Pin Number Monitor Side of the 15 pin Side Signal Cable 1 Video Red 2 Video Green 3 Video Blue 4 GND 5 Self test 6 GND R 7 GND G 8 GND B 9 DDC 5V 10 GND sync 11 GND 12 DDC data 13 H sync 14 V sync 15 DDC clock 24 pin Digital only DVI Connector ...

Page 9: ...m The monitor automatically provides the computer with its Extended Display Identification Data EDID using Display Data Channel DDC protocols so that the system can configure itself and optimize the monitor settings Most monitor installations are automatic You can select different settings if required Specifications Model number S1909WX Screen type Active matrix TFT LCD Screen dimensions 19 inches...

Page 10: ...ut voltage frequency current 100 to 240 VAC 50 or 60 Hz 3 Hz 1 5A Max Inrush current 120V 30A Max 240V 60A Max Color depth 16 7M colors Color Gamut 85 typical Dell S1909WX Flat Panel monitor color gamut typical is based on CIE 1976 85 and CIE1931 72 test standards Preset Display Modes The following table lists the preset modes for which Dell guarantees image size and centering Display Mode Horizon...

Page 11: ...imensions Height 11 03 inches 280 26 mm Width 7 93 inches 201 50 mm Depth 7 93 inches 201 50 mm Weight with packaging 13 51 lbs 6 14 kg Weight with stand assembly and cables 10 69 lbs 4 86 kg Weight without stand assembly For wall mount or VESA mount considerations no cables 8 12 lbs 3 69 kg Weight of stand assembly 2 20 lbs 1 00 kg Environmental Characteristics The following table lists the envir...

Page 12: ...structions before cleaning the monitor CAUTION Before cleaning the monitor unplug the monitor power cable from the electrical outlet For best practices follow the instructions in the list below while unpacking cleaning or handling your monitor To clean your antistatic screen slightly dampen a soft clean cloth with water If possible use a special screen cleaning tissue or solution suitable for the ...

Page 13: ...ar Optional Removing the Base Attaching the Base NOTE The base is detached when the monitor is shipped from the factory After placing the monitor panel on soft cloth or cushion complete the following steps to attach the base 1 Place the monitor on a stable flat table 2 Fit the groove on the base onto the riser of the monitor 3 Turn the screw clockwise to tighten the base and hinge ...

Page 14: ...ecting Your Monitor CAUTION Before you begin any of the procedures in this section follow the safety instructions Connecting Your Monitor Using a VGA Cable Connecting Your Monitor Using a DVI Cable Optional ...

Page 15: ...on your monitor and computer If you do not see an image press the input select button and ensure the correct input source is selected If you still do not see an image see Troubleshooting your monitor Organizing Your Cables After attaching all necessary cables to your monitor and computer See Connecting Your Monitor for cable attachment use the cable holder to neatly organize all cables as shown ab...

Page 16: ...f the monitor attach the Soundbar aligning the two slots with the two tabs along the bottom rear of the monitor 2 Slide the Soundbar to the left until it snaps into place 3 Connect the power cord from the Soundbar to the Dell Soundbar power connector on the monitor 4 Insert the lime green mini stereo plug from the rear of the Soundbar into the computer s audio output jack Removing the Base ...

Page 17: ...loth or cushion complete the following steps to remove the base 1 Place the monitor on a stable flat table 2 Turn the screw counter clockwise to loosen the base from the riser 3 Detach the base away from the monitor hinge Back to Contents Page ...

Page 18: ...Using the Front Panel Use the buttons on the front of the monitor to adjust the image settings The following table describes the front panel buttons Front panel Button Description A OSD menu Use the Menu button to open and exit the on screen display OSD and exit from menus and sub menus See Using the OSD Menu B Brightness Contrast Use this button for direct access to the Brightness and Contrast co...

Page 19: ...k screen as the monitor automatically adjusts to the current input D Input select Use the Input Select button to select between two different video signals that may be connected to your monitor VGA input DVI D input NOTE The floating Dell Self test Feature Check dialog appears on a black background if the monitor cannot sense a video signal Depending upon the selected input one of the dialogs show...

Page 20: ...ng the OSD Menu NOTE If you change the settings and then either proceed to another menu or exit the OSD menu the monitor automatically saves those changes The changes are also saved if you change the settings and then wait for the OSD menu to disappear 1 Press the Menu button to open the OSD menu and display the main menu Main Menu for Analog VGA Input Main Menu for Digital DVI Input or or ...

Page 21: ...ns according to the indicators on the menu to make your changes 6 Press the button once to return to the main menu to select another option or press the button two or three times to exit from the OSD menu Icon Menu and Submenus Description Brightness Contrast Brightness adjusts the luminance of the backlight Adjust Brightness first then adjust Contrast only if further adjustment is necessary Press...

Page 22: ...play settings for use with your particular setup NOTE In most cases Auto Adjust produces the best image for your configuration NOTE When using DVI source Auto Adjust is not available Input Source Select the right input source that you need If you need input Analog signal select VGA need input Digital signal select DVI D ...

Page 23: ...our monitor Preset Modes Allows you to set the color settings to one of the preset modes In the Graphics mode you can choose one of the following preset modes Standard Multimedia Game Warm Cool sRGB or Custom R G B Standard Allows you to utilize the flat panel s native color format Multimedia suitable for viewing media applications like photo or video clips using your computer Game suitable for pl...

Page 24: ...settings This setting is also the sRGB standard default color space Display Settings Use the Display Settings menu to adjust the image position and sharpness Horizontal Position Allows you to adjust the horizontal position of the image Use the and buttons to move the image horizontally Vertical Position Allows you to adjust the vertical position of the image Use the and buttons to move the image v...

Page 25: ... Sharpness and Reset Display Settings are available Other Settings Use the Other Settings menu to adjust the settings of the OSD such as the location of the OSD the amount of time the menu remains on screen and the rotation of the OSD and so on Language Allows you to choose language of the OSD menu You can choose from English French Spanish German and Japanese NOTE The change only affects the OSD ...

Page 26: ...enu Select Unlock to unlock and allow the user to access and adjust all applicable settings NOTE You can also lock or unlock the OSD by pushing and holding the Menu button for 15 seconds DCC CI Display Data Channel Command Interface allows you to adjust the monitor parameters brightness color balance etc using software applications on your computer You can disable this feature by selecting Disable...

Page 27: ...ng that the monitor is out of synchronization This means that the monitor cannot synchronize with the signal that it receives from the computer Either the signal is too high or too low for the monitor to use See Specifications for the Horizontal and Vertical frequency ranges addressable by this monitor Recommended mode is 1440 X 900 60Hz NOTE The floating Dell Self test Feature Check dialog appear...

Page 28: ...er for your graphics card If you are using a non Dell computer portable or desktop Go to the support site for your computer and download the latest graphic drivers Go to your graphics card website and download the latest graphic drivers Using the Dell Soundbar Optional The Dell Soundbar is a stereo two channel system adaptable to mount on Dell Flat Panel Displays The Soundbar has a rotary volume a...

Page 29: ...Back to Contents Page ...

Page 30: ... below will continuously scroll through the screen or 4 This box also appears during normal system operation if the video cable becomes disconnected or damaged 5 Turn off your monitor and reconnect the video cable then turn on both your computer and the monitor If your monitor screen remains blank after you use the previous procedure check your video controller and computer because your monitor is...

Page 31: ...table contains general information about common monitor problems you might encounter and the possible solutions Common Symptoms What You Experience Possible Solutions No Video Power LED off No picture Ensure that the video cable connecting the monitor and the computer is properly connected and secure Verify that the power outlet is functioning properly using any other electrical equipment Ensure t...

Page 32: ...tings Perform monitor self test feature check to determine if the intermittent problem occurs in self test mode Missing Color Picture missing color Perform monitor self test feature check Ensure that the video cable connecting the monitor to the computer is connected properly and is secure Check for bent or broken pins in the video cable connector Wrong Color Picture color not good Change the Colo...

Page 33: ...rm that the audio line in plug is completely inserted into the jack of the sound card Set all Windows volume controls to their midpoints Decrease the volume of the audio application Turn the Power Volume knob on the Soundbar counter clockwise to a lower volume setting Clean and reseat the audio line in plug Troubleshoot the computer s sound card Test the Soundbar using another audio source i e por...

Page 34: ...ELL 800 999 3355 NOTE If you do not have an active Internet connection you can find contact information on your purchase invoice packing slip bill or Dell product catalog Dell provides several online and telephone based support and service options Availability varies by country and product and more services may not be available in your area To contact Dell for sales technical support or customer s...

Reviews: