background image

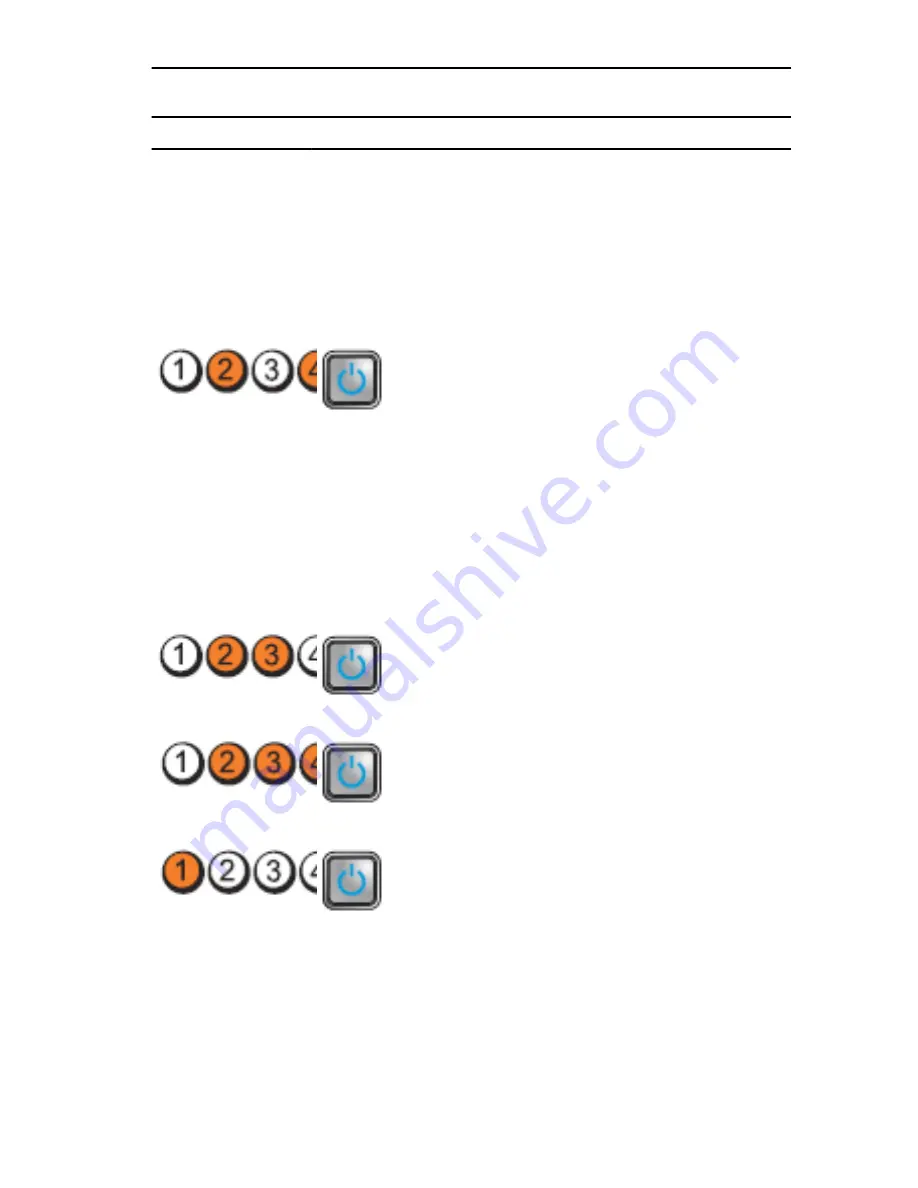
Light Pattern

Problem Description

Troubleshooting 

Steps

Diagnostic LEDs

Power Button LED

reinstalled all 

modules without 

error.

If available, 

install working 

memory of the 

same type into 

your computer.

A possible graphics 
card failure has 
occurred.

Ensure that the 

display/monitor 

is plugged into a 

discrete graphic 

card.

Re-seat any 

installed 

graphics cards.

If available, 

install a working 

graphics card 

into your 

computer.

A possible floppy 
drive or hard drive 
failure has 
occurred.

Re-seat all power 
and data cables.

A possible USB 
failure has occurred

Re-install all USB 
devices and check 
all cable 
connections.

No memory modules 
are detected.

If two or more 

memory 

modules are 

installed, 

remove the 

modules, then 

reinstall one 

module and 

restart the 

computer. If the 

computer starts 

71

Summary of Contents for Precision T1600

Page 1: ...Dell Precision T1600 Service Manual Regulatory Model D09M Regulatory Type D09M001 ...

Page 2: ...registered trademarks or trademarks of Intel Corporation in the U S and other countries AMD is a registered trademark and AMD Opteron AMD Phenom AMD Sempron AMD Athlon ATI Radeon and ATI FirePro are trademarks of Advanced Micro Devices Inc Microsoft Windows MS DOS Windows Vista the Windows Vista start button and Office Outlook are either trademarks or registered trademarks of Microsoft Corporation...

Page 3: ...ver 12 3 Front Bezel 13 Removing The Front Bezel 13 Installing The Front Bezel 14 4 Expansion Card Tab 15 Removing The Expansion Card 15 Installing The Expansion Card 17 5 Optical Drive 19 Removing The Optical Drive 19 Installing The Optical Drive 20 6 Hard Drive 21 Removing The Hard Drive 21 Installing The Hard Drive 22 7 Memory 23 Removing The Memory 23 Installing The Memory 24 8 Chassis Intrusi...

Page 4: ...Battery 33 Installing The Coin Cell Battery 34 12 Power Switch Cable 35 Removing The Power Switch Cable 35 Installing The Power Switch Cable 36 13 Front Thermal Sensor 39 Removing The Front Thermal Sensor 39 Installing The Front Thermal Sensor 40 14 System Fan 41 Removing The System Fan 41 Installing The System Fan 42 15 Input Output Panel 43 Removing The Input Output Panel 43 Installing The Input...

Page 5: ...tup 53 Boot Menu 53 Boot Menu Enhancements 53 Timing Key Sequences 54 Beep Codes And Text Error Messages 55 Navigation 55 System Setup Options 55 19 Troubleshooting 65 Diagnostic LEDs 65 Beep Codes 74 Error Messages 76 20 Specifications 81 Technical Specifications 81 21 Contacting Dell 89 Contacting Dell 89 ...

Page 6: ...6 ...

Page 7: ...cumentation or as directed by the online or telephone service and support team Damage due to servicing that is not authorized by Dell is not covered by your warranty Read and follow the safety instructions that came with the product CAUTION To avoid electrostatic discharge ground yourself by using a wrist grounding strap or by periodically touching an unpainted metal surface such as a connector on...

Page 8: ...d the power button while the computer is unplugged to ground the system board 6 Remove the cover CAUTION Before touching anything inside your computer ground yourself by touching an unpainted metal surface such as the metal at the back of the computer While you work periodically touch an unpainted metal surface to dissipate static electricity which could harm internal components Recommended Tools ...

Page 9: ...ou shut down your operating system press and hold the power button for about 6 seconds to turn them off After Working Inside Your Computer After you complete any replacement procedure ensure you connect any external devices cards and cables before turning on your computer 1 Replace the cover CAUTION To connect a network cable first plug the cable into the network device and then plug it into the c...

Page 10: ...10 ...

Page 11: ...low the procedures in Before Working Inside Your Computer 2 Pull up the cover release latch at the side of the computer 3 Lift the cover upward to a 45 degree angle and remove it from the computer Related Links Installing The Cover 11 ...

Page 12: ...nstalling The Cover 1 Place the cover on the computer 2 Press down on the cover till it clicks into place 3 Follow the procedures in After Working Inside Your Computer Related Links Removing The Cover 12 ...

Page 13: ... Computer 2 Remove the Cover 3 Gently pry the front bezel retention clips away from the chassis located at the side edge of front bezel 4 Rotate the bezel away from the computer to release the hooks on the opposite edge of the bezel from the chassis Related Links Installing The Front Bezel 13 ...

Page 14: ...t bezel into the slots on the chassis front 2 Rotate the bezel toward the computer to engage the four front bezel retention clips until they click into place 3 Install the Cover 4 Follow the procedures in After Working Inside Your Computer Related Links Removing The Front Bezel 14 ...

Page 15: ...lease tab on the card retention latch outward 4 Gently pull the release lever away from the PCIe x16 card until you release the securing tab from the dent in the card Then ease the card up and out of its connector and remove it from the system 5 Lift the PCIe x1 expansion card if any up and out of its connector and remove it from the system 15 ...

Page 16: ...nsion card if any up and out of its connector and remove it from the system 7 Lift the PCI x4 expansion card if any up and out of its connector and remove it from the system Related Links Installing The Expansion Card 16 ...

Page 17: ... securely in place 3 Insert the PCIe x1 card into the connector on the system board and press down until it is securely in place 4 Insert the PCIe x16 card into the connector on the system board and press down until it is securely in place 5 Press the retention tab on the card retention latch downwards 6 Install the Cover 7 Follow the procedures in After Working Inside Your Computer Related Links ...

Page 18: ...18 ...

Page 19: ... Cover 3 Remove the Front Bezel 4 Remove the data cable 1 and power cable 2 from the back of the optical drive 5 Slide down the optical drive latch and then push the optical drive from the back toward the front of the computer 6 Repeat steps four and five to remove the second optical drive if available Related Links 19 ...

Page 20: ...hen push the optical drive from the front toward the back of the computer 2 Connect the data cable and power cable to the back of the optical drive 3 Install the Front Bezel 4 Install the Cover 5 Follow the procedures in After Working Inside Your Computer Related Links Removing The Optical Drive 20 ...

Page 21: ...e Your Computer 2 Remove the Cover 3 Remove the data cable 1 and power cable 2 from the back of the hard drive 4 Press both blue securing bracket tabs inward and lift the hard drive bracket out of the bay 5 Flex the hard drive bracket and then remove the hard drive from the bracket 21 ...

Page 22: ...bracket and then insert the hard drive into the bracket 2 Press both blue securing bracket tabs inward and slide the hard drive bracket into the bay in the chassis 3 Connect the data cable and power cable to the back of the hard drive 4 Install the Cover 5 Follow the procedures in After Working Inside Your Computer Related Links Removing The Hard Drive 22 ...

Page 23: ...edures in Before Working Inside Your Computer 2 Remove the Cover 3 Press down on the memory retaining tabs on each side of the memory modules 4 Lift the memory modules out of the connectors on the system board Related Links Installing the Memory 23 ...

Page 24: ...he system board Install the memory in the order of A1 B1 A2 B2 2 Press down on the memory modules until the release tabs spring back to secure them in place 3 Install the Cover 4 Follow the procedures in After Working Inside Your Computer Related Links Removing the Memory 24 ...

Page 25: ...llow the procedures in Before Working Inside Your Computer 2 Remove the Cover 3 Disconnect the intrusion cable from system board 4 Slide the intrusion switch toward the chassis bottom and remove it from the chassis Related Links Installing the Intrusion Switch 25 ...

Page 26: ...Switch into the chassis rear and slide it toward the chassis top to secure it 2 Connect the intrusion cable to the system board 3 Install the Cover 4 Follow the procedures in After Working Inside Your Computer Related Links Removing the Intrusion Switch 26 ...

Page 27: ...edures in Before Working Inside Your Computer 2 Remove the Cover 3 Disconnect the speaker cable from the system board 4 Unthread the internal speaker cable from the chassis clip 5 Press down the speaker securing tab and slide the speaker upwards to remove 27 ...

Page 28: ...ker securing tab and slide the speaker downward to secure it 2 Thread the internal speaker cable into the chassis clip 3 Connect the speaker cable to the system board 4 Install the Cover 5 Follow the procedures in After Working Inside Your Computer Related Links Removing the Internal Speaker 28 ...

Page 29: ...nect the heat sink fan assembly cable from the system board 4 Use a Phillips screwdriver to loosen the captive screws securing the heat sink fan assembly to the system board 5 Lift the heat sink fan assembly upward gently and remove it from the system Lay the assembly with the fan facing downward and with the thermal grease facing upward 29 ...

Page 30: ...release lever down and then move it outward to release it from the retention hook that secures it 7 Lift the processor cover 8 Lift the processor to remove it from the socket and place it in antistatic packaging 30 ...

Page 31: ...lever down and then move it inward to secure it with the retention hook 4 Place the heat sink fan assembly into the chassis 5 Use a Phillips screwdriver to tighten the captive screws securing the heat sink fan assembly to the system board 6 Connect the heat sink fan assembly cable to the system board 7 Install the Cover 8 Follow the procedures in After Working Inside Your Computer Related Links Re...

Page 32: ...32 ...

Page 33: ...cedures in Before Working Inside Your Computer 2 Remove the Cover 3 Carefully press the release latch away from the battery to allow the battery to pop up from the socket 4 Lift the coin cell battery out of the computer Related Links Installing the Coin Cell Battery 33 ...

Page 34: ...into the slot on the system board 2 Press the coin cell battery downward until the release latch springs back into place and secures it 3 Install the Cover 4 Follow the procedures in After Working Inside Your Computer Related Links Removing the Coin Cell Battery 34 ...

Page 35: ... Before Working Inside Your Computer 2 Remove the Cover 3 Remove the Front Bezel 4 Remove the Optical Drive 5 Disconnect the power switch cable from the system board 6 Unthread the power switch cable from the chassis clips 7 Unthread the power switch cable from the chassis clip 35 ...

Page 36: ...ower switch cable out through the front of the computer Related Links Installing the Power Switch Cable Installing The Power Switch Cable 1 Slide the power switch cable in through the front of the computer 2 Secure the power switch cable to the chassis 36 ...

Page 37: ...sis clips 4 Connect the power switch cable to the system board 5 Install the Optical Drive 6 Install the Front Bezel 7 Install the Cover 8 Follow the procedures in After Working Inside Your Computer Related Links Removing the Power Switch Cable 37 ...

Page 38: ...38 ...

Page 39: ...w the procedures in Before Working Inside Your Computer 2 Remove the Cover 3 Disconnect the thermal sensor cable from the system board 4 Unthread the thermal sensor cable from the chassis clip 5 Gently pry the thermal sensor away from the chassis front and remove 39 ...

Page 40: ...ly secure the thermal sensor to the chassis front 2 Thread the thermal sensor cable into the chassis clips 3 Connect the thermal sensor cable to the system board 4 Install the Cover 5 Follow the procedures in After Working Inside Your Computer Related Links Removing the Front Thermal Sensor 40 ...

Page 41: ...es in Before Working Inside Your Computer 2 Remove the cover 3 Disconnect the chassis fan cable from the system board 4 Pry and remove the system fan away from the four grommets securing it to the back of the computer Related Links Installing the System Fan 41 ...

Page 42: ... 2 Pass the four grommets through the chassis and slide outward along the groove to secure in place 3 Connect the fan cable to the system board 4 Install the Cover 5 Follow the procedures in After Working Inside Your Computer Related Links Removing the System Fan 42 ...

Page 43: ...e Working Inside Your Computer 2 Remove the Cover 3 Remove the Front Bezel 4 Disconnect the Input output panel and FlyWire cable from the system board 5 Unthread the I O Panel and FlyWire cable from the clip on the computer 6 Remove the screw that secures the I O panel to the computer 43 ...

Page 44: ...7 Slide the I O panel towards the left of the computer to release it 8 Remove the I O panel by routing the cable through the front of the computer Related Links Installing the Input Output Panel 44 ...

Page 45: ... Use a Phillips screwdriver to tighten the single screw securing the Input Output Board to the chassis 4 Thread the Input Output Board FlyWire cable into the chassis clip 5 Connect the Input Output Board FlyWire cable to the system board 6 Install the Front Bezel 7 Install the Cover 8 Follow the procedures in After Working Inside Your Computer Related Links Removing the Input Output Panel 45 ...

Page 46: ...46 ...

Page 47: ...ures in Before Working Inside Your Computer 2 Remove the Cover 3 Disconnect the power cables connected to the hard drive s and optical drive s 4 Unthread the power cables from the clips in the computer 5 Disconnect the 24 pin power cable from the system board 47 ...

Page 48: ...able from the system board 7 Remove the four screws securing the power supply to the back of the computer 8 Push in on the blue release tab beside the power supply 1 and slide the power supply towards the front of the computer 2 48 ...

Page 49: ...er to tighten the screws securing the power supply to the back of the computer 3 Connect the 4 pin power cable to the system board 4 Connect the 24 pin power cable to the system board 5 Thread the power cables into the chassis clips 6 Connect the power cables connected to the hard drives s and optical drive s 7 Install the Cover 8 Follow the procedures in After Working Inside Your Computer Related...

Page 50: ...50 ...

Page 51: ...mputer 2 Remove the Cover 3 Remove the Front Bezel 4 Remove the Expansion Card 5 Remove the heat sink and processor 6 Disconnect all the cables connected to the system board 7 Remove the screws that secure the system board to the computer 8 Slide the system board towards the front of the computer 51 ...

Page 52: ...ort connectors on the rear of the chassis and place the system board in the chassis 2 Tighten the screws securing the system board to the chassis 3 Connect the cables to the system board 4 Install the Heat sink and Processor 5 Install the Expansion Card 6 Install the Front Bezel 7 Install the Cover 8 Follow the procedures in After Working Inside Your Computer Related Links Removing the System Boar...

Page 53: ... floppy CD ROM or hard drive Keystroke Function Ctrl Alt F8 One time boot and diagnostics utility menu F12 One time boot and diagnostics utility menu Boot Menu Enhancements The boot menu enhancements introduced on previous platforms are as follows Easier access Although the Ctrl Alt F8 keystroke still exists and can be used to call up the menu simply press F12 during system boot to access the menu...

Page 54: ...the current boot it has the added benefit of not requiring the technician to restore the customer s boot order after completing troubleshooting Timing Key Sequences The keyboard is not the first device initialized by Setup As a result if you press a keystroke too early you lock out the keyboard When this happens a keyboard error message appears on the monitor and you cannot restart the system with...

Page 55: ...d contact Dell Technical Support The blank is filled with a SmartVu code To research the code given search for the phrase SMVU codes in the Dell Knowledge Base These codes are only meant to be indicators perform thorough troubleshooting before replacing components Navigation The system setup can be navigated by either the keyboard or the mouse Use the following keystrokes to navigate the BIOS scre...

Page 56: ...echnology PCI Information Displays SLOT1 SLOT2 SLOT3 SLOT4 Device Information Displays SATA 0 SATA 1 SATA 2 SATA 3 and LOM MAC Address Boot Sequence Specifies the order in which the computer attempts to find an operating system from the devices specified in this list USB Storage Device CD DVD CD RW Drive Onboard NIC SATA Date Time Displays current date and time settings Changes to the system date ...

Page 57: ... every boot Legacy The hard drive controller is configured for legacy mode NOTE Legacy mode provides for compatibility with some older operating systems that do not support native resources assigned to the drive controller RAID Mode is incompatible with ImageServer Please disable RAID mode if enabling ImageServer Drives These fields let you enable or disable various drives on board SATA 0 SATA 1 S...

Page 58: ... in video controller Onboard PEG Use the integrated video controller unless a Graphic card is installed A PCI Express Graphic PEG card will override and disable the integrated video controller Security Strong Password This field enforces strong passwords If enabled all passwords must contain at least one uppercase character one lowercase character and be at least 8 characters long Enabling this fe...

Page 59: ...ting system You can set the TPM Security to Deactivate Disable Activate NOTE When the TPM security is set to Clear the system setup program clears the owner information stored in the TPM Use this setting to restore the TPM to its default state if you lose or forget the owner authentication data Computrace This field lets you Activate or Disable the BIOS module interface of the optional Computrace ...

Page 60: ...nes whether users are able to enter Option ROM Configuration screens via hotkeys during boot Specifically these settings are capable of preventing access to Intel RAID CTRL I or Intel Management Engine BIOS Extension CTRL P F12 Enable User may enter OROM configuration screens via the hotkey One Time Enable User may enter OROM configuration screens via the hotkeys on next boot only After next boot ...

Page 61: ...essor Standard CPUID Function will support Some operating systems will not complete installation when the maximum CPUID Function supported is greater than 3 This option is disabled by default Hyper Thread Control This option enables or disables the Hyper Threading Technology When disabled only one thread per enabled core is enabled This option is enabled by default Power Management AC Recovery Det...

Page 62: ...by default POST Behavior Numlock LED Enables or disables the Numlock feature when your computer starts When enabled default this option activates the numeric and mathematical features shown at the top of each key When disabled this option activates the cursor control functions labeled on the bottom of each key Keyboard Errors Enables or disables keyboard error reporting when the computer starts Th...

Page 63: ...ualization Technology and Virtualization Technology for Direct I O must be enabled to use this feature Enable Intel Trusted Execution Technology This option is disabled by default Maintenance Service Tag Displays the Service Tag of your computer Asset Tag Allows you to create a system asset tag if an asset tag is not already set This option is not set by default SERR Messages Controls the SERR mes...

Page 64: ...System Logs BIOS Progress Events Displays the BIOS Progress event log 64 ...

Page 65: ...tem now includes pre POST and POST LEDs in an attempt to help pinpointing a possible problem with the system easier and more accurate NOTE The diagnostic lights will blink when the power button is amber or off and will not blink when it is blue This has no other significance Light Pattern Problem Description Troubleshooting Steps Diagnostic LEDs Power Button LED The computer is either turned off o...

Page 66: ...in power cable and front panel cable are securely connected to the system board A possible system board failure has occurred Unplug the computer Allow one minute for the power to drain Plug the computer into a working electrical outlet and press the power button A possible system board power supply or peripheral failure has occurred Power off computer leaving the computer plugged in Press and hold...

Page 67: ...the power supply test button If it illuminates there could be a problem with a peripheral If the LED still does not illuminate remove the PSU connections from the system board then press and hold the power supply button If it illuminates there could be a problem with the system board If the LED still does not illuminate the problem is with the power supply Memory modules are detected but a memory ...

Page 68: ...or reinstalled all modules without error If only one memory module is installed try moving it to a different DIMM connector and re start the computer If available install verified working memory of the same type into your computer A possible CPU or system board failure has occurred Replace the CPU with a known good CPU If the computer still fails to boot inspect the CPU socket for damage BIOS may ...

Page 69: ...operly Re seat the 2x2 power connector from the power supply unit Possible peripheral card or system board failure has occurred Remove all peripheral cards from the PCI and PCI E slots and re start the computer If the computer boots add the peripheral cards back one by one until you find the bad one A possible system board failure has occurred Disconnect all internal and external peripherals and r...

Page 70: ...puter successfully boots to the operating system Ensure that the display is connected and powered on A possible processor failure has occurred Re seat the processor Memory modules are detected but a memory failure has occurred If two or more memory modules are installed remove the modules see your service manual then re install one module see your service manual and re start the computer If the co...

Page 71: ... into a discrete graphic card Re seat any installed graphics cards If available install a working graphics card into your computer A possible floppy drive or hard drive failure has occurred Re seat all power and data cables A possible USB failure has occurred Re install all USB devices and check all cable connections No memory modules are detected If two or more memory modules are installed remove...

Page 72: ...to your computer Memory modules are detected but a memory configuration or compatibility error has occurred Ensure that no special requirements for memory module connector placement exist Ensure that the memory you are using is supported by your computer A possible expansion card failure has occurred Determine if a conflict exists by removing an expansion card not a graphics card and restarting th...

Page 73: ...ble system board resource and or hardware failure has occurred Clear CMOS Disconnect all internal and external peripherals and restart the computer If the computer boots add the peripheral cards back one by one until you find the bad one If the problem persists the system board system board component is faulty Some other failure has occurred Ensure that the display monitor is plugged into a discre...

Page 74: ...rive check system setup to ensure the boot sequence is correct for the devices installed on your computer Beep Codes The system can emit a series of beeps during start up if the display cannot show errors or problems These series of beeps called beep codes identify various problems The delay between each beep is 300 ms the delay between each set of beeps is 3 sec and the beep sound lasts 300 ms Af...

Page 75: ...failure 3 1 4 Slave interrupt mask register failure 3 2 2 Interrupt vector loading failure 3 2 4 Keyboard Controller Test failure 3 3 1 NVRAM power loss 3 3 2 NVRAM configuration 3 3 4 Video Memory Test failure 3 4 1 Screen initialization failure 3 4 2 een retrace failure 3 4 3 Search for video ROM failure 4 2 1 No time tick 4 2 2 Shutdown failure 4 2 3 Gate A20 failure 4 2 4 Unexpected interrupt ...

Page 76: ...jumper has been set and AMT Management features are disabled until it is removed Attachment failed to respond The floppy or hard drive controller cannot send data to the associated drive Bad command or file name Ensure that you have spelled the command correctly put spaces in the proper place and used the correct pathname Bad error correction code ECC on disk read The floppy or hard drive controll...

Page 77: ...s and if necessary replace them General failure The operating system is unable to carry out the command This message is usually followed by specific information for example Printer out of paper Take the appropriate action to resolve the problem Hard disk drive configuration error The hard drive failed initialization Hard disk drive controller failure The hard drive failed initialization Hard disk ...

Page 78: ...essary replace them Memory write read failure at address read value expecting value A memory module may be faulty or improperly seated Reinstall the memory modules and if necessary replace them Memory size in CMOS invalid The amount of memory recorded in the computer configuration information does not match the memory installed in the computer Memory tests terminated by keystroke A keystroke inter...

Page 79: ... chip on the system board might be malfunctioning Time of day clock stopped The battery might be dead Time of day not set please run the System Setup program The time or date stored in System Setup does not match the computer clock Timer chip counter 2 failed A chip on the system board may be malfunctioning Unexpected interrupt in protected mode The keyboard controller may be malfunctioning or a m...

Page 80: ...e the drive from the computer Write fault The operating system cannot write to the floppy or hard drive Write fault on selected drive The operating system cannot write to the floppy or hard drive X is not accessible The device is not ready The floppy drive cannot read the disk Insert a floppy disk into the drive and try again 80 ...

Page 81: ...and Support and then select the option to view information about your computer Processor Processor type Intel Core i3 series Intel Core i5 series Intel Core i7 series Intel Xeon E3 1200 series Total Cache Up to 8 MB cache depending on processor type Memory Type DDR3 Speed 1333 MHz Connectors four DIMM slots Capacity 1 GB 2 GB 4 GB and 8 GB Minimum Memory 1 GB Maximum memory 32 GB 81 ...

Page 82: ...ion System Chipset Intel C206 Series Express Chipset DMA Channels two 82C37 DMA controllers with seven independently programmable channels Interrupt Levels Integrated I O APIC capability with 24 interrupts BIOS Chip NVRAM 80 MB 10 MB Expansion Bus Bus Type PCI 2 3 PCI Express 2 0 SATA 3 0 and 2 0 USB 2 0 Bus Speed PCI Express x1 slot bidirectional speed 500 MB s x16 slot bidirectional speed 16 GB ...

Page 83: ...dio Back Panel two connectors for line out and line in microphone Front Panel two connectors for microphone and headphone Network Adapter one RJ45 connector Serial one 9 pin connector 16550C compatible Parallel one 25 pin connector optional for mini tower USB 2 0 Front Panel four Back Pane six Video 15 pin VGA connector 20 pin DisplayPort connector NOTE Available video connectors may vary based on...

Page 84: ... one PCI Express lane and one USB interface none Serial ATA four 7 pin connectors Memory four 240 pin connectors Internal USB one 10 pin connector System Fan one 5 pin connector Front panel control one 34 pin and one 5 pin connector Thermal Sensor one 2 pin connector Processor one 1155 pin connector Processor Fan one 5 pin connector Service mode jumper one 2 pin connector Password clear jumper one...

Page 85: ...the computer is reading data from or writing data to the hard drive Diagnostic lights Four lights located on the front panel of the computer For more information on the diagnostic lights see the Service Manual at support dell com manuals Back of the computer Link integrity light on integrated network adapter green a good 10 Mbps connection exists between the network and the computer orange a good ...

Page 86: ...he system power supply voltage is within specification the self test LED lights up If the LED does not light up the power supply may be defective AC power must be connected during this test Power Wattage Maximum Heat Dissipation Voltage 265 W 1390 BTU hr 100 VAC to 240 VAC 50 Hz to 60 Hz 5 0 A Coin cell battery 3 V CR2032 lithium coin cell NOTE Heat dissipation is calculated by using the power sup...

Page 87: ...Relative humidity maximum Operating 20 to 80 non condensing Storage 5 to 95 non condensing Maximum vibration Operating 0 26 GRMS Storage 2 2 GRMS Maximum shock Operating 40 G Storage 105 G Altitude Operating 140 G Storage 163 G Airborne contaminant level G1 or lower as defined by ANSI ISA S71 04 1985 87 ...

Page 88: ...88 ...

Page 89: ...hone based support and service options Availability varies by country and product and some services may not be available in your area To contact Dell for sales technical support or customer service issues 1 Visit dell com support 2 Select your support category 3 Verify your country or region in the Choose a Country Region drop down menu at the top of page 4 Select the appropriate service or suppor...

Reviews: