background image

8

Dell PowerVault 56F Systems Rack Installation Guide

2.

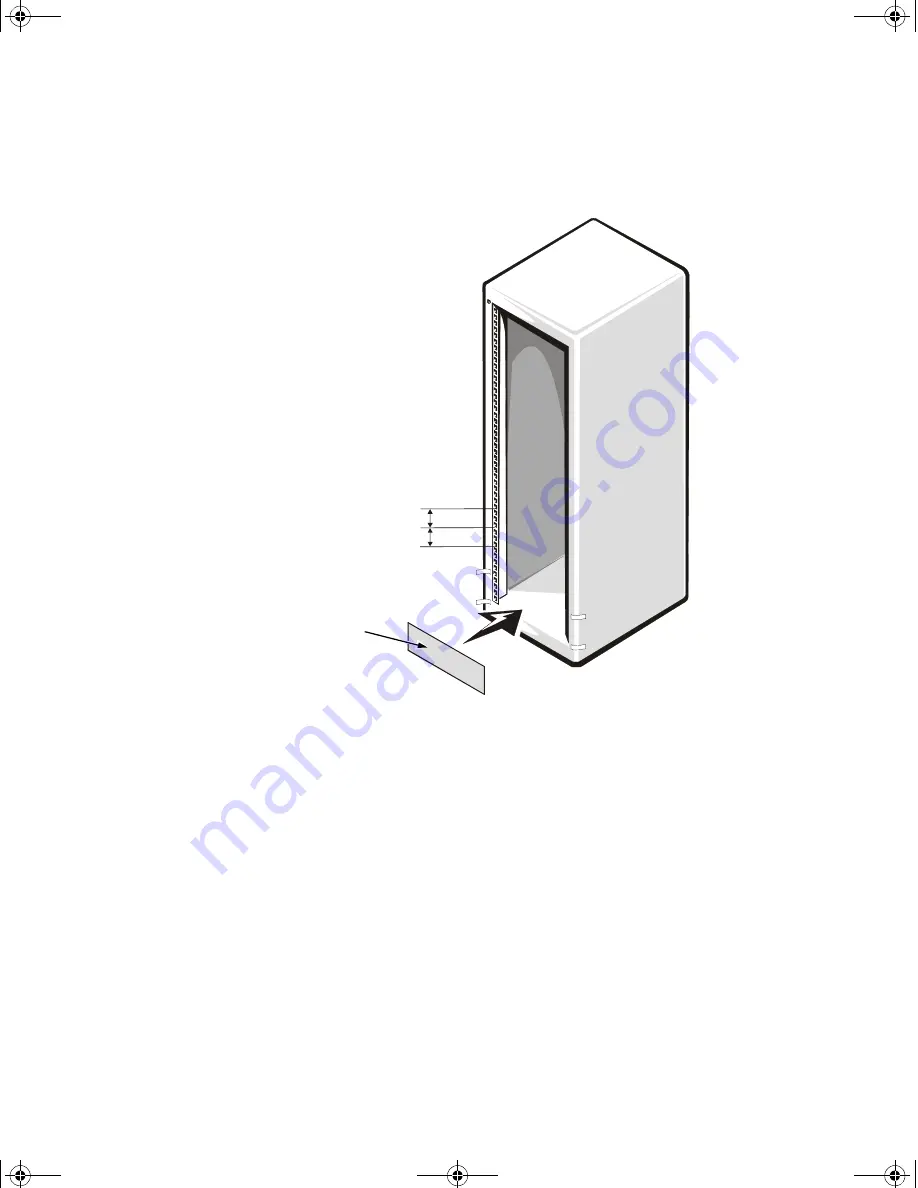
Mark the rack’s front vertical rails with a felt-tipped marker or place self-adhesive 
masking tape where the switch’s upper and lower edges will be located (see Fig-
ure 7). Make a mark or place tape on the vertical rails next to the template’s 
V-shaped notches.

# $%&'%%

3.

At the front of the rack cabinet, position one of the slide assemblies so that its 
fixed mounting bracket flange fits between the marks or tape you placed on the 
rack, marking the upper and lower edges of the template. The hooks on the 
mounting bracket should align with the marks you made from the V-shaped 
notches in the template.

4.

Align the slide-assembly mounting-bracket flange (on the front of the slide 
assembly) with the square holes in the front vertical rail (see Figure 8).

template

2 U (3.5 inches) between 
slide assemblies 
(drawing is not to scale)

886nceb0.book  Page 8  Friday, April 14, 2000  9:37 AM

Summary of Contents for PowerVault 50F

Page 1: ... 886nceb0 book Page 3 Friday April 14 2000 9 37 AM ...

Page 2: ... Trademarks used in this text Dell the DELL logo and PowerVault are trademarks of Dell Computer Corporation Other trademarks and trade names may be used in this document to refer to either the entities claiming the marks and names or their products Dell Computer Corporation disclaims any proprietary interest in trademarks and trade names other than its own April 2000 P N 886NC Rev A00 886nceb0 boo...

Page 3: ... may be accompanied by an icon and printed in bold type or in italic type These blocks are notes notices cautions and warnings and they are used as follows NOTE A NOTE indicates important information that helps you make better use of your computer system Observe the following caution and warnings while servicing this system 0 1 2 3 0 04 0 2 886nceb0 book Page v Friday April 14 2000 9 37 AM ...

Page 4: ...em documentation Opening or removing covers that are marked with the triangular symbol with a lightning bolt may expose you to electrical shock Components inside these compartments should be serviced only by a Dell authorized service technician If any of the following conditions occur unplug the product from the electrical outlet and replace the part or contact your Dell authorized service provide...

Page 5: ...countries such as South Korea and Taiwan 100 V 50 Hz in eastern Japan and 100 V 60 Hz in western Japan 230 V 50 Hz in most of Europe the Middle East and the Far East Also be sure that your monitor and attached devices are electrically rated to oper ate with the power available in your location Use only approved power cable s If you have not been provided with a power cable for your server storage ...

Page 6: ... open or ser vice batteries replace batteries only with batteries designated for the product Turn down the volume before using headphones or other audio devices Observe the following additional safety guidelines for your system Unless your installation and or troubleshooting documentation specifically allows it do not remove enclosure covers attempt to override the safety interlocks or access any ...

Page 7: ...ions of a Dell rack Do not move large racks by yourself Due to the height and weight of the rack Dell recommends a minimum of two people to accomplish this task Before working on the rack make sure that the stabilizers are secure to the rack extend to the floor and that the full weight of the rack rests on the floor Install front and side stabilizers on a single rack or front stabilizers for joine...

Page 8: ...following precautions for laser devices Do not open any panels operate controls make adjustments or perform proce dures on a laser device other than those specified in the product s documentation Only authorized service technicians should repair laser devices Before you remove the computer covers perform the following steps in the sequence indicated 8 1 Turn off your computer and any devices 2 Gro...

Page 9: ... delicate components inside your computer To prevent static damage discharge static electricity from your body before you touch any of your computer s electronic components such as the microprocessor You can do so by touching an unpainted metal surface on the computer chassis As you continue to work inside the computer periodically touch an unpainted metal surface to remove any static charge your ...

Page 10: ...nd the curtains or blinds on nearby windows to minimize reflections and glare on the monitor screen Use a chair that provides good lower back support Keep your forearms horizontal with your wrists in a neutral comfortable position while you use the keyboard or mouse Always leave space to rest your hands while you use the keyboard or mouse Let your upper arms hang naturally at your sides Sit erect ...

Page 11: ...r screen at or below eye level 2 Wrists relaxed and flat 3 Arms at desk level 4 Feet flat on the floor 5 Monitor and keyboard positioned directly in front of user 886nceb0 book Page xiii Friday April 14 2000 9 37 AM ...

Page 12: ...xiv 886nceb0 book Page xiv Friday April 14 2000 9 37 AM ...

Page 13: ...re 1 Rack Kit Contents 2 Figure 2 Opening the 24 U Rack Cabinet Front Door Latch 3 Figure 3 Opening the 42 U Rack Cabinet Front Door Latch 4 Figure 4 Removing the 24 U Rack Cabinet Doors 5 Figure 5 Removing the 42 U Rack Cabinet Doors 6 Figure 6 One Rack Unit 7 Figure 7 Using Template to Mark Vertical Rails 8 Figure 8 Installing the Switch Slide Assemblies 9 Figure 9 Installing the Manifold 10 886...

Page 14: ...xvi 886nceb0 book Page xvi Friday April 14 2000 9 37 AM ...

Page 15: ...kit is required for each PowerVault switch installation The PowerVault 56F switch includes the following items to be installed into the rack see Figure 1 One pair of slide assemblies One template One PowerVault 56F Manifold One PowerVault 56F 16 Port Fibre Channel Switch NOTE If you purchased a Dell rack along with your PowerVault switch the slide assemblies may be preinstalled in the rack 886nceb...

Page 16: ... install the rack kit and the PowerVault 56F switch you will need the following items An installation template helpful in slide assembly placement and alignment Masking tape or a felt tip pen for use in marking the mounting holes to be used A Phillips 2 screwdriver slide assemblies manifold PowerVault 56F 16 Port Fibre Channel Switch 886nceb0 book Page 2 Friday April 14 2000 9 37 AM ...

Page 17: ...tall the slide assemblies in the rack The subsections that follow include instructions for performing these tasks You must remove the doors from the rack to provide access to the interior of the rack and to prevent damage to the doors while installing the switch To remove the doors perform the following steps 1 Open the latch on the front door If you have a 24 U 1 U 1 75 inches rack cabinet unlock...

Page 18: ...rack cabinet slide the latch s push button cover up as far as it will go press the push button rotate the handle clockwise until the latch releases and then pull the door open see Figure 3 push button push button cover handle 886nceb0 book Page 4 Friday April 14 2000 9 37 AM ...

Page 19: ...move the front door of the rack If you have a 24 U rack cabinet perform the following steps see Figure 4 a With the door open lift out and fully retract all hinge pins b Lift the door out carefully hinge insert hinge pin hinge 886nceb0 book Page 5 Friday April 14 2000 9 37 AM ...

Page 20: ...the door should press the release lever on the bottom hinge and then pull the bottom of the door away from the rack cabinet a few inches c The person holding the top of the door should press the release lever on the top hinge and then pull the door away from the rack Repeat steps 1 and 2 to remove the back door from the rack Store the doors in an area where they will not fall over while you instal...

Page 21: ...able on the Dell Web site at http support dell com To install the slide assemblies in the rack perform the following steps NOTE Each slide assembly has a fixed non adjustable and floating adjustable mounting bracket When installing the slide assemblies in the rack make sure that the fixed mounting bracket is mounted at the front of the rack otherwise you will not be able to install the switch 1 Pl...

Page 22: ... one of the slide assemblies so that its fixed mounting bracket flange fits between the marks or tape you placed on the rack marking the upper and lower edges of the template The hooks on the mounting bracket should align with the marks you made from the V shaped notches in the template 4 Align the slide assembly mounting bracket flange on the front of the slide assembly with the square holes in t...

Page 23: ... and the push button clicks and pops out 6 Push back on the floating slide assembly mounting bracket flange until the mounting tabs lock into the square holes on the back vertical rail 7 Repeat steps 1 through 6 for the remaining slide assembly on the other side of the rack vertical rail slide assembly slide rail switch 886nceb0 book Page 9 Friday April 14 2000 9 37 AM ...

Page 24: ...es on the rack see Figure 8 2 Slide the switch into the rack until both latch assemblies snap into place 3 Lift the manifold the component that attaches to the front of the switch and align its rails to fit inside the slide assemblies on the rack see Figure 9 4 Slide the manifold into the rack 5 Tighten the thumbscrews on the front of the manifold 6 Connect the cabling and power cords to the back ...

Page 25: ... Figure 2 5 Repeat steps 1 through 4 to replace the back door To replace the 42 U rack s front and back doors perform the following steps 1 Lift the front door into position and align the hinges with the holes in the rack as shown in Figure 5 2 Slide the hinges into the holes in the rack until the hinge release levers lock the hinges into position 3 Verify that the hinges are latched 4 Close the d...

Page 26: ...12 Dell PowerVault 56F Systems Rack Installation Guide 886nceb0 book Page 12 Friday April 14 2000 9 37 AM ...

Page 27: ...ifold into rack 10 rack kit 3 slide assemblies 7 switch 10 kit contents illustrated 2 list of 1 manifold illustrated 2 installing into rack 10 notational conventions v rack doors opening latch 3 4 removing 3 5 6 rack kit contents illustrated 2 list of 1 rack kit installation slide assemblies 7 rack unit 7 removing the rack doors 3 886nceb0 book Page 1 Friday April 14 2000 9 37 AM ...

Page 28: ...D xi health considerations xii slide assemblies illustrated 2 installing into rack 7 switch illustrated 2 installing in rack 10 installing slide assemblies 9 template 2 8 tools recommended 2 vertical rails marking 8 one rack unit 7 warnings v 886nceb0 book Page 2 Friday April 14 2000 9 37 AM ...

Reviews: