


Rack Installation Guide
1-17
7
Connect the power cables to their receptacles on the system back panel.
NOTE:
Use the strain-relief loop (if available) on the back of the system to provide strain relief for
the power cables.
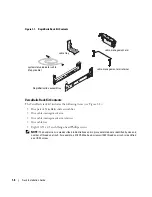
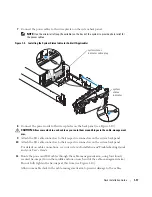
Figure 1-9.
Installing the System Status Indicator Cable (If Applicable)
8
Connect the power cords to their receptacles on the back panel (see Figure 1-10).
CAUTION:
Allow some slack in each cable as you route them around hinges in the cable-management
arm.
9
Attach the I/O cable connectors to their respective connectors on the system back panel.
10
Attach the I/O cable connectors to their respective connectors on the system back panel.
For details on cable connections, see your system’s
Installation and Troubleshooting Guide
and your
User’s Guide
.
11
Route the power and I/O cables through the cable-management arm, using four loosely
secured tie-wraps (two in the middle and one on each end of the cable-management arm).
Do not fully tighten the tie-wraps at this time (see Figure 1-10).
Allow some cable slack in the cable-management arm to prevent damage to the cables.
system status
indicator cable plug
system
status
indicator
Summary of Contents for PowerEdge 1800
Page 2: ......
Page 3: ...Rack Installation Guide ...
Page 22: ...1 20 Rack Installation Guide ...
Page 24: ...22 Index 1 22 Index ...
Page 25: ...Guide d installation en rack ...
Page 44: ...2 20 Guide d installation en rack ...
Page 46: ...22 Index 2 22 Index ...
Page 47: ...Rack Installationsanleitung ...
Page 68: ...22 Index 3 22 Index ...
Page 69: ...ラック取り付けガイド ...
Page 88: ...4 20 ラック取り付けガイド ...
Page 90: ...22 索引 4 22 索引 ...
Page 91: ...Guía de instalación del rack ...
Page 112: ...22 Índice 5 22 Índice ...


