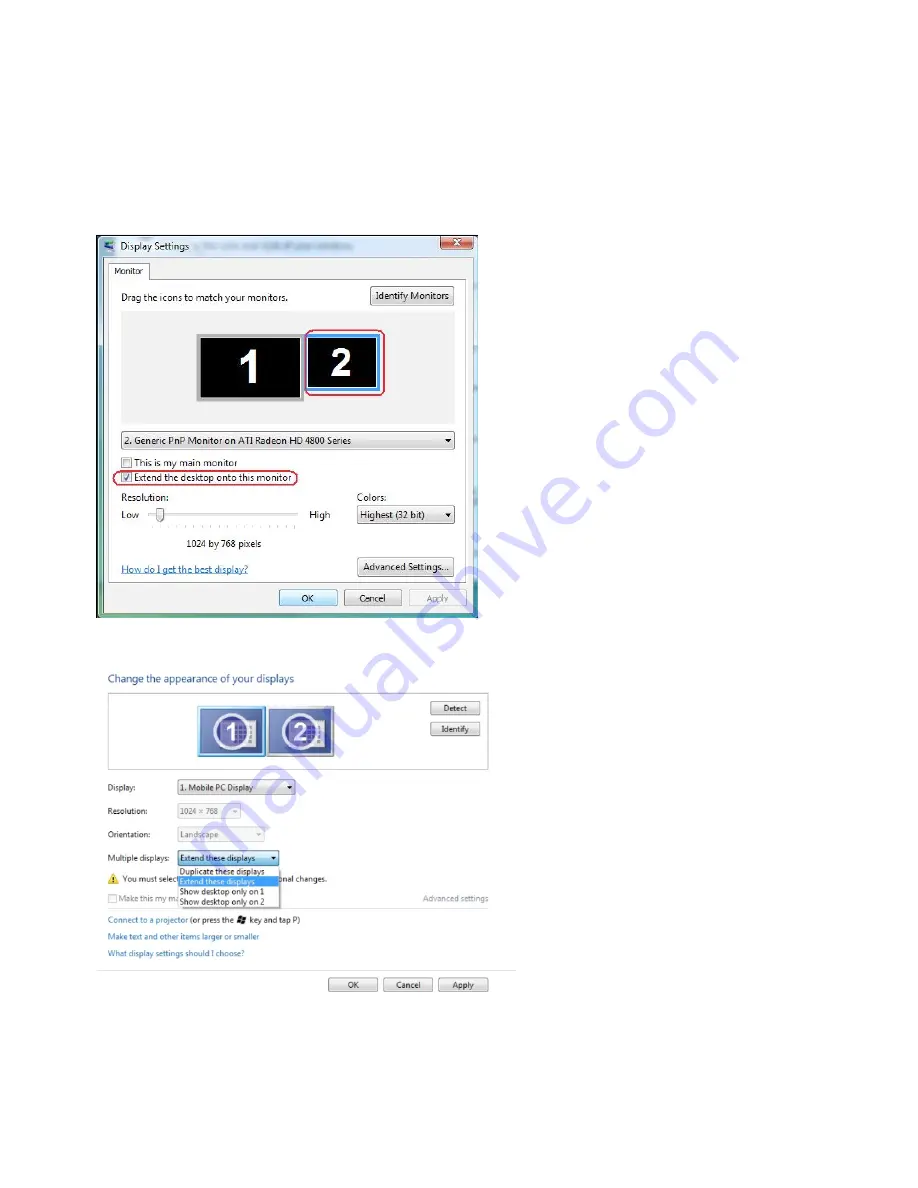
Dell P2314T User Manual Download Page 49

Extend displays 

This option shows separate content on the selected monitors. The resolution of each 
monitor can be set independently. You can set the relative position of the displays. you 
can match the location of the screen relative to the physical placement of the monitors, 
such as left, right, top, bottom, and so on. To set the position, drag the monitor icons to 
the desired position. 

Windows Vista 

Windows 7 

Appendix 

49 

Summary of Contents for P2314T

Page 1: ...User s Guide Dell P2314T Dell P2714T Regulatory model P2314Tt P2714Tt ...

Page 2: ...these materials in any manner whatsoever without the written permission of Dell Inc is strictly forbidden Trademarks used in this text Dell and the DELL logo are trademarks of Dell Inc Microsoft Windows and the Windows start button logo are either trademarks or registered trademarks of Microsoft Corporation in the United States and or other countries Other trademarks and trade names may be used in...

Page 3: ... Quality and Pixel Policy 17 Maintenance Guidelines 17 Setting Up the Monitor 18 Preparing the Stand 18 Connecting Your Monitor 18 Organizing Cables 20 Wall Mounting Optional 20 Operating the Monitor 21 Side Panel Controls 21 Front Panel Button 22 Using the On Screen Display OSD Menu 23 Setting the Maximum Resolution 34 Tilt 34 ...

Page 4: ...39 Product Specific Problems 40 Appendix 41 Safety Instructions 41 FCC Notices U S only and Other Regulatory Information 41 Contacting Dell 41 Setting Display Resolution to 1920 X 1080 maximum 42 Downloading Latest Video Drivers 42 Setting up Dual Monitors 43 Display Styles For Multiple Monitors 48 ...

Page 5: ...missing NOTE Some items may be optional and may not ship with your monitor Some features or media may not be available in certain countries NOTE To set up with any other stand see the documentation for the stand Monitor with stand Power cable varies by country Power adapter HDMI cable USB 3 0 upstream cable enables touch screen function on the monitor About Your Monitor 5 ...

Page 6: ...tions Tilt adjustment capability 10 60 typical Removable pedestal and Video Electronics Standards Association VESA 100 mm mounting holes for flexible mounting solutions Plug and play capability if supported by your computer On Screen Display OSD adjustments for ease of set up and screen optimization Software and documentation media includes an information file INF Image Color Matching file ICM Del...

Page 7: ...ting Wall mount monitor using holes under VESA cover 100 mm x 100 mm VESA compatible wall mount kit 2 Regulatory label Lists the regulatory approvals 3 Service Tag label P2714T only Refer to this label if you need to contact Dell for technical support 4 Barcode serial number label Refer to this label if you need to contact Dell for technical support 5 Cable management slot Use to organize cables b...

Page 8: ... The audio line out port does not support headphones USB upstream port Connect the USB cable from the monitor to the computer to allow you to use the USB ports and touch screen function on the monitor 7 USB 2 0 downstream ports Connect your USB device You can only use this port after you connect the USB cable from your computer to the USB upstream port on the monitor 8 Security cable slot Use a se...

Page 9: ...78 degrees typical Vertical 178 degrees typical Luminance Panel 300 cd m typical Monitor 270 cd m typical Dynamic contrast ratio 8 000 000 1 typical Faceplate coating Antiglare with hard coating 3H Glass gloss 30 gloss units NOTE For displays with edge to edge design consider the placement of the display as the reflection of surrounding light and bright surfaces from the glass may cause disturbanc...

Page 10: ...hin gloves Operating system Windows 8 certified Resolution Horizontal scan range 30 kHz 83 kHz automatic Vertical scan range 56 Hz 75 Hz automatic Maximum resolution 1920 X 1080 at 60 Hz Supported video modes 480p 576p 720p 1080p and 1080i Electrical Video input signals DisplayPort 1 2 HDMI MHL 2 0 VGA Synchronization input Separate horizontal and vertical synchronization signals Polarity free TTL...

Page 11: ...our typical 95 9 BTU hour maximum P2714T 64 8 BTU hour typical Preset Display Modes P2314T Display Mode Horizontal Frequency kHz Vertical Frequency Hz Pixel Clock MHz Sync Polarity Horizontal Vertical 720 x 400 31 5 70 0 28 3 640 x 480 31 5 60 0 25 2 640 x 480 37 5 75 0 31 5 800 x 600 37 9 60 0 40 0 800 x 600 46 9 75 0 49 5 1024 x 768 48 4 60 0 65 0 1024 x 768 60 0 75 0 78 8 1152 x 864 67 5 75 0 1...

Page 12: ...stics P2314T P2714T Connector type D Sub D Sub DisplayPort DisplayPort HDMI MHL HDMI MHL USB USB Signal cable type Dimensions with stand D Sub HDMI MHL DisplayPort USB 3 0 D Sub HDMI MHL DisplayPort USB 3 0 Height extended 216 40 mm 8 52 inches 246 50 mm 9 70 inches Height compressed 412 70 mm 16 25 inches 475 50 mm 18 72 inches Width 569 90 mm 22 44 inches 665 mm 26 18 inches Depth extended 421 3...

Page 13: ...er Save Mode The monitor automatically resumes functioning when it computer detects input from keyboard mouse or other input devices The following table shows the power consumption and signaling of Power Save Mode P2314T VESA Horizontal Vertical Video Power Power Modes Sync Sync Indicator Consumption Normal Active Active Active White 17 W typical operation 26 W maximum Active off Inactive Inactive...

Page 14: ...ive off mode the following message is displayed Pin Assignments VGA Pin number 15 pin side of Pin number 15 pin side of the cable the cable 1 Video Red 9 Computer 5 V 3 3 V 2 Video Green 10 GND sync 3 Video Blue 11 GND 4 GND 12 DDC data 5 Self test 13 H sync 6 GND R 14 V sync 7 GND G 15 DDC clock 8 GND B ...

Page 15: ...DC CLOCK SDA 6 TMDS DATA 1 16 DDC DATA SDA 7 TMDS DATA 0 17 GROUND 8 TMDS DATA 0 SHIELD 18 5 V POWER 9 TMDS DATA 0 19 HOT PLUG DETECT 10 TMDS CLOCK DisplayPort DP Pin Number 20 pin side of the port Pin Number 20 pin side of the port 1 ML0 p 11 GND 2 GND 12 ML3 n 3 ML0 n 13 GND 4 ML1 p 14 GND 5 GND 15 AUX p 6 ML1 n 16 GND 7 ML2 p 17 AUX n 8 GND 18 HPD 9 ML2 n 19 DP_PWR Return 10 ML3 p 20 3 3 V DP_P...

Page 16: ... off the monitor and then turn it on the attached peripherals may take a few seconds to resume normal functionality Transfer speed Data rate Power consumption SuperSpeed 5 Gbps 4 5 W Max each port Hi Speed 480 Mbps 2 5 W Max each port Full speed 12 Mbps 2 5 W Max each port USB upstream port USB 3 0 USB 2 0 downstream port downstream port Pin Signal Pin Signal Pin Signal number name number name num...

Page 17: ...ety instructions before cleaning the monitor WARNING Before cleaning the monitor unplug the monitor power cable from the electrical outlet For best practices follow these instructions while unpacking cleaning or handling your monitor To clean your screen use a soft clean cloth lightly dampened with water You can also use special screen cleaning tissue or solution suitable for the anti static coati...

Page 18: ...lace the monitor upright Connecting Your Monitor WARNING Follow the safety instructions before you perform any of the procedures in this section To connect your monitor to the computer 1 Turn off your computer and disconnect the power cable from the wall outlet 2 Connect the USB cable and only one of the following display cables to your computer VGA cable DisplayPort cable HDMI cable NOTE Do not c...

Page 19: ...rately Connecting the DisplayPort or miniDP cable cable sold separately Connecting the HDMI cable Connecting the USB cable NOTE The graphics used are for illustration purpose only Appearance of the computer may vary Setting Up the Monitor 19 ...

Page 20: ...me with the VESA compatible wall mounting kit 1 Place the monitor on a soft cloth or cushion on a stable flat table 2 Remove the stand 3 Use a screwdriver to remove the four screws that secure the back cover 4 Attach the mounting bracket from the wall mounting kit to the monitor 5 Mount the monitor on the wall by following the instructions that came with the wall mounting kit NOTE For use only wit...

Page 21: ...nge 1 2 3 4 5 The following table describes the front panel buttons Front panel button Description Use this button to choose from a list of preset color modes Shortcut key Preset Modes Use this button to directly access the Brightness Contrast menu Shortcut key Brightness Contrast Use this button to launch the On Screen Display OSD and select options in the OSD See Accessing the Menu System Menu O...

Page 22: ...icates the monitor is on and fully functional Power A blinking breathing white light indicates DPMS with power light indicator power save mode Front Panel Button 1 2 3 Use the buttons on the front of the monitor to adjust the image settings Button Description 1 Use the Up increase and Down decrease keys to adjust items in the OSD menu Up Down Use the OK key to confirm your selection OK Use the Bac...

Page 23: ... use the VGA connector 2 Press the and buttons to move between options As you move from one icon to another the option name is highlighted 3 Press the or button once to activate the highlighted option 4 Press the and buttons to select the desired parameter 5 Press to enter the slide bar and then use the or button according to the indicators on the menu to make your changes 6 Press the button once ...

Page 24: ...imum 0 maximum 100 Press the button to increase brightness Press the button to decrease brightness NOTE Brightness control is disabled during Screen dim in PowerNap option when screen saver is activated Brightness Contrast Press the button to increase contrast and Press the button to decrease contrast between 0 and 100 Adjust Brightness first and then adjust Contrast only if further adjustment is ...

Page 25: ...reen as the monitor automatically adjusts to the current input NOTE In most cases Auto Adjust produces the best image for your configuration NOTE Auto Adjust feature option is only available when your monitor is connected using the VGA cable Use the Input Source menu to select between different video inputs that are be connected to your monitor Input Source VGA Select VGA and press when your compu...

Page 26: ...omputer and HDMI MHL 2 monitor are connecting using the HDMI MHL 2 cable Use the Color Settings menu to adjust the monitor s color settings Color Settings Input Color Format Allows you to set the video input mode to RGB Select this option if your monitor is connected to a computer or DVD player using the VGA and HDMI cable YPbPr Select this option if your DVD player supports only YPbPr output Pres...

Page 27: ...ou to manually adjust the color settings Press the and buttons to adjust the Red Green and Blue values and create your own preset color mode Image Enhance Automatically sharpen images enhance hues and boost color contrast to enhance image clarity NOTE Image Enhance is only available for Standard Multimedia Movie and Game modes Shift color of video image to green or purple Use this setting to achie...

Page 28: ...usts the vertical position of the image Vertical Position Use the and buttons to change the image position Makes the image look sharper or softer Sharpness Use or to adjust the sharpness The Phase and Pixel Clock adjustments allow you to adjust your monitor to your preference Pixel Clock Use the and buttons to adjust for best image quality Phase If satisfactory results are not obtained using the P...

Page 29: ...nd the Energy Use bar decreases For bright scenes the monitor will consume more power and the energy level increases This applies for both Energy smart on or Energy smart turned off System Monitor status On Standby Off USB Monitor with upstream connected On Disabled On Disabled Off Disabled Monitor without upstream connected On Off On depends on OSD selections Off Power Button LED Allows you to se...

Page 30: ...f time the OSD remains active after you press a button Use the and buttons to adjust the slider in 1 second increments from 5 to 60 seconds Timer Controls user access to adjustments When Lock is selected no user adjustments are allowed All buttons are locked NOTE Lock function Either soft lock through OSD menu or hard lock Press and hold the button above power button for 10 sec Unlock function Onl...

Page 31: ...software on your computer Enable this feature for best user experience and optimum performance of your monitor Select Disable to turn off this feature LCD Conditioning Helps reduce minor cases of image retention Depending on the degree of image retention the program may take some time to run Select Enable to start the process Restores other settings such as such as DDC CI to Reset Other Settings f...

Page 32: ... Reset Personalization Restores shortcut keys to factory defaults OSD Warning Messages When the monitor does not support a display resolution the following message appears This means that the monitor cannot synchronize with the signal that it is receiving from the computer See Specifications for the frequency ranges addressable by this monitor Recommended mode is 1920 X 1080 The following message ...

Page 33: ...e OSD If you press any button other than the power button the following message appears If you set the input to a particular mode but the cable for that mode VGA DP or HDMI is disconnected one of the following messages appears depending on the selected input or or For help on resolving errors see Troubleshooting Operating the Monitor 33 ...

Page 34: ...lution and select 1920 X 1080 4 Click OK If you do not see 1920 X 1080 as an option you may need to update your video driver For more information on updating video drivers see Appendix Tilt With the built in stand you can tilt the monitor for the most comfortable viewing angle The monitor can be adjusted 10 degrees to 60 degrees 10 60 typical CAUTION Adjust the tilt by holding the edges of the mon...

Page 35: ...move both the digital white connector and the analog blue connector cables from the back of computer if connected 3 Turn on the monitor If the monitor is working correctly but cannot sense an incoming video signal one of the following messages appear on the screen depending on the selected input The power light remains blue in self test mode or or NOTE This message also appears during normal opera...

Page 36: ...he monitor The monitor enters the self test mode 3 Press and hold button 1 and button 4 simultaneously for 2 seconds A gray screen appears 4 Carefully inspect the screen for abnormalities 5 Press button 4 again The color of the screen changes to red 6 Inspect the display for any abnormalities 7 Repeat step 5 and step 6 to inspect the display in green blue black white and text screens The test is c...

Page 37: ...orts Run the built in diagnostics Make sure the correct input source is selected using the Input Source Select button Perform Auto Adjust using OSD Poor Focus Picture is fuzzy blurry or ghosting Adjust the Phase and Pixel Clock using OSD Eliminate video extension cables Reset the monitor to factory settings Change the video resolution to the correct aspect ratio 16 9 Perform Auto Adjust using OSD ...

Page 38: ...s Run the built in diagnostics Screen is Synchronization scrambled or Problems appears torn Reset the monitor to factory settings Perform Auto Adjust using OSD Adjust Phase and Pixel Clock using OSD Perform monitor self test check to determine if the problem appears in self test mode Check for bent or broken pins on the display cable and the ports Restart the computer in safe mode Make sure the di...

Page 39: ...time Safety Related Visible signs of Do not perform any troubleshooting steps Issues smoke or sparks Contact Dell immediately Touchscreen Problems Specific Symptoms What You Experience Possible Solutions Use the Dell provided USB cable to connect your computer Make sure the power cable has a ground pin Touch report error Touch function miss alignment or no touch function Unplug and replug the powe...

Page 40: ...ns on the front panel OSD does not appear on the screen Turn off the monitor disconnect and reconnect the power cable and turn on the monitor Check the signal source Make sure the computer is not in power saving mode by moving the mouse or pressing a key on the keyboard No input signal when controls are pressed No picture the light is white Make sure your computer or other video output device is p...

Page 41: ...at dell com regulatory_compliance Contacting Dell NOTE If you do not have an active Internet connection you can find contact information on your purchase invoice packing slip bill or Dell product catalog Dell provides several online and telephone based support and service options Availability varies by country and product and some services may not be available in your area To contact Dell for sale...

Page 42: ... right by pressing and holding the left mouse button and adjust the screen resolution to 1920 X 1080 4 Click OK Downloading Latest Video Drivers Dell computer 1 Go to dell com support enter the Service Tag of your computer and download the latest driver for your video card 2 After installing the drivers try setting the resolution to 1920 X 1080 again If you are unable to set the resolution to 1920...

Page 43: ...rivers for your video card try setting the resolution to 1920 X 1080 again If you are unable to set the resolution to 1920 X 1080 contact the manufacturer of your computer or consider purchasing a graphics adapter that supports the resolution of 1920 X 1080 Setting up Dual Monitors Connect the external monitor s to your computer and follow any of the below setup method Using keyboard shortcut 1 Pr...

Page 44: ...sta 1 Right click on the desktop and click Personalize 2 Click Display Settings 3 Click Identify Monitors and select the appropriate options NOTE If your computer does not detect the second monitor restart your computer and repeat step 1 to step 3 ...

Page 45: ...creen resolution 2 Click Multiple displays to choose a display selection If you do not see the additional monitor listed click Detect NOTE If your computer does not detect the second monitor restart your computer and repeat step 1 to step 3 Appendix 45 ...

Page 46: ...46 Appendix Windows 8 1 From the Start screen select Desktop tile to switch to the classic Windows desktop 2 Right click on the desktop and click Screen resolution ...

Page 47: ...displays to choose a display selection If you do not see the additional monitor listed click Detect NOTE If your computer does not detect the second monitor restart your computer and repeat step 1 to step 3 Appendix 47 ...

Page 48: ...s you can choose to duplicate extend or use only one of the monitors Duplicate displays This option shows the same content on all monitors The resolution of all monitors is set to match the monitor with the minimum resolution Windows Vista DUPLICATE NOT AVAILABLE Windows 7 Windows 8 ...

Page 49: ...can be set independently You can set the relative position of the displays you can match the location of the screen relative to the physical placement of the monitors such as left right top bottom and so on To set the position drag the monitor icons to the desired position Windows Vista Windows 7 Appendix 49 ...

Page 50: ... use any one of the monitors connected to your computer or in case of laptop the built in display or the external display This option is generally used when a laptop with a lower resolution display is connected to a higher resolution external display and you want to see the content only on the external monitor Windows Vista ...

Page 51: ...aketut and other Items larger or smaller What dtsplay sett ngs should I choose Change the appearance of your displays D splay 1 1 Mob le PC Otsplay I Resolution 1024 768 Orientation landscape Connectto a proJed Or or press the II key and tap P Make text and other items larger or smaller What display setttngsshould I choose Advanced setbngs Windows 7 Appendix 51 ...

Page 52: ...l Screen Resolution e f lll Appearancelind Personalization Display Scr n Resolution Change the appearanceofyour displays D isplay 2 DEU E2414H Resolution 1366 768 Orientation landKape Multiple displ Show desktop only on 2 v OuplicatethHe di5piJY5 I Youmustal Extt nd thH tdi5piJY5 nalchangt Show dt kto o ly on 1 Maketho smym ProJKI to 1 5e ond 5CfHn or prH5 the Windaw5logo key 11 P Maketext andothe...

Reviews: