Dell P2210H User Manual Download Page 7


Monitor Specifications 

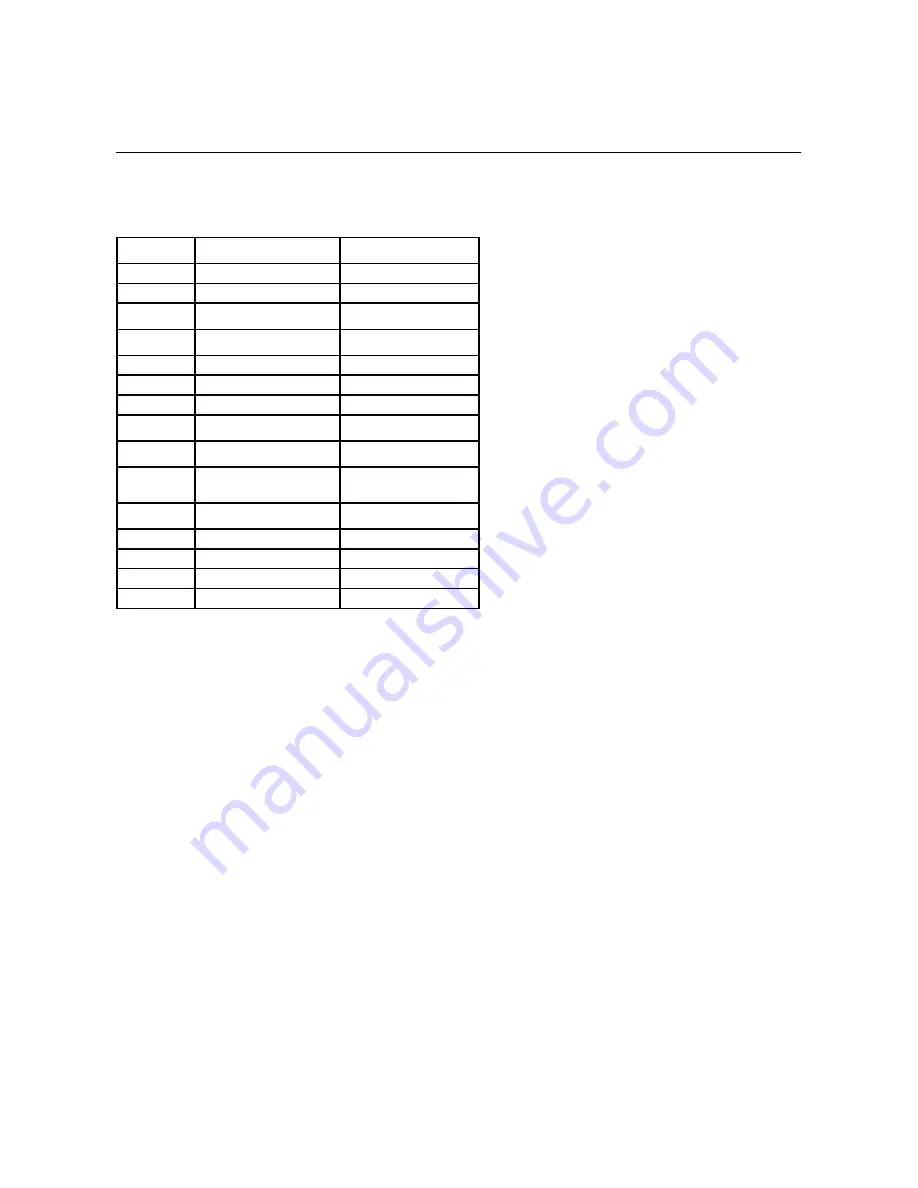
Flat Panel Specifications 

*[P2210H/P2310H] color gamut (typical) is based on CIE1976 (83%) and CIE1931 (72%) test standards.  

Model number

Dell P2210H Flat Panel 
Monitor

Dell P2310H Flat Panel 
Monitor

Screen type

Active matrix - TFT LCD

Active matrix - TFT LCD

Panel type 

TN

TN

Screen 
dimensions

21.5 inches (21.5-inch viewable 
image size)

23 inches (23-inch viewable 
image size)

Preset display 
area

476.64(H)X268.11(V)

509.18(H)X286.41(V)

Horizontal

476.64 mm (18.8 inch)

509.18 mm (20 inches)

Vertical

268.11 mm (10.6 inch)

286.41 mm (11.27 inches)

Pixel pitch

0.248 mm

0.265 mm

Viewing angle

160° (vertical) typical


170° (horizontal) typical


160° (vertical) typical


170° (horizontal) typical


Luminance 
output

250 CD/m

²

(typical)

250 CD/m

²

(typical)

Contrast ratio

1000 to 1 (typical),  
10000 to 1 (typical Dynamic 
Contrast On) 

1000 to 1 (typical),  
10000 to 1 (typical Dynamic 
Contrast On) 

Faceplate 
coating

Antiglare with hard-coating 3H

Antiglare with hard-coating 3H

Backlight

2-CCFL edgelight system

2-CCFL edgelight system

Response Time

5ms panel typical

5ms panel typical

Color depth

16.7 million colors

16.7 million colors

Color Gamut

83%*

83%*

Summary of Contents for P2210H

Page 1: ...ection Agency As an ENERGY STAR partner Dell Inc has determined that this product meets the ENERGY STAR guidelines for energy efficiency Other trademarks and trade names may be used in this document to refer to either the entities claiming the marks and names or their products Dell Inc disclaims any proprietary interest in trademarks and trade names other than its own Model P2210Hc P2310Hc June 20...

Page 2: ...hing is missing Package Contents Product Features Identifying Parts and Controls Monitor Specifications Plug and Play Capability Universal Serial Bus USB Interface LCD Monitor Quality and Pixel Policy Maintenance Guidelines NOTE Some items may be optional and may not ship with your Monitor Some features or media may not be available in certain countries l Monitor l Stand l Power Cable l VGA Cable ...

Page 3: ...ible mounting solutions Plug and play capability if supported by your system Retractable label card allows convenient access to monitor serial number for technical support and easily hidden away providing label free clean look On Screen Display OSD adjustments for ease of set up and screen optimization Software and documentation media includes an information file INF Image color Matching File ICM ...

Page 4: ...SA compatible wall mount kit 100 mm x 100 mm 2 Stand removal button Release stand from monitor 3 Security lock slot Secures monitor with security cable lock 4 Dell Soundbar mounting brackets Attaches the optional Dell Soundbar 5 Information mark Help locating regulatory and barcode labels 6 Cable management slot Organizes cables by placing them through the slot NOTE Monitor is shipped with label c...

Page 5: ...k View with label card pulled out Front View with label card pulled out Label Description Use 1 Regulatory label Lists the regulatory approvals 2 Barcode serial number label Use to contact Dell for technical support ...

Page 6: ...dbar optional 3 DisplayPort connector Connect your computer DP cable 4 DVI connector Connect your computer DVI cable 5 VGA connector Connect your computer VGA cable 6 USB upstream port Connect the USB cable that shipped with your monitor to the monitor and the computer Once this cable is connected you can use the USB connectors on the side and bottom of the monitor 7 USB downstream ports 2 Connect...

Page 7: ...64 mm 18 8 inch 509 18 mm 20 inches Vertical 268 11 mm 10 6 inch 286 41 mm 11 27 inches Pixel pitch 0 248 mm 0 265 mm Viewing angle 160 vertical typical 170 horizontal typical 160 vertical typical 170 horizontal typical Luminance output 250 CD m typical 250 CD m typical Contrast ratio 1000 to 1 typical 10000 to 1 typical Dynamic Contrast On 1000 to 1 typical 10000 to 1 typical Dynamic Contrast On ...

Page 8: ......

Page 9: ......

Page 10: ......

Page 11: ......

Page 12: ......

Page 13: ...lability varies by country and product and some services may not be available in your area To contact Dell for sales technical support or customer service issues Back to Contents Page WARNING Use of controls adjustments or procedures other than those specified in this documentation may result in exposure to shock electrical hazards and or mechanical hazards NOTE If you do not have an active Intern...

Page 14: ...tp support dell com enter your service tag and download the latest driver for your graphics card 2 After installing the drivers for your Graphics Adapter attempt to set the resolution to 1920 x1080 again Back to Contents Page NOTE If you are unable to set the resolution to 1920 x1080 please contact Dell to inquire about a Graphics Adapter that supports these resolutions ...

Page 15: ...iption at the top of the window e g NVIDIA ATI Intel etc 5 Refer to the graphic card provider website for updated driver for example http www ATI com OR http www NVIDIA com 6 After installing the drivers for your Graphics Adapter attempt to set the resolution to 1920 x1080 again Back to Contents Page NOTE If you are unable to set the resolution to 1920 x1080 please contact the manufacturer of your...

Page 16: ...t Panel Use the keys on the front of the monitor to adjust the image settings Front panel Button Description A Shortcut key Preset Modes Use Preset Modes to set the display mode to Graphics or Video according to the input signal Select Graphics if you are connecting a computer to your monitor Select Video if you are connecting a DVD player STB or VCR player to your monitor B Shortcut key Brightnes...

Page 17: ...he OSD main menu Front panel Key Description A Up Use the Up key to adjust increase ranges items in the OSD menu B Down Use the Down key to adjust decrease ranges items in the OSD menu C OK Use the OK key to confirm your selection D Back Use the back key to back previous menu NOTE If you change the settings and then either proceed to another menu or exit the OSD menu the monitor automatically save...

Page 18: ...ll the options available for the monitor 3 Press the button once to activate the highlighted option 4 Press and button to select the desired parameter 5 Press to enter the slide bar and then use the and buttons according to the indicators on the menu to make your changes 6 Select the option to return to the main menu or exit the OSD menu NOTE AUTO ADJUST is only available when you use the analog V...

Page 19: ...htness on the monitor screen Dynamic Contrast Dynamic Contrast adjusts the contrast ratio to 10000 1 Press the button to select the Dynamic Contrast On or Off Auto Adjust Even though your computer recognizes your monitor on startup the Auto Adjustment function optimizes the display settings for use with your particular setup Auto Adjustment allows the monitor to self adjust to the incoming video s...

Page 20: ...e Color Settin gs Use the Color Settings to adjust the color setting mode and color temperature There are different color setting sub menus for VGA DVI D and Video input Input Color Format Choose the RGB option if monitor is connected to a computer or a DVD using a VGA or DVI cable Choose the YPbPr option if monitor is connected to a DVD by a YPbPr to VGA or YPbPr to DVI cable or if the DVD color ...

Page 21: ...ovies This is the default preset mode l Sports Loads color settings ideal for sports l Game Loads color settings ideal for game l Nature Loads color settings ideal for nature Hue This feature can shift color of video image to green or purple This is used to correct the flesh tone color Use to adjust the hue from 0 to 100 Press to increase the green shade of the video image Press to increase the pu...

Page 22: ...to one of eight languages English Espanol Francais Deutsch Brazilian Portuguese Russian Simplified chinese or Japanese Menu Trans parency Select this option to change the menu transparency by pressing 1st or 2nd buttons Minimum 0 Maximum 100 Menu Timer OSD Hold Time Sets the length of time the OSD will remain active after the last time you pressed a button Use the or to adjust the slider in 5 seco...

Page 23: ...values Personalize User can select from Preset Modes Brightness Contrast Auto Adjust Input Source Energy Modes and set as shortcut key NOTE This monitor has a built in feature to automatically calibrate the brightness to compensate for CCFL aging When Dynamic Contrast Feature is enabled in these modes Game Movie Sport and Nature the manual brightness adjustment is disabled When the monitor does no...

Page 24: ...er and download the latest graphic drivers Go to your graphics card website and download the latest graphic drivers This means that the monitor cannot synchronize with the signal that it is receiving from the computer See Monitor Specifications for the Horizontal and Vertical frequency ranges addressable by this monitor Recommended mode is 1920x1080 You will see the following message before the DD...

Page 25: ...tary volume and on off control to adjust the overall system level a blue LED for power indication and two audio headset jacks Using the Tilt Swivel and Vertical Extension Tilt Swivel With the built in pedestal you can tilt the monitor for the most comfortable viewing angle 1 Power Volume control 2 Attach mechanism 3 Power indicator 4 Headphone jacks ...

Page 26: ...tically extended Vertical Extension and fully tilted Tilt up to avoid hitting the bottom edge of the monitor NOTE The stand is detached and extended when the monitor is shipped from the factory NOTE The stand extends vertically up to 100 mm The figures below illustrate how to extend the stand vertically ...

Page 27: ...e Rotation tab and then set the preferred rotation Back to Contents Page NOTE To use the Display Rotation function Landscape versus Portrait view with your Dell computer you require an updated graphics driver that is not included with this monitor To download the graphics driver go to support dell com and see the Download section for Video Drivers for latest driver updates NOTE When in Portrait Vi...

Page 28: ...operties 2 Select the Settings tab 3 Move the slider bar to the right by pressing and holding left mouse button and adjust the screen resolution to 1920 x1080 4 Click OK If you do not see 1920 x1080 as an option you may need to update your graphics driver Please choose the scenario below that best describes the computer system you are using and follow the provided directions 1 If you have a Dell d...

Page 29: ...f Microsoft Corporation in the United States and or other countries ENERGY STAR is a registered trademark of the U S Environmental Protection Agency As an ENERGY STAR partner Dell Inc has determined that this product meets the ENERGY STAR guidelines for energy efficiency Other trademarks and trade names may be used in this document to refer to either the entities claiming the marks and names or th...

Page 30: ...the monitor 3 Press the stand till it snaps into its place Connecting Your Monitor To connect your monitor to the computer 1 Turn off your computer and disconnect the power cable Connect the blue VGA cable from your monitor to your computer NOTE The stand is detached when the monitor is shipped from the factory WARNING Before you begin any of the procedures in this section follow the Safety Instru...

Page 31: ...me computer Use all the cables only when they are connected to three different computers with appropriate video systems Connecting the white DVI cable Connecting the blue VGA cable Connecting the black DisplayPort cable NOTE Do not connect the blue VGA the White DVI and the black DisplayPort cables to the computer at the same time All monitors are shipped with the VGA blue cable attached by defaul...

Page 32: ...cables for your computer and monitor into a nearby outlet 4 Turn on the monitor and the computer If your monitor displays an image installation is complete If it does not display an image see Solving Problems 5 Use the cable slot on the monitor stand to organize the cables Organizing Your Cables After attaching all necessary cables to your monitor and computer see Connecting Your Monitor for cable...

Page 33: ...C output is for the optional Dell Soundbar only 1 Working from the back of the monitor attach the Soundbar by aligning the two slots with the two tabs along the bottom of the monitor 2 Slide the Soundbar to the left until it snaps into place 3 Connect the Soundbar with the DC power connector 4 Insert the mini stereo plug from the back of the Soundbar into the computer s audio output jack NOTE To p...

Page 34: ...2 Remove the stand 3 Use a screwdriver to remove the four screws securing the plastic cover 4 Attach the mounting bracket from the wall mounting kit to the LCD 5 Mount the LCD on the wall by following the instructions that came with the base mounting kit Back to Contents Page NOTE For use only with UL Listed Wall Mount Bracket with minimum weight load bearing capacity of 5 05 kg ...

Page 35: ...nd reconnect the video cable then turn on both your computer and the monitor If your monitor screen remains blank after you use the previous procedure check your video controller and computer because your monitor is functioning properly Built in Diagnostics Your monitor has a built in diagnostic tool that helps you determine if the screen abnormality you are experiencing is an inherent problem wit...

Page 36: ... l Ensure that the power button is depressed fully No Video Power LED on No picture or no brightness l Increase brightness contrast controls via OSD l Perform monitor self test feature check l Check for bent or broken pins in the video cable connector l Run the built in diagnostics Poor Focus Picture is fuzzy blurry or ghosting l Perform Auto Adjust via OSD l Adjust the Phase and Pixel Clock contr...

Page 37: ... displayed appears on the screen l Use the Power Management feature to turn off the monitor at all times when not in use for more information see Power Management Modes l Alternatively use a dynamically changing screensaver Specific Symptoms What You Experience Possible Solutions Screen image is too small Image is centered on screen but does not fill entire viewing area l Check the Scaling Ratio s...

Page 38: ...ar counter clockwise to a lower volume setting l Clean and reseat the audio line in plug l Troubleshoot the computer s sound card l Test the Soundbar using another audio source i e portable CD player MP3 player Distorted Sound Other audio source is used l Clear any obstructions between the Soundbar and the user l Confirm that the audio line in plug is completely inserted into the jack of the audio...

Reviews: