background image

Operating the Monitor:Dell P170S/P190S Flat Panel Monitor User's Guide

file:///S|/SSA_Proposal/P170S_P190S/UG/operate.htm[7/8/2011 4:48:31 PM]

Accessing the Menu System

NOTE:

If you change the settings and then either proceed to another menu, or exit the OSD menu, the monitor automatically saves those changes. The changes are also

saved if you change the settings and then wait for the OSD menu to disappear.

Push the MENU button to open the OSD menu and display the main menu.

1.

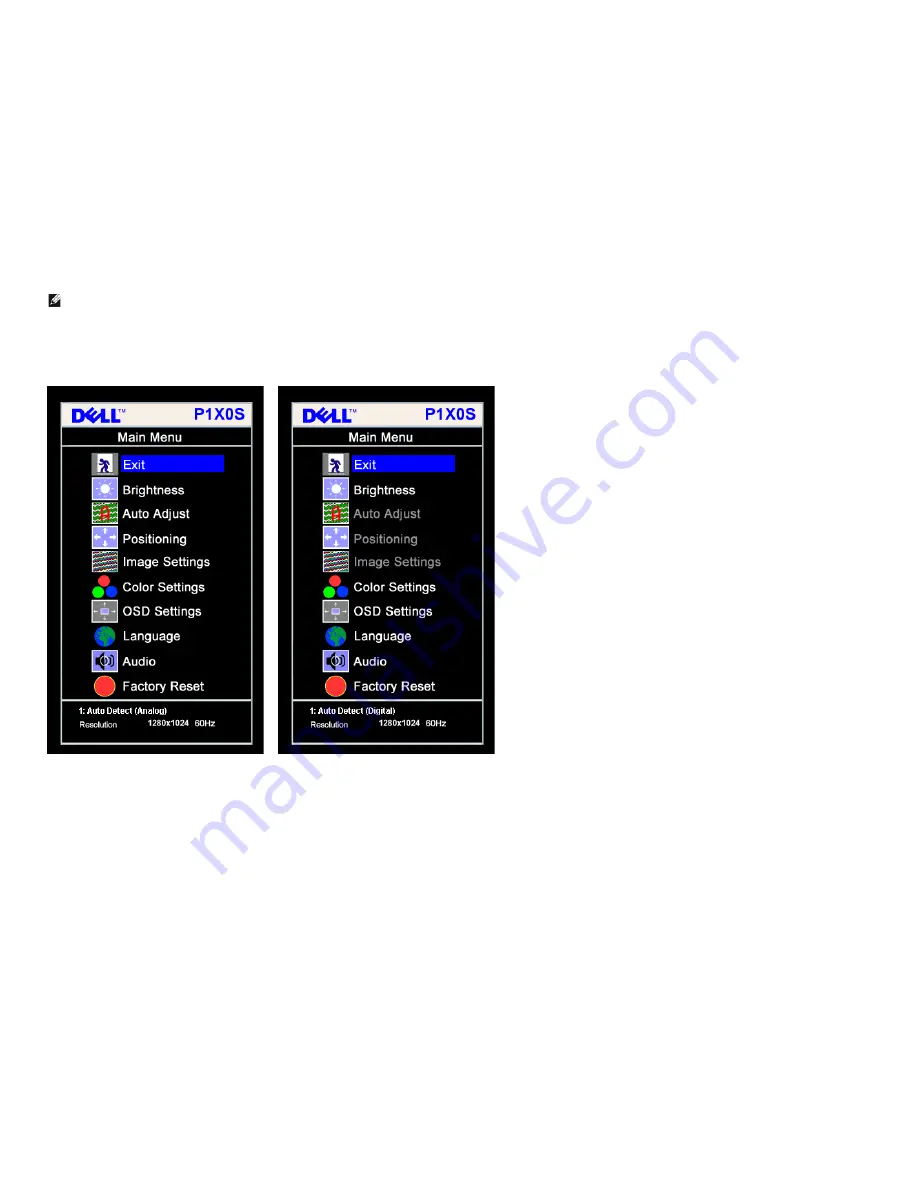
Push the MENU button to launch the OSD menu and display the main menu.


Main Menu for Auto Detect Analog (VGA)

Input


Main Menu for Auto Detect Digital (DVI)

Input

or

Main Menu for Analog (VGA) Input


Main Menu for Digital (DVI) Input

Summary of Contents for P170S - 17" LCD Monitor

Page 1: ...erved Reproduction of these materials in any manner whatsoever without the written permission of Dell Inc is strictly forbidden Trademarks used in this text Dell and the DELL logo are trademarks of Dell Inc Microsoft and Windows are either trademarks or registered trademarks of Microsoft Corporation in the United States and or other countries ENERGY STAR is a registered trademark of the U S Enviro...

Page 2: ...ll portable computer with internet access 1 Go to http support dell com enter your service tag and download the latest driver for your graphics card 2 After installing the drivers for your Graphics Adapter attempt to set the resolution to 1280x1024 again NOTE If you are unable to set the resolution to 1280x1024 please contact Dell to inquire about a Graphics Adapter that supports these resolutions...

Page 3: ... your graphics controller supplier from the description at the top of the window e g NVIDIA ATI Intel etc 5 Please refer to the graphics card provider website for updated driver for example http www ATI com OR http www NVIDIA com 6 After installing the drivers for your Graphics Adapter attempt to set the resolution to 1280x1024 again NOTE If you are unable to set the resolution to 1280x1024 please...

Page 4: ...s as they change Front panel Button Description Use the Input Select button to select between two different video signals that may be connected to your monitor If both VGA and DVI cables are connected to one PC this monitor will display an image automatically just as long as a video signal is present in either VGA or DVI outputs When connecting one display to two PCs if using screen savers best to...

Page 5: ...tup and adjustment The following dialog appears on a black screen as the monitor self adjusts to the current input Auto Adjust Auto Adjustment button allows the monitor to self adjust to the incoming video signal After using Auto Adjustment you can further tune your monitor by using the Pixel Clock Coarse Phase Fine controls in the OSD NOTE Auto Adjust does not occur if you press the button while ...

Page 6: ...e OSD menu the monitor automatically saves those changes The changes are also saved if you change the settings and then wait for the OSD menu to disappear Push the MENU button to open the OSD menu and display the main menu 1 Push the MENU button to launch the OSD menu and display the main menu Main Menu for Auto Detect Analog VGA Input Main Menu for Auto Detect Digital DVI Input or Main Menu for A...

Page 7: ...sh MENU to enter the slide bar and then use the and buttons according to the indicators on the menu to make your changes 6 Push the MENU button once to return to the main menu to select another option or push the MENU button two or three times to exit from the OSD menu Icon Menu and Submenus Description Exit Select to exit the Main menu Brightness Contrast Brightness adjusts the luminance of the b...

Page 8: ...ialog appears on a black screen as the monitor self adjusts to the current input Auto Adjustment allows the monitor to self adjust to the incoming video signal After using Auto Adjustment you can further tune your monitor by using the Pixel Clock Coarse and Phase Fine controls under Image Settings NOTE In most cases Auto Adjust produces the best image for your configuration Image settings The Phas...

Page 9: ...ext based applications spreadsheets programming text editors etc Red Preset Red Preset is selected to obtain a redder tint This color setting is typically used for color intensive applications photograph image editing multimedia movies etc User Preset User Preset Use the plus and minus buttons to increase or decrease each of the three colors R G B independently in single digit increments from 0 to...

Page 10: ...ounter clockwise Adjust according to Rotating Your Monitor setction OSD Lock OSD Lock Controls user access to adjustments When Yes is selected no user adjustments are allowed All buttons are locked except the menu button NOTE When the OSD is locked pressing the menu button takes the user directly to the OSD settings menu with OSD Lock selected Select No to unlock and allow user access to all appli...

Page 11: ...SD It has no effect on any software running on the computer Audio optional You can select to have the audio on or off when the monitor is in power saving mode Yes enables audio No disables audio default NOTE When the Dell Soundbar is not properly connected to the monitor the audio menu is not available Factory Reset Reset the OSD menu options to the factory preset values ...

Page 12: ...sition brightness contrast and OSD hold time to the factory defaults The language of the OSD does not change IR This feature will help reduce minor cases of image retention Enable LCD Conditioning If an image appears to be stuck on the monitor select LCD Conditioning to help eliminate any image retention Using the LCD Conditioning feature may take several hours Severe cases of image retention are ...

Page 13: ...bled NOTE If user select Disable display Warning message box as below Select Yes disable DDC CI and return to Factory Reset menu Warning message time out in 20 sec OSD Warning Messages The following warning messages may appear on the screen indicating that the monitor is out of synchronization This means that the monitor cannot synchronize with the signal that it is receiving from the computer See...

Page 14: ...option you may need to update your graphics driver Depending on your computer complete one of the following procedures If you have a Dell desktop or portable computer Go to support dell com enter your service tag and download the latest driver for your graphics card If you are using a non Dell computer portable or desktop Go to the support site for your computer and download the latest graphic dri...

Page 15: ...tor 3 Headphone connectors Using the Tilt Swivel and Vertical Extension NOTE This is applicable for a monitor with a stand When the OptiPlex USFF 780 OptiPlex SFF 980 AIO Stand is bought please refer to the respective AIO stand setup guide for set up instructions Tilt Swivel With the built in stand you can tilt and or swivel the monitor for the most comfortable viewing angle ...

Page 16: ...M NOTE Stand is detached and extended when the monitor is shipped from the factory Vertical Extension Stand extends vertically up to 130mm Changing the Rotation of Your Monitor Before you rotate the monitor your monitor should either be vertically extended Vertical Extension or titled Tilt to avoid hitting the bottom edge of the monitor ...

Page 17: ...Operating the Monitor Dell P170S P190S Flat Panel Monitor User s Guide file S SSA_Proposal P170S_P190S UG operate htm 7 8 2011 4 48 31 PM Back to Contents Page ...

Page 18: ...ing the following steps 1 Right click on the desktop and click Properties 2 Select the Settings tab 3 Move the slider bar to the right by pressing and holding the left mouse button and adjust the screen resolution to 1280x1024 4 Click OK If you do not see 1280x1024 as an option you may need to update your graphics driver Please choose the scenario below that best describes the computer system you ...

Page 19: ...bought please refer to the respective AIO stand setup guide for set up instructions Remove the monitor cover and place the monitor on it 1 Fit the two tabs on the upper part of the stand to the groove on the back of the monitor 2 Lower the stand so that the monitor mounting area snaps onto the stand Connecting the Monitor WARNING Before you begin any of the procedures in this section follow the sa...

Page 20: ...only when they are connected to two different computers with appropriate video systems Connecting the Blue VGA Cable Connecting the White DVI Cable NOTE The Graphics are used for the purpose of illustration only Appearance of the the computer may vary After you have completed connecting the VGA DVI cable follow the procedure below to complete your monitor setup ...

Page 21: ...arby outlet 2 Turn on the monitor and the computer If your monitor displays an image installation is complete If it does not display an image see Solving Problems Organizing Your Cables After attaching all necessary cables to your monitor and computer see Connecting Your Monitor use the cable management slot to organize all cables as shown above Attaching the Soundbar Optional ...

Page 22: ...rear of the monitor 2 Slide the Soundbar to the left until it snaps into place 3 Connect the Soundbar with the DC power connector 4 Insert the mini stereo plug from the rear of the Soundbar into the computer s audio output jack CAUTION Do not use with any device other than the Dell Soundbar Removing the Stand After placing the monitor panel on a soft cloth or cushion press and hold the stand remov...

Page 23: ...event scratches on the LCD screen while removing the stand ensure that the monitor is placed on a clean surface NOTE This is applicable for a monitor with a stand When the OptiPlex USFF 780 Optiplex SFF 980 AIO Stand is bought please refer to the respective AIO stand setup guide for set up instructions Back to Contents Page ...

Page 24: ...l and is working correctly While in self test mode the power LED remains green Also depending upon the selected input one of the dialogs shown below will continuously scroll through the screen or or 4 This box also appears during normal system operation if the video cable becomes disconnected or damaged 5 Turn off your monitor and reconnect the video cable then turn on both your computer and the m...

Page 25: ...via OSD Perform monitor Self Test Feature Check Check for bent or broken pins in the video cable connector Run the built in diagnostics Poor Focus Picture is fuzzy blurry or ghosting Perform Auto Adjust via OSD Adjust the Phase and Pixel Clock controls via OSD Eliminate video extension cables Reset the monitor to Factory Settings Shaky Jittery Video Wavy picture or fine movement Perform Auto Adjus...

Page 26: ...ed on screen but Perform monitor reset on Factory Reset does not fill entire viewing area Cannot adjust the monitor with OSD does not appear on the Turn the monitor off and unplug the power cord and then plug back and power on the buttons on the front panel screen No Input Signal when user No picture the LED light is green Check the signal source Ensure that the computer is not in power saving by ...

Page 27: ...hat the audio line in plug is completely inserted into the jack of the audio source Decrease the volume of the audio source Turn the Power Volume knob on the Soundbar counter clockwise to a lower volume setting Clean and reseat the audio line in plug Unbalanced Sound Output Sound from only one side of Clear any obstructions between the Soundbar and the user Soundbar Confirm that the audio line in ...

Page 28: ...Guidelines Package Contents Your monitor ships with the components shown below Ensure that you have received all the components and contact Dell if something is missing NOTE Some items may be optional and may not ship with your Monitor Some features or media may not be available in certain countries NOTE Stand and cables are not included when purchased with OptiPlex USFF 780 OptiPlex SFF 980 AIO S...

Page 29: ...0 x 1024 resolution plus full screen support for lower resolutions Wide viewing angle to allow viewing from a sitting or standing position or while moving from side to side Tilt swivel vertical extension and rotate adjustment capabilities Removable stand and Video Electronics Standards Association VESA 100 mm mounting holes for flexible mounting solutions Plug and play capability if supported by y...

Page 30: ...scription Use 1 VESA mounting holes 100mm behind attached VESA Plate Use to mount the monitor 2 Barcode serial number label Refer to this label if you need to contact Dell for technical support 3 Security lock slot Use a security lock with the slot to help secure your monitor 4 Dell Soundbar mounting brackets Attach the optional Dell Soundbar 5 Regulatory rating label Lists the regulatory approval...

Page 31: ...1 PM USB connectors downstream Right side Left side Bottom View Bottom view Label Description 1 Power connector Insert the power cable 2 Dell Soundbar power connector Connect the power cord for the Soundbar optional 3 DVI connector Connect your computer DVI cable 4 VGA connector Connect your computer VGA cable ...

Page 32: ...Sync Video Power Power Consumption Sync Indicator Normal operation Active Active Active Green 50 W maximum 22 W typical Active off mode Inactive Inactive Blanked Amber Less than 1 W Switch off Off Less than 1 W P190S VESA Modes Horizontal Vertical Sync Video Power Power Consumption Sync Indicator Normal operation Active Active Active Green 53 W maximum 25 W typical Active off mode Inactive Inactiv...

Page 33: ...ating 5 Floating 6 DDC Clock 7 DDC Data 8 Floating 9 TMDS RX1 10 TMDS RX1 11 TMDS Ground 12 Floating 13 Floating 14 5V 3 3V power 15 Self test 16 Hot Plug Detect 17 TMDS RX0 18 TMDS RX0 19 TMDS Ground 20 Floating 21 Floating 22 TMDS Ground 23 TMDS Clock 24 TMDS Clock Universal Serial Bus USB Interface This monitor supports High Speed Certified USB 2 0 interface Data Rate Power Consumption High spe...

Page 34: ...izontal typical 160 vertical typical 170 horizontal typical Luminance output 250 CD m typical 250 CD m typical Contrast ratio 800 to 1 typical 800 to 1 typical Faceplate coating Antiglare with hard coating 3H Antiglare with hard coating 3H Backlight 2 CCFLs backlight 2 CCFLs backlight Response Time 5 ms typical 5 ms typical Color Depth 16 7 mil colors 16 7 mil colors Color Gamut 72 72 P170S P190S ...

Page 35: ...ght Compressed 332 16 mm 13 08 inches 362 6 mm 14 26 inches Height Extended 462 16 mm 18 20 inches 492 6 mm 19 39 inches Width 372 10 mm 14 65 inches 410 1 mm 16 15 inches Depth 182 25 mm 7 18 inches 182 0 mm 7 17 inches Dimensions without stand Height 309 25 mm 12 18 inches 338 1 mm 13 31 inches Width 372 10 mm 14 65 inches 410 1 mm 16 15 inches Depth 59 20 mm 2 33 inches 65 9 mm 2 59 inches Stan...

Page 36: ...or one or more pixels to become fixed in an unchanging state which are hard to see and do not affect the display quality or usability For more information see Dell Support site at support dell com Maintenance Guidelines Caring for Your Monitor WARNING Read and follow the Safety Instructions before cleaning the monitor WARNING Before cleaning the monitor unplug the monitor from the electrical outle...

Page 37: ...the regulatory compliance website located at www dell com regulatory_compliance Contacting Dell For customers in the United States call 800 WWW DELL 800 999 3355 NOTE If you do not have an active Internet connection you can find contact information on your purchase invoice packing slip bill or Dell product catalog Dell provides several online and telephone based support and service options Availab...

Reviews: