Steps
1. Remove the two screws (M2x2) that secure the M.2 2230 solid-state drive thermal plate to the palm-rest and keyboard
assembly.
2. Slide and lift the M.2 2230 solid-state drive thermal pate off the M.2 2230 solid-state drive.
NOTE:
A thermal pad is included with the solid-state drive thermal plate and must always be adhered to the plate. If in
the process of replacing the solid-state drive, the thermal pad is separated from the thermal plate or gets adhered to
the solid-state drive, readhere the thermal pad to the solid-state drive thermal plate before reinstalling the thermal plate
to the system.
3. Slide and remove the M.2 2230 solid-state drive extension bracket from the M.2 card slot on the system board.
4. Slide and remove the M.2 2230 solid-state drive from the M.2 card slot on the system board.
Installing the M.2 2230 solid-state drive
Prerequisites
If you are replacing a component, remove the existing component before performing the installation procedure.
About this task
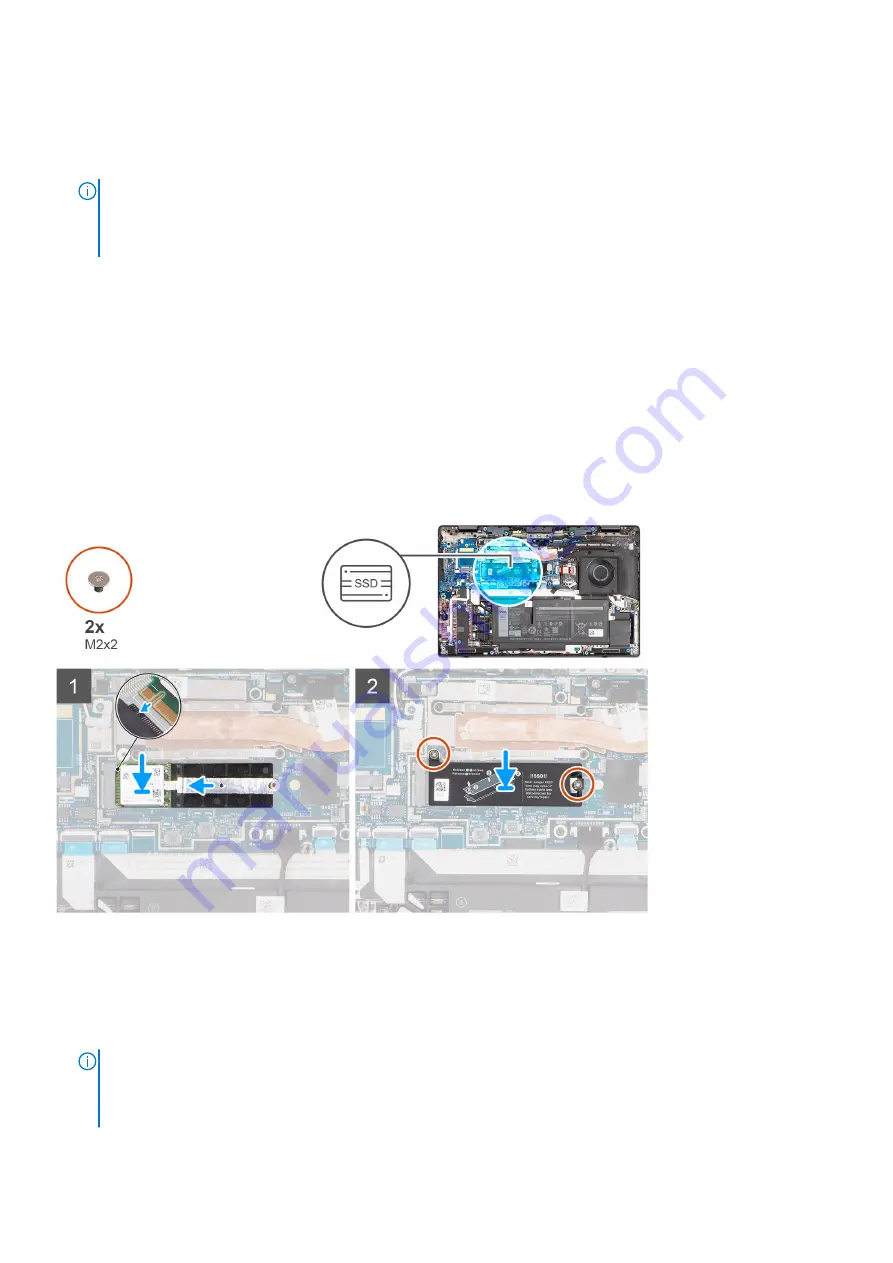
The following images indicate the location of the M.2 2230 solid-state drive and provide a visual representation of the
installation procedure.
Steps
1. Align the notch on the M.2 2230 solid-state drive with the tab on the M.2 card slot on the system board.
2. Slide and place the M.2 2230 solid-state drive into the M.2 card slot on the system board.
3. Place the M.2 2230 solid-state drive extension bracket into the M.2 card slot on the system board.
4. Place the M.2 2230 solid-state drive thermal plate on the M.2 2230 solid-state drive.
NOTE:
A thermal pad is included with the solid-state drive thermal plate and must always be adhered to the plate. If in
the process of replacing the solid-state drive, the thermal pad is separated from the thermal plate or gets adhered to
the solid-state drive, readhere the thermal pad to the solid-state drive thermal plate before reinstalling the thermal plate
to the system.
20
Removing and installing components
Summary of Contents for P110F
Page 18: ...18 Removing and installing components ...
Page 36: ...36 Removing and installing components ...
Page 46: ...46 Removing and installing components ...
Page 61: ...Removing and installing components 61 ...
Page 70: ...70 Removing and installing components ...


