background image

12

การดเครือขายวงกวางไรสาย

 (WWAN)

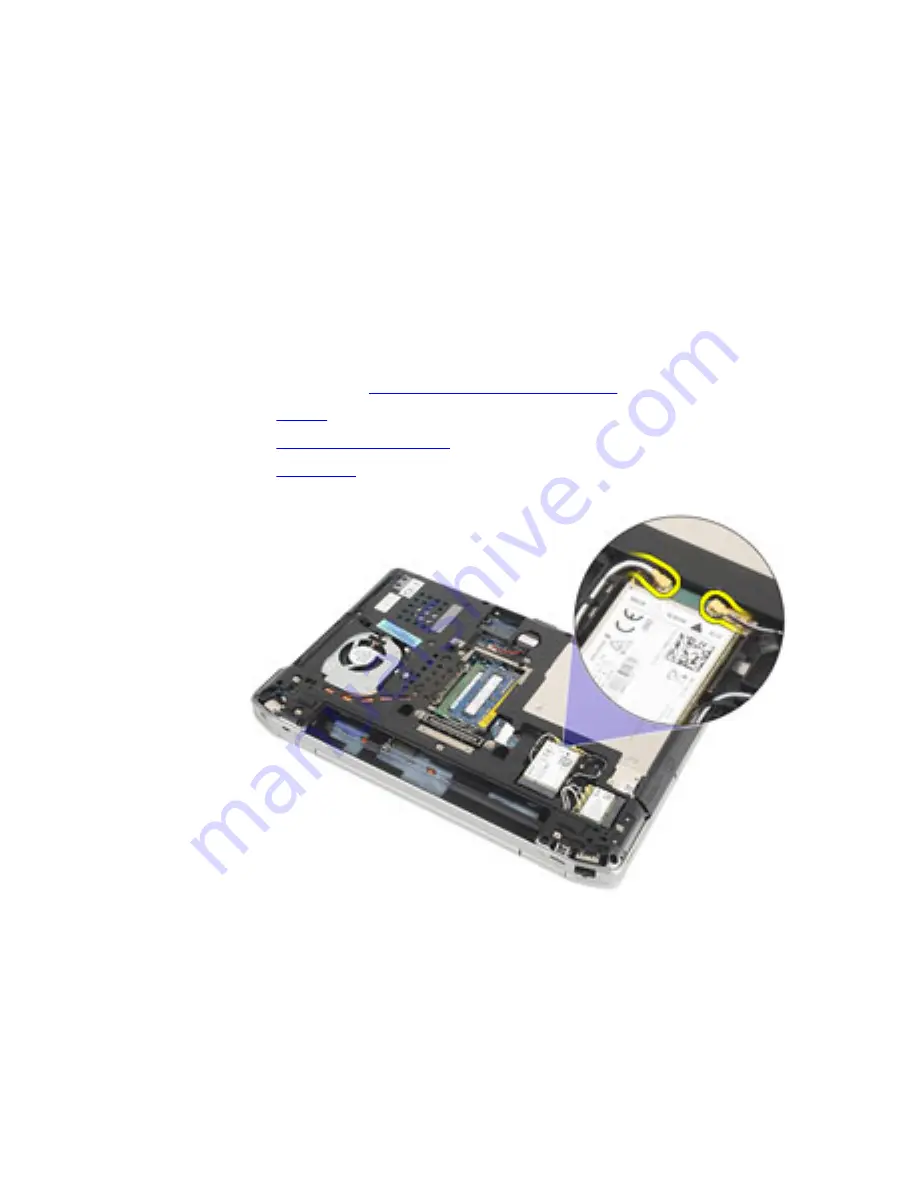
Removing The Wireless Wide Area Network 

(WWAN) Card

1.

Follow the procedures in 

Before Working On Your Computer

.

2.

Remove the 

battery

.

3.

Remove the 

Secure Digital (SD) card

.

4.

Remove the 

base cover

.

5.

Disconnect the antenna cables from the WWAN card.

6.

Remove the screw that secures the WWAN card to the computer.

41

Summary of Contents for Latitude E6320

Page 1: ...Dell Latitude E6320 Owner s Manual Regulatory Model P12S Regulatory Type P12S001 ...

Page 2: ...ค าจดทะเบียนหรือเครื องหมายการค าของ Intel Corporation ในสหรัฐฯ และ ในประเทศอื น AMD เป นเครื องหมายการค าจดทะเบียนและ AMD Opteron AMD Phenom AMD Sempron AMD Athlon ATI Radeon และ ATI FirePro เป นเครื องหมายการค าของ Advanced Micro Devices Inc Microsoft Windows MS DOS Windows Vista ปุ มเริ มการทำงานของ Windows Vista และ Office Outlook เป นเครื องหมายการค า หรือเครื องหมายการค าจดทะเบียนของ Microso...

Page 3: ...stalling the ExpressCard 14 บทที 3 การ ด SD 15 Removing The Secure Digital SD Card 15 Installing the Secure Digital SD Card 16 บทที 4 แบตเตอรี 17 Removing The Battery 17 Installing The Battery 18 บทที 5 Subscriber Identity Module SIM Card 19 Removing The Subscriber Identity Module SIM Card 19 Installing the Subscriber Identity Module SIM Card 20 บทที 6 ฮาร ดไดร ฟ 21 Removing The Hard Drive 21 Inst...

Page 4: ... The Wireless Local Area Network WLAN Card 37 Installing The Wireless Local Area Network WLAN Card 38 บทที 12 การ ดเครือข ายวงกว างไร สาย WWAN 41 Removing The Wireless Wide Area Network WWAN Card 41 Installing The Wireless Wide Area Network WWAN Card 42 13 Keyboard Trim 45 Removing The Keyboard Trim 45 Installing The Keyboard Trim 46 บทที 14 แป นพิมพ 47 Removing The Keyboard 47 Installing The Keyb...

Page 5: ...Installing The Media Board 70 บทที 20 Display Hinges 73 Removing The Display Hinge Covers 73 Installing The Display Hinge Covers 74 บทที 21 ชุดจอแสดงผล 75 Removing The Display Assembly 75 Installing The Display Assembly 78 บทที 22 เมนบอร ด 81 Removing The System Board 81 Installing The System Board 85 บทที 23 ฮีทซิงค 87 Removing The Heat Sink Assembly 87 Installing The Heat Sink Assembly 89 บทที 2...

Page 6: ...l 104 บทที 28 แผงจอแสดงผล 105 Removing The Display Panel 105 Installing The Display Panel 107 บทที 29 กล อง 109 Removing The Camera 109 Installing The Camera 110 บทที 30 รายละเอียดทางเทคนิค 113 Technical Specifications 113 บทที 31 การตั งค าระบบ 119 Overview 119 Entering System Setup 119 System Setup Menu Options 119 General 120 System Configuration 121 Video 123 Security 123 Performance 126 Power...

Page 7: ...tion Support 129 Wireless 129 Maintenance 130 System Logs 130 บทที 32 การวินิจฉัยระบบ 131 Device Status Lights 131 Battery Status Lights 131 LED Error Codes 131 บทที 33 การติดต อกับ Dell 135 การติดต อกับ Dell 135 ...

Page 8: ...8 ...

Page 9: ... Dell จะไม ได รับความคุ มครองตามการรับ ประกัน อ านและปฏิบัติตามคำแนะนำด านความปลอดภัยที จัดมาให พร อมกับผลิตภัณฑ ข อควรระวัง เพื อป องกันไฟฟ าสถิต ให คายประจุไฟฟ าสถิตในตัวคุณโดยการใส สายรัดข อมือป องกันไฟฟ าสถิต หรือให สัมผัส พื นผิวโลหะที ไม ทาสี เช น ช องต อที ด านหลังของคอมพิวเตอร เป นระยะ ๆ ข อควรระวัง ใช งานส วนประกอบและการ ดด วยความระมัดระวัง อย าสัมผัสที ส วนประกอบหรือหน าสัมผัสของการ ด ถื...

Page 10: ...เตอร ให ลงกราวด ตัวเองโดยสัมผัสพื นผิวโลหะที ไม มีการเคลือบ ผิว เช น โลหะที ด านหลังคอมพิวเตอร ขณะปฏิบัติงาน ให สัมผัสพื นที โลหะไม เคลือบผิวเป นประจำเพื อถ ายประจุไฟฟ า สถิตที อาจเป นอันตรายต อส วนประกอบภายในของคอมพิวเตอร 11 ถอด ExpressCards หรือ Smart Cards จากช องเสียบ เครื องมือที แนะนำให ใช ขั นตอนต าง ๆ ในเอกสารนี อาจจำเป นต องใช เครื องมือต อไปนี ไขควงปากแบนขนาดเล ก ไขควงหัวแฉกเบอร 0 ไขควงห...

Page 11: ...ละสายใด ๆ ให เรียบร อยก อน ที จะเปิดเครื องคอมพิวเตอร ของคุณ ข อควรระวัง เพื อป องกันความเสียหายต อคอมพิวเตอร ให ใช เฉพาะแบตเตอรี ที ได รับการออกแบบมาสำหรับคอมพิวเตอร Dell รุ นนี โดยเฉพาะ ห ามใช แบตเตอรี ที ออกแบบมาสำหรับคอมพิวเตอร ของ Dell รุ นอื น 1 ต ออุปกรณ ต อพ วง เช น ตัวจำลองพอร ต battery slice หรือ media base แล วใส การ ด เช น ExpressCard กลับ เข าที 2 เสียบสายโทรศัพท หรือสายเครือข ายเข าก...

Page 12: ...12 ...

Page 13: ...ExpressCard Removing The ExpressCard 1 Follow the procedures in Before Working On Your Computer 2 Press in on the ExpressCard to release it from the computer 3 Slide the ExpressCard out of the computer 13 ...

Page 14: ...talling the ExpressCard Installing the ExpressCard 1 Slide the ExpressCard into its slot until it clicks into place 2 Follow the procedures in After working inside your computer Related Links Removing The ExpressCard 14 ...

Page 15: ...การ ด SD Removing The Secure Digital SD Card 1 Follow the procedures in Before Working On Your Computer 2 Press in on the SD card to release it from the computer 3 Slide the SD card out of the computer 15 ...

Page 16: ...ital SD Card Installing the Secure Digital SD Card 1 Slide the Secure Digital SD card into its slot until it clicks into place 2 Follow the procedures in After working inside your computer Related Links Removing The Secure Digital SD Card 16 ...

Page 17: ...4 แบตเตอรี Removing The Battery 1 Follow the procedures in Before Working On Your Computer 2 Slide the battery latches to unlock the battery 3 Slide the battery out and remove it from the computer 17 ...

Page 18: ...inks Installing The Battery Installing The Battery 1 Slide the battery into its slot until it clicks into place 2 Follow the procedures in After working inside your computer Related Links Removing The Battery 18 ...

Page 19: ...rd Removing The Subscriber Identity Module SIM Card 1 Follow the procedures in Before Working On Your Computer 2 Remove the battery 3 Press in on the SIM card to release it from the computer 4 Slide the SIM card out from the computer 19 ...

Page 20: ...le SIM Card Installing the Subscriber Identity Module SIM Card 1 Slide the SIM card into its compartment 2 Install the battery 3 Follow the procedures in After Working Inside Your Computer Related Links Removing The Subscriber Identity Module SIM Card 20 ...

Page 21: ...ving The Hard Drive 1 Follow the procedures in Before Working On Your Computer 2 Remove the battery 3 Remove the screws that secure the hard drive to the computer 4 Slide and remove the hard drive out of the computer 21 ...

Page 22: ...5 Remove the screw that secures the hard drive caddy to the hard drive 6 Pull and remove the hard drive caddy away from the hard drive 22 ...

Page 23: ...e 2 Tighten the screws to secure the hard drive caddy to the hard drive 3 Slide the hard drive into the computer 4 Replace and tighten the screws that secure the hard drive to the computer 5 Install the battery 6 Follow the procedures in After working inside your computer Related Links Removing The Hard Drive 23 ...

Page 24: ...24 ...

Page 25: ...The Optical Drive 1 Follow the procedures in Before Working On Your Computer 2 Press and release the optical drive latch 3 Pull the optical drive out of the computer 4 Pull the optical drive door from one side to release it 25 ...

Page 26: ...5 Pull the other side of the optical drive door to release it completely from the optical drive 6 Remove the screw that secures the drive latch to the optical drive 26 ...

Page 27: ...7 Remove the drive latch from the optical drive 8 Remove the screws that secures the drive latch bracket to the optical drive 27 ...

Page 28: ... drive 3 Insert the drive latch into the optical drive 4 Tighten the screw to secure the drive latch to the optical drive 5 Push the optical drive door to insert it completely into the optical drive 6 Push the optical drive door from the other side till it clicks into place 7 Insert the optical drive using the drive latch 8 Push the drive latch in to secure it into its slot 9 Follow the procedures...

Page 29: ...Removing The Optical Drive 29 ...

Page 30: ...30 ...

Page 31: ...er 1 Follow the procedures in Before Working On Your Computer 2 Remove the battery 3 Remove the Secure Digital SD Card 4 Remove the screws that secure the base cover to the computer 5 Lift the base cover up and away from the computer 31 ...

Page 32: ... base cover to align the screw holes correctly with the computer 2 Replace and tighten the screws to secure the base cover to the computer 3 Install the Secure Digital SD Card 4 Follow the procedures in After Working Inside Your Computer Related Links Removing The Base Cover 32 ...

Page 33: ...he procedures in Before Working On Your Computer 2 Remove the battery 3 Remove the Secure Digital SD card 4 Remove the base cover 5 Pry the retention clips away from the memory module until it pops up 6 Remove the memory module from the computer 33 ...

Page 34: ...y module into the memory slot 2 Press the clips to secure the memory module to the system board 3 Install the base cover 4 Install the Secure Digital SD card 5 Install the battery 6 Follow the procedures in After Working Inside Your Computer Related Links Removing The Memory 34 ...

Page 35: ...he procedures in Before Working on Your Computer 2 Remove the battery 3 Remove the Secure Digital SD card 4 Remove the base cover 5 Disconnect the coin cell battery cable from the system board 6 Release and remove the coin cell battery from the computer 35 ...

Page 36: ...the coin cell battery in its location 2 Connect the coin cell battery cable to the system board 3 Install the base cover 4 Install the Secure Digital SD card 5 Install the battery 6 Follow the procedures in After working inside your computer Related Links Removing The Coin Cell Battery 36 ...

Page 37: ...twork WLAN Card 1 Follow the procedures in Before Working On Your Computer 2 Remove the battery 3 Remove the Secure Digital SD card 4 Remove the base cover 5 Disconnect the antenna cables from the WLAN card 6 Remove the screw that secures the WLAN card to the computer 37 ...

Page 38: ...etwork WLAN Card Installing The Wireless Local Area Network WLAN Card 1 Insert the WLAN card into its connector at a 45 degree angle 2 Replace and tighten the screw that secures the WLAN card to the computer 3 Connect the antenna cables according to the color code on the WLAN card 4 Install the base cover 38 ...

Page 39: ...5 Install the Secure Digital SD card 6 Install the battery 7 Follow the procedures in After Working Inside Your Computer Related Links Removing The Wireless Local Area Network WLAN Card 39 ...

Page 40: ...40 ...

Page 41: ...twork WWAN Card 1 Follow the procedures in Before Working On Your Computer 2 Remove the battery 3 Remove the Secure Digital SD card 4 Remove the base cover 5 Disconnect the antenna cables from the WWAN card 6 Remove the screw that secures the WWAN card to the computer 41 ...

Page 42: ...WWAN Card Installing The Wireless Wide Area Network WWAN Card 1 Insert the WWAN card into its connector at a 45 degree angle 2 Replace and tighten the screw to secure the WWAN card to the computer 3 Connect the antenna cables according to the color code on the WLAN card 4 Install the base cover 42 ...

Page 43: ...5 Install the Secure Digital SD card 6 Install the battery 7 Follow the procedures in After Working Inside Your Computer Related Links Removing The Wireless Wide Area Network WWAN Card 43 ...

Page 44: ...44 ...

Page 45: ...board Trim 1 Follow the procedures in Before Working On Your Computer 2 Using a plastic scribe pry under the keyboard trim to release it from the computer 3 Lift the keyboard trim to release the tabs and remove it from the computer 45 ...

Page 46: ...ing The Keyboard Trim Installing The Keyboard Trim 1 Align the keyboard trim with the keyboard and snap it into place 2 Follow the procedures in After Working Inside Your Computer Related Links Removing The Keyboard Trim 46 ...

Page 47: ...Follow the procedures in Before Working On Your Computer 2 Remove the battery 3 Remove the keyboard trim 4 Remove the screws that secure the keyboard to the computer 5 Remove the screws that secure the keyboard to the palmrest assembly 47 ...

Page 48: ...6 Flip the keyboard over and lay it toward the display 7 Lift the clip to release the keyboard cable and disconnect it from the computer 48 ...

Page 49: ...8 Remove the keyboard from the computer 9 Remove the tape securing the keyboard cable from the keyboard 49 ...

Page 50: ...he keyboard cable and secure it to the keyboard using the tape 2 Connect the keyboard cable to its connector on the system board 3 Turn the keyboard over and lay it on the palmrest 4 Replace and tighten the screws to secure the keyboard to the palmrest assembly 5 Replace and tighten the screws to secure the keyboard to the computer 50 ...

Page 51: ...6 Install the battery 7 Install the keyboard trim 8 Follow the procedures in After Working Inside Your Computer Related Links Removing The Keyboard 51 ...

Page 52: ...52 ...

Page 53: ...cure Digital SD card 4 Remove the optical drive 5 Remove the base cover 6 Remove the ExpressCard 7 Remove the hard drive 8 Remove the keyboard trim 9 Remove the keyboard 10 Remove the screws that secure the palmrest assembly to the computer 11 Flip the computer and disconnect the following cables from the system board LED board touchpad 53 ...

Page 54: ...art card reader ExpressCard fingerprint reader 12 Remove the screws to release the palmrest assembly from the system board 13 Lift the palmrest assembly along the edges to unlock the tabs and remove it away from the computer 54 ...

Page 55: ...the system board LED board touchpad bluetooth contactless smart card reader Express Card fingerprint reader 4 Replace and tighten the screws to secure the palmrest assembly to the computer 5 Install the keyboard 6 Install the keyboard trim 7 Install the hard drive 8 Install the ExpressCard 9 Install the base cover 10 Install the optical drive 11 Install the Secure Digital SD card 12 Install the ba...

Page 56: ...Related Links Removing The Palmrest Assembly 56 ...

Page 57: ... Secure Digital SD card 4 Remove the optical drive 5 Remove the base cover 6 Remove the ExpressCard 7 Remove the hard drive 8 Remove the keyboard trim 9 Remove the keyboard 10 Remove the palmrest assembly 11 Remove the screws that secure the bluetooth card to the palmrest assembly 12 Remove the bluetooth card from the palmrest assembly 57 ...

Page 58: ...th Card 1 Connect the bluetooth cable to the bluetooth card 2 Place the bluetooth card on the palmrest assembly 3 Replace and tighten the screw to secure the bluetooth card to the palmrest assembly 4 Install the palmrest assembly 5 Install the keyboard 6 Install the keyboard trim 7 Install the hard drive 8 Install the ExpressCard 58 ...

Page 59: ...the base cover 10 Install the optical drive 11 Install the Secure Digital SD card 12 Install the battery 13 Follow the procedures in After Working Inside Your Computer Related Links Removing The Bluetooth Card 59 ...

Page 60: ...60 ...

Page 61: ...ure Digital SD card 4 Remove the optical drive 5 Remove the base cover 6 Remove the ExpressCard 7 Remove the hard drive 8 Remove the keyboard trim 9 Remove the keyboard 10 Remove the palmrest assembly 11 Release the LED board cable from the routing channel 12 Remove the screw that secures the LED board to the palm rest assembly 61 ...

Page 62: ...t assembly Related Links Installing The LED Board Installing The LED Board 1 Align the LED board on the palmrest 2 Replace and tighten the screw that secure the LED board to the palmrest 3 Route the LED board cable to its original position 62 ...

Page 63: ...rd trim 7 Install the hard drive 8 Install the ExpressCard 9 Install the base cover 10 Install the optical drive 11 Install the Secure Digital SD card 12 Install the battery 13 Follow the procedures in After Working Inside Your Computer Related Links Removing The LED Board 63 ...

Page 64: ...64 ...

Page 65: ...he Secure Digital SD card 4 Remove the optical drive 5 Remove the base cover 6 Remove the ExpressCard 7 Remove the hard drive 8 Remove the keyboard trim 9 Remove the keyboard 10 Remove the palmrest assembly 11 Disconnect the smart card reader cable from the system board 12 Remove the screws that secure the smart card reader to the computer 65 ...

Page 66: ...card reader to its original position on the computer 2 Replace and tighten the screws to secure the smart card reader to the computer 3 Connect the smart card reader cable to the system board 4 Replace and tighten the screws to secure the palmrest assembly to the computer 5 Install the palmrest assembly 6 Install the keyboard 7 Install the keyboard trim 66 ...

Page 67: ... ExpressCard 10 Install the base cover 11 Install the optical drive 12 Install the Secure Digital SD card 13 Install the battery 14 Follow the procedures in After Working Inside Your Computer Related Links Removing The Smart Card Reader 67 ...

Page 68: ...68 ...

Page 69: ...e Secure Digital SD card 4 Remove the optical drive 5 Remove the base cover 6 Remove the ExpressCard 7 Remove the hard drive 8 Remove the keyboard trim 9 Remove the keyboard 10 Remove the palmrest assembly 11 Disconnect the media board cable from the system board 12 Remove the screws that secures the media board to the computer 69 ...

Page 70: ...Board 1 Align the media board to its original position on the computer 2 Replace and tighten the screws to secure the media board to the computer 3 Connect the media board cable to the system board 4 Install the palmrest assembly 5 Install the keyboard 6 Install the keyboard trim 7 Install the hard drive 70 ...

Page 71: ...ard 9 Install the base cover 10 Install the optical drive 11 Install the Secure Digital SD card 12 Install the battery 13 Follow the procedures in After Working Inside Your Computer Related Links Removing The Media Board 71 ...

Page 72: ...72 ...

Page 73: ...ve the Secure Digital SD card 4 Remove the optical drive 5 Remove the base cover 6 Remove the ExpressCard 7 Remove the hard drive 8 Remove the keyboard trim 9 Remove the keyboard 10 Remove the palmrest assembly 11 Remove the screws that secure the display hinge covers to the computer 12 Remove the display hinge covers from the computer 73 ...

Page 74: ...lay hinge covers to the computer 3 Install the palmrest assembly 4 Install the keyboard 5 Install the keyboard trim 6 Install the hard drive 7 Install the ExpressCard 8 Install the base cover 9 Install the optical drive 10 Install the Secure Digital SD card 11 Install the battery 12 Follow the procedures in After Working Inside Your Computer Related Links Removing The Display Hinge Covers 74 ...

Page 75: ...the battery 3 Remove the Secure Digital SD card 4 Remove the optical drive 5 Remove the base cover 6 Remove the ExpressCard 7 Remove the hard drive 8 Remove the keyboard trim 9 Remove the keyboard 10 Remove the palmrest assembly 11 Remove the display hinge covers 12 Release the antenna cables from the computer 75 ...

Page 76: ...emove the screws that secure the display assembly to the computer 14 Pull out the antenna cables from their routing channels 15 Remove the screws that secure the display cable bracket to the system board 76 ...

Page 77: ...16 Remove the display cable bracket from the computer 17 Pull the display cable to disconnect it from the system board 77 ...

Page 78: ...nstalling The Display Assembly Installing The Display Assembly 1 Align the display assembly into its original position on the computer 2 Replace and tighten the screw to secure the display assembly to the computer 3 Replace and connect the display cable to the system board 4 Align the display cable bracket to its original position 78 ...

Page 79: ...na cables to their original position 9 Install the display hinge covers 10 Install the palmrest assembly 11 Install the keyboard 12 Install the keyboard trim 13 Install the hard drive 14 Install the ExpressCard 15 Install the base cover 16 Install the optical drive 17 Install the Secure Digital SD card 18 Install the battery 19 Follow the procedures in After Working Inside Your Computer Related Li...

Page 80: ...80 ...

Page 81: ...over 7 Remove the ExpressCard 8 Remove the hard drive 9 Remove the keyboard trim 10 Remove the keyboard 11 Remove the wireless local area network WLAN card 12 Remove the wireless wide area network WWAN card 13 Remove the coin cell battery 14 Remove the media board 15 Remove the palmrest assembly 16 Remove the display hinge covers 17 Remove the display assembly 18 Disconnect and release the smart c...

Page 82: ...19 Remove the screws that secure the system board to the computer 20 Lift the system board to locate the power supply cable 82 ...

Page 83: ...21 Disconnect the power supply cable from the system board 22 Lift and remove the system board from the computer 83 ...

Page 84: ... Steps 23 and 24 are applicable for computers that shipped in the United States of America 23 Flip the system over and remove the screw that secures the TAA board 24 Remove the TAA board from the system 84 ...

Page 85: ... original position on the computer 4 Connect the power supply cable 5 Replace and tighten the screws to secure the system board to the computer 6 Route and connect the smart card and speaker cables to the system board 7 Install the display assembly 8 Install the display hinge covers 9 Install the palmrest assembly 10 Install the keyboard 11 Install the keyboard trim 12 Install the hard drive 13 In...

Page 86: ...17 Install the battery 18 Follow the procedures in After Working Inside Your Computer Related Links Removing The System Board 86 ...

Page 87: ...se cover 7 Remove the ExpressCard 8 Remove the hard drive 9 Remove the keyboard trim 10 Remove the keyboard 11 Remove the wireless local area network WLAN card 12 Remove the wireless wide area network WWAN card 13 Remove the coin cell battery 14 Remove the media board 15 Remove the palmrest assembly 16 Remove the display hinge covers 17 Remove the display assembly 18 Remove the system board 19 Dis...

Page 88: ...20 Loosen the screws that secure the heat sink assembly to the system board 21 Remove the heat sink assembly from the system board 88 ...

Page 89: ...stem board 4 Install the heat sink assembly 5 Install the display assembly 6 Install the display hinge covers 7 Install the palmrest assembly 8 Install the keyboard 9 Install the keyboard trim 10 Install the hard drive 11 Install the ExpressCard 12 Install the base cover 13 Install the optical drive 14 Install the Secure Digital SD card 15 Install the battery 16 Follow the procedures in After Work...

Page 90: ...90 ...

Page 91: ...ove the base cover 7 Remove the ExpressCard 8 Remove the hard drive 9 Remove the keyboard trim 10 Remove the keyboard 11 Remove the wireless local area network WLAN card 12 Remove the wireless wide area network WWAN card 13 Remove the coin cell battery 14 Remove the media board 15 Remove the palmrest assembly 16 Remove the display hinge covers 17 Remove the display assembly 18 Remove the screw tha...

Page 92: ...lling The Input Output Panel Installing The Input Output Panel 1 Replace the I O panel in the computer 2 Tighten the screw securing the I O panel to the computer 3 Install the display assembly 4 Install the display hinge covers 5 Install the palmrest assembly 92 ...

Page 93: ... hard drive 9 Install the ExpressCard 10 Install the base cover 11 Install the optical drive 12 Install the Secure Digital SD card 13 Install the battery 14 Follow the procedures in After Working Inside Your Computer Related Links Removing The Input Output Panel 93 ...

Page 94: ...94 ...

Page 95: ...ard 7 Remove the ExpressCard 8 Remove the hard drive 9 Remove the keyboard trim 10 Remove the keyboard 11 Remove the wireless local area network WLAN card 12 Remove the wireless wide area network WWAN card 13 Remove the coin cell battery 14 Remove the media board 15 Remove the palmrest assembly 16 Remove the display hinge covers 17 Remove the display assembly 18 Remove the system board 19 Remove t...

Page 96: ...20 Remove the screws that secure the speakers to the computer 21 Remove the speakers from the computer 96 ...

Page 97: ...ssembly 8 Install the coin cell battery 9 Install the Wireless Local Area Network WLAN card 10 Install the Wireless Wide Area Network WWAN card 11 Install the keyboard 12 Install the keyboard trim 13 Install the hard drive 14 Install the ExpressCard 15 Install the media board 16 Install the Subscriber Identity Module SIM card 17 Install the optical drive 18 Install the Secure Digital SD card 19 In...

Page 98: ...98 ...

Page 99: ...r 7 Remove the ExpressCard 8 Remove the hard drive 9 Remove the keyboard trim 10 Remove the keyboard 11 Remove the wireless local area network WLAN card 12 Remove the wireless wide area network WWAN card 13 Remove the coin cell battery 14 Remove the media board 15 Remove the palmrest assembly 16 Remove the display hinge covers 17 Remove the display assembly 18 Remove the system board 19 Remove the...

Page 100: ...20 Remove the DC In bracket from the system 21 Remove the DC In port from the system 100 ...

Page 101: ...all the palmrest assembly 8 Install the media board 9 Install the Wireless Local Area Network WLAN card 10 Install the Wireless Wide Area Network WWAN card 11 Install the coin cell battery 12 Install the keyboard 13 Install the keyboard trim 14 Install the hard drive 15 Install the ExpressCard 16 Install the base cover 17 Install the Subscriber Identity Module SIM Card 18 Install the optical drive...

Page 102: ...102 ...

Page 103: ...ng The Display Bezel 1 Follow the procedures in Before Working On Your Computer 2 Remove the battery 3 Starting from the bottom pry the bezel from inside the display assembly 4 Remove the bezel from the display assembly 103 ...

Page 104: ... display bezel onto the display assembly 2 Work along to the top and bottom edges of the display bezel 3 Press the left and right edges of the display bezel 4 Install the battery 5 Follow the procedures in After Working Inside Your Computer Related Links Removing The Display Bezel 104 ...

Page 105: ...Display Panel 1 Follow the procedures in Before Working On Your Computer 2 Remove the battery 3 Remove the display bezel 4 Remove the screws that secures the display panel to the display assembly 5 Flip the display panel over 105 ...

Page 106: ...6 Disconnect the Low Voltage Differential Signaling LVDS cable from the display panel 7 Remove the display panel from the display assembly 106 ...

Page 107: ...e display assembly 2 Connect the Low Voltage Differential Signaling LVDS cable to the display panel 3 Tighten the screws to secure the display panel to the display assembly 4 Install the display bezel 5 Install the battery 6 Follow the procedures in After Working Inside Your Computer Related Links Removing The Display Panel 107 ...

Page 108: ...108 ...

Page 109: ...edures in Before Working On Your Computer 2 Remove the battery 3 Remove the display bezel 4 Remove the display panel 5 Disconnect the cable from the camera module 6 Remove the screw that secures the camera and microphone to the display assembly 109 ...

Page 110: ...he camera module to its original position in the display assembly 2 Tighten the screw to secure the camera to the display assembly 3 Connect the camera cable to the camera 4 Install the display panel 5 Install the display bezel 6 Install the battery 7 Follow the procedures in After working inside your computer 110 ...

Page 111: ...Related Links Removing The Camera 111 ...

Page 112: ...112 ...

Page 113: ...option to view information about your computer System Information Chipset Intel Mobile QM67 Express chipset DRAM bus width 64 bit Flash EPROM SPI 32 Mbits PCIe Gen1 bus 100 MHz Processor Types Intel Core i3 series Intel Core i5 series with Turbo BoostTechnology 2 0 Intel Core i7 series with Turbo BoostTechnology 2 0 L2 cache up to 6 MB External bus frequency 1333 MHz Memory Memory connector two SO...

Page 114: ...nector Speakers two Internal speaker amplifier 0 5 W typical per channel Volume controls keyboard function keys program menus Video Type integrated on system board Controller Intel HD Graphics Communications Network adapter 10 100 1000 Mbps Ethernet LAN Wireless internal wireless local area network WLAN and wireless wide area network WWAN Ports and Connectors Audio one microphone stereo headphone ...

Page 115: ... kbps 212 kbps 424 kbps and 848 kbps ISO15693 HID iClass FIPS201 NXP Desfire Display Type white Light Emitting Diode WLED display Size 13 3 inch high definition HD Active area X Y 293 42 mm x 164 97 mm Dimensions Height 189 00 mm 7 44 inches Width 314 00 mm 12 36 inches Diagonal 337 82 mm 13 30 inches Maximum resolution 1366 x 768 pixels at 263 K colors Maximum Brightness 200 nits Operating angle ...

Page 116: ... 30Wh lithium ion battery with ExpressCharge 6 cell 60Wh lithium ion battery with ExpressCharge 6 cell 58Wh lithium ion battery Dimensions 3 cell Depth 29 97 mm 1 18 inches Height 19 80 mm 0 78 inch Width 208 00 mm 8 19 inches 6 cell Depth 54 10 mm 2 13 inches Height 20 85 mm 0 82 inch Width 214 00 mm 8 43 inches Weight 3 cell 177 00 g 0 39 lb 6 cell 349 00 g 0 77 lb Charge time with computer off ...

Page 117: ...d 90 W Input voltage 100 VAC to 240 VAC Input current maximum 1 50 A 1 60 A 1 70 A Input frequency 50 Hz to 60 Hz Output power 65 W and 90 W Output current 3 34 A and 4 62 A continuous Rated output voltage 19 5 1 0 VDC Temperature range Operating 0 C to 40 C 32 F to 104 F Non Operating 40 C to 70 C 40 F to 158 F Physical Height 25 40 mm to 30 10 mm 1 00 inch to 1 18 inches Width 335 00 mm 13 19 in...

Page 118: ... 40 F to 149 F Relative humidity maximum Operating 10 to 90 noncondensing Storage 5 to 95 noncondensing Altitude maximum Operating 15 24 m to 3048 m 50 ft to 10 000 ft Non Operating 15 24 m to 10 668 m 50 ft to 35 000 ft Airborne contaminant level G1 as defined by ISA 71 04 1985 118 ...

Page 119: ... can cause your computer to work incorrectly Entering System Setup 1 Turn on or restart your computer 2 When the blue DELL logo is displayed you must watch for the F2 prompt to appear 3 Once the F2 prompt appears press F2 immediately NOTE The F2 prompt indicates that the keyboard has initialized This prompt can appear very quickly so you must watch for it to display and then press F2 If you press ...

Page 120: ...rmation Displays the battery status and the type of AC adapter connected to the computer Boot Sequence Allows you to change the order in which the computer attempts to find an operating system Diskette Drive Internal HDD USB Storage Device CD DVD CD RW Drive Onboard NIC Cardbus NIC You can also choose the Boot List option The options are Legacy UEFI Date Time Allows you to change the date and time...

Page 121: ...ork controller The options are Disabled Enabled Enabled w PXE Default Setting Enabled w PXE System Management Allows you to control the systems management mechanism The options are Disabled Alert Only ASF 2 0 DASH ASF 2 0 Default Setting DASH ASF 2 0 Parallel Port Allows you to configure the parallel port on the docking station The options are Disabled AT PS2 ECP Default Setting AT Serial Port All...

Page 122: ...le USB Controller Diasanle USB Mass Storage Dev Disable USB Controller Default Setting Enable USB Controller Diskette Drive Allows you to activate the diskette drives The options are Disabled Enabled Default Setting Enabled Miscellaneous Devices Allows you to enable or disable the following devices Internal Modem Fixed Bay eSATA Ports Hard Drive Free Fall Protection External USB Port Microphone Ca...

Page 123: ...ons are SATA 0 SATA 1 SATA 4 SATA 5 Default Setting All drives are enabled Video Option Description LCD Brightness Allows you to set the display brightness depending up on the power source On Battery and On AC Security Option Description Admin Password Allows you to set change or delete the administrator admin password NOTE You must set the admin password before you set the system or hard drive pa...

Page 124: ...rnal hard disk drive NOTE Successful password changes take effect immediately Default Setting Not set Password Bypass Allows you to enable or disable the permission to bypass the System and the Internal HDD password when they are set The options are Disabled Reboot bypass Default Setting Disabled Password Change Allows you to enable the disable permission to the System and Hard Drive passwords whe...

Page 125: ... The Activate and Disable options will permanently activate or disable the feature and no further changes will be allowed Default Setting Deactivate CPU XD Support Allows you to enable the Execute Disable mode of the processor Default Setting Enable CPU XD Support is selected Non Admin Setup Changes Allows you to determine whether changes to the setup options are allowed when an Administrator Pass...

Page 126: ...Setting Enable Intel SpeedStep is selected C States Control Allows you to enable or disable the additional processor sleep states Default Setting The options C states C3 C6 Enhanced C states andC7 options are selected enabled Limit CPUID Allows you to limit the maximum value the processor Standard CPUID Function will support Default Setting Enable CPUID Limit is selected Intel TurboBoost Allows yo...

Page 127: ...rt is not selected NOTE This feature is only functional when the AC power adapter is connected If the AC power adapter is removed during Standby the system setup will remove power from all of the USB ports to conserve battery power Wireless Radio Control Allows you to enable or disable the feature that automatically switches from wired or wireless networks without depending on the physical connect...

Page 128: ...ad Embedded Allows you to choose one or two methods to enable the keypad that is embedded in the internal keyboard Default Setting Fn Key Only Mouse Touchpad Allows you to define how the system handles mouse and touch pad input The options are Serial Mouse PS2 Mouse Touchpad PS 2 Mouse Default Setting Touchpad PS 2 Mouse Numlock Enable Allows you to enable the Numlock option when the computer boot...

Page 129: ...s to set the option to speed up the boot process The options are Minimal Thorough Auto Default Setting Thorough Virtualization Support Option Description Virtualization Allows you to enable or disable the Intel Virtualization Technology Default Setting Enable Intel Virtualization Technology is selected VT for Direct I O Allows you to enable or disable Virtualization Technology for Direct I O Defau...

Page 130: ...of your computer Asset Tag Displays the Asset Tag SERR Messages Allows you to create a system asset tag System Logs Option Description BIOS Events Allows you to view and clear the System Setup BIOS POST events DellDiag Events Allows you to view and clear the DellDiag events Thermal Events Allows you to view and clear the Thermal events Power Events Allows you to view and clear the Power events BIO...

Page 131: ... as follows Alternately blinking amber light and blue light An unauthenticated or unsupported non Dell AC adapter is attached to your laptop Alternately blinking amber light with steady blue light Temporary battery failure with AC adapter present Constantly blinking amber light Fatal battery failure with AC adapter present Light off Battery in full charge mode with AC adapter present White light o...

Page 132: ...Blinkin g Blinkin g Solid Video card error Replace the system board Blinkin g Blinkin g Off Keyboard error 1 Reseat the keboard cable 2 Replace the keyboard Blinkin g Off Blinkin g USB controller error Unplug the USB device if any Solid Blinkin g Blinkin g No SODIMMs are installed 1 Install supported memory modules 2 If memory is already present reseat the module s one at a time in each slot 3 Try...

Page 133: ...Appearance Description Next Step Off Blinkin g Blinkin g Modem error 1 Reseat the modem 2 Replace the modem 3 Replace the system board 133 ...

Page 134: ...134 ...

Page 135: ...ัดหาบริการจะขึ นอยู กับประเทศและประเภทผลิตภัณฑ บริการบางตัวอาจไม มีในพื นที ของคุณ การติดต อฝ ายขายของ Dell ฝ ายบริการทางเทคนิคหรือฝ ายบริการลูกค าเพื อแจ งปัญหา 1 กรุณาเข าไปที เว บไซต support dell com 2 เลือกประเภทบริการที เกี ยวข อง 3 หากคุณไม ใช ลูกค าในสหรัฐฯ ให เลือกรหัสประเทศจากด านล างของหน า support dell com หรือเลือก All เพื อดูตัว เลือกเพิ มเติม 4 เลือกลิงค ของบริการหรือความช วยเหลือที ...

Reviews: