background image

Back to Contents Page


 Battery Latch Assembly  

Dell™ Latitude™ D531 Service Manual


Removing the Battery Latch Assembly 


Replacing the Battery Latch Assembly 


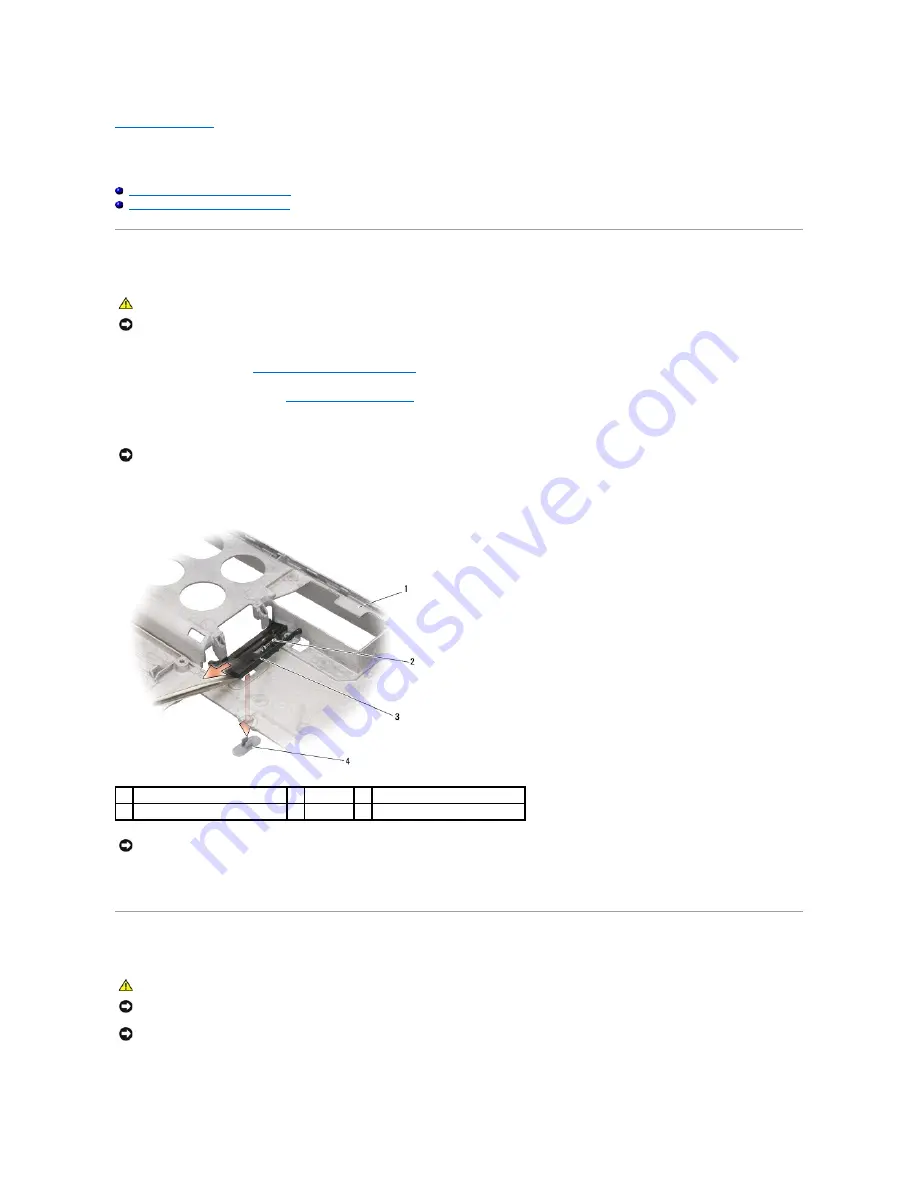
Removing the Battery Latch Assembly  


1.

Follow the instructions in 

Before Working Inside Your Computer

.  


2.

Remove the computer base (see 

Removing the Computer Base

).  


3.

Insert a plastic scribe into the notch beneath the edge of the battery latch assembly, and then carefully pry the latch assembly loose.  


4.

Slightly lift the battery latch assembly, and then slide the assembly forward out of the base of the computer.  


5.

Press the tabs on the battery release button together, and then push the tabs through the base of the computer to remove the button.  


Replacing the Battery Latch Assembly  


1.

Align the tabs on the battery release button with the hole in the base of the computer, then push the tabs into the hole until they snap into place.  


CAUTION: 

Before you begin the following procedure, follow the safety instructions in the 

Product Information Guide

.


NOTICE: 

To avoid electrostatic discharge, ground yourself by using a wrist grounding strap or by periodically touching an unpainted metal surface, such 

as the back panel on the computer.


NOTICE: 

The battery latch spring is not secured to the latch assembly and can be easily misplaced. When removing the battery latch assembly, place 

the spring in a secure location until the latch is ready to be reinstalled.

computer base 

spring 

battery latch assembly 

battery release button 


NOTICE: 

Before you remove the battery release button, observe the orientation of the button to ensure proper installation when the button is 

replaced.


CAUTION: 

Before you begin the following procedure, follow the safety instructions in the 

Product Information Guide

.


NOTICE: 

To avoid electrostatic discharge, ground yourself by using a wrist grounding strap or by periodically touching an unpainted metal surface, such 

as the back panel on the computer.


NOTICE: 

Ensure the battery release button is properly oriented before installing the battery latch assembly.

Summary of Contents for Latitude D531

Page 1: ...ent to refer to either the entities claiming the marks and names or their products Dell Inc disclaims any proprietary interest in trademarks and trade names other than its own April 2007 Rev A00 Before You Begin Media Bay Devices Hard Drive Hinge Cover Keyboard Memory Display Internal Card With Bluetooth Wireless Technology Mini Card Coin Cell Battery Palm Rest Modem Processor Thermal Cooling Asse...

Page 2: ... procedure follow the safety instructions in the Product Information Guide NOTICE To avoid electrostatic discharge ground yourself by using a wrist grounding strap or by periodically touching an unpainted metal surface such as the back panel on the computer NOTE When removing the system board to replace the computer base it is not necessary to remove the processor memory or Mini Card CAUTION Befor...

Page 3: ...llowing procedure follow the safety instructions in the Product Information Guide NOTICE To avoid electrostatic discharge ground yourself by using a wrist grounding strap or by periodically touching an unpainted metal surface such as the back panel on the computer NOTICE The battery latch spring is not secured to the latch assembly and can be easily misplaced When removing the battery latch assemb...

Page 4: ...he hole in the battery latch assembly 6 Apply pressure to the battery latch assembly then simultaneously apply pressure to the battery release button until the tabs on the button push through the hole on the latch assembly and snap into place 7 Replace the computer base see Replacing the Computer Base Back to Contents Page NOTE Ensure that the tabs on the battery latch assembly are behind the rete...

Page 5: ...r electrical outlets 4 Disconnect all external cables from the computer 5 Close the display and turn the computer upside down on a flat work surface CAUTION Before you begin any of the procedures in this section follow the safety instructions in the Product Information Guide NOTICE Only a certified service technician should perform repairs on your computer Damage due to servicing that is not autho...

Page 6: ...6 Slide and hold the battery latch on the bottom of the computer then lift the battery out of the battery bay Back to Contents Page 1 battery 2 battery latch ...

Page 7: ...erly installed and a network cable is attached 2 Turn on the computer 3 Locate the latest BIOS update file for your computer at support dell com 4 Click Download Now to download the file 5 If the Export Compliance Disclaimer window appears click Yes I Accept this Agreement The File Download window appears 6 Click Save this program to disk and then click OK The Save In window appears 7 Click the do...

Page 8: ...9 Double click the file icon on the desktop and follow the instructions on the screen Back to Contents Page ...

Page 9: ...metal tab 4 Pull the cable connector from the card connector Replacing the Card With Bluetooth Wireless Technology CAUTION Before you perform any of the procedures in this section follow the safety instructions in the Product Information Guide NOTICE To avoid electrostatic discharge ground yourself by using a wrist grounding strap or by periodically touching an unpainted metal surface such as the ...

Page 10: ...beneath the metal tab 3 Replace the hinge cover see Replacing the Hinge Cover Back to Contents Page NOTICE To avoid electrostatic discharge ground yourself by using a wrist grounding strap or by periodically touching an unpainted metal surface such as the back panel on the computer ...

Page 11: ... battery compartment and then ease the battery out of the compartment Replacing the Coin Cell Battery CAUTION Before you perform any of the procedures in this section follow the safety instructions in the Product Information Guide NOTICE To avoid electrostatic discharge ground yourself by using a wrist grounding strap or by periodically touching an unpainted metal surface such as the back panel on...

Page 12: ...he battery into place 2 Replace the memory module coin cell battery cover and tighten the screw Back to Contents Page NOTICE To avoid electrostatic discharge ground yourself by using a wrist grounding strap or by periodically touching an unpainted metal surface such as the back panel on the computer ...

Page 13: ...trate on which the die is mounted while turning the cam screw to prevent intermittent contact between the cam screw and processor NOTICE To avoid damage to the processor hold the screwdriver so that it is perpendicular to the processor when turning the cam screw NOTE The ZIF socket cam screw secures the processor to the system board Take note of the arrow on the ZIF socket cam screw which indicate...

Page 14: ...cam screw to prevent intermittent contact between the cam screw and processor NOTICE Ensure that the cam lock is in the fully open position before seating the processor module Seating the processor module properly in the ZIF socket does not require force A processor module that is not properly seated can result in an intermittent connection or permanent damage to the microprocessor and ZIF socket ...

Page 15: ...s from the back of the computer 6 Disconnect the display cable from the display cable connector on the system board 7 Disconnect the Mini Card antenna cables see Removing the Mini Card 8 Lift the display out of the computer CAUTION Before you begin the following procedure follow the safety instructions in the Product Information Guide NOTICE To avoid electrostatic discharge ground yourself by usin...

Page 16: ...el 1 Follow the instructions in Before Working Inside Your Computer 2 Remove the hinge cover see Removing the Hinge Cover 3 Remove the keyboard see Removing the Keyboard 4 Remove the display assembly see Removing the Display Assembly 1 display assembly 2 antenna cables 3 3 display cable pull tab NOTICE Ensure the antenna cables are not twisted and that they are lying flat in the antenna cable clip...

Page 17: ...play Assembly 5 Replace the keyboard see Replacing the Keyboard 6 Replace the hinge cover see Replacing the Hinge Cover Display Panel Removing the Display Panel 1 Follow the instructions in Before Working Inside Your Computer 2 Remove the hinge cover see Removing the Hinge Cover 3 Remove the keyboard see Removing the Keyboard 4 Remove the display assembly see Removing the Display Assembly 5 Remove...

Page 18: ...or from the inverter connector 10 Press inward on the metal clamps on both sides of the top flex cable connector and gently pull to disconnect the top flex cable connector from the display locking connector Replacing the Display Panel 1 Connect the top flex cable connector to the display connector 1 M2 5 x 5 mm screws 8 2 display panel assembly 3 display cover 1 display panel 2 bracket 2 3 M2 x 3 ...

Page 19: ...ove the keyboard see Removing the Keyboard 4 Remove the display assembly see Removing the Display Assembly 5 Remove the display bezel see Removing the Display Bezel 6 Remove the four M2 x 3 mm screws that secure the wireless antenna cover to the display cover 7 Using your fingers gently separate the latch cover from the display cover and set it aside 8 Remove the display latch spring and set it as...

Page 20: ...isplay cover 3 Replace the wireless antenna cover then replace the four M2 x 3 mm screws to secure the antenna cover to the display cover 4 Replace the display bezel see Replacing the Display Bezel 5 Replace the display assembly see Replacing the Display Assembly 6 Replace the keyboard see Replacing the Keyboard 7 Replace the hinge cover see Replacing the Hinge Cover Back to Contents Page 1 displa...

Page 21: ...n connector to the system board connector 4 Replace the palm rest see Replacing the Palm Rest Back to Contents Page CAUTION Before you begin the following procedure follow the safety instructions in the Product Information Guide NOTICE To avoid electrostatic discharge ground yourself by using a wrist grounding strap or by periodically touching an unpainted metal surface such as the back panel on t...

Page 22: ...rge ground yourself by using a wrist grounding strap or by periodically touching an unpainted metal surface such as the back panel on the computer NOTICE To avoid damaging the hard drive handle the drive with care NOTE Dell does not guarantee compatibility or provide support for hard drives obtained from sources other than Dell NOTE If you are installing a hard drive obtained from a source other t...

Page 23: ...ll the drivers and utilities for your computer if necessary see Reinstalling Drivers and Utilities in your User s Guide Returning a Hard Drive to Dell Return your hard drive to Dell in the replacement drive s foam packaging Otherwise the hard drive may be damaged in transit Back to Contents Page NOTE The hard drive should be inserted in the replacement drive s antistatic bag before being placed in...

Page 24: ...efore you perform any of the procedures in this section follow the safety instructions in the Product Information Guide NOTICE To avoid electrostatic discharge ground yourself by using a wrist grounding strap or by periodically touching an unpainted metal surface such as the back panel on the computer NOTICE The hinge cover is fragile and can be damaged if extreme force is used Exercise care when ...

Page 25: ......

Page 26: ...uide NOTICE To avoid electrostatic discharge ground yourself by using a wrist grounding strap or by periodically touching an unpainted metal surface such as the back panel on the computer NOTICE The key caps on the keyboard are fragile easily dislodged and time consuming to replace Exercise care when removing and handling the keyboard 1 M2 x 3 mm screws 3 2 keyboard 3 keyboard tabs 5 4 latch 5 key...

Page 27: ... to secure the keyboard 4 Replace the hinge cover see Replacing the Hinge Cover Back to Contents Page NOTICE To avoid scratching the palm rest when replacing the keyboard hook the tabs along the front edge of the keyboard into the palm rest and then secure the keyboard in place NOTE You may need to push the bottom of the keyboard down slightly to slide the keyboard tabs into place ...

Page 28: ...low the procedures in Before Working Inside Your Computer 2 Remove the hinge cover see Removing the Hinge Cover 3 Remove the keyboard see Removing the Keyboard 4 Use your fingertips to carefully spread apart the metal clips securing each end of the memory module until the module pops up 5 Remove the memory module from the connector at a 45 degree angle DIMM B Connector NOTICE If you need to instal...

Page 29: ...d to spread the metal clips that secure the module 1 memory module 2 metal retention clips 2 CAUTION Before you perform any of the procedures in this section follow the safety instructions in the Product Information Guide NOTICE To avoid electrostatic discharge ground yourself by using a wrist grounding strap or by periodically touching an unpainted metal surface such as the back panel on the comp...

Page 30: ...Start Help and Support Computer Information DIMM B Connector 1 Align the notch in the module edge connector with the tab in the connector slot then slide the module firmly into the slot at a 45 degree angle 2 Rotate the module down until it clicks into place If you do not feel the click remove the module and reinstall it 3 Replace the memory module cover and tighten the screw 4 Insert the battery ...

Page 31: ...ps to carefully push the metal retention bracket away from the card until the card pops up CAUTION Before you perform any of the procedures in this section follow the safety instructions in the Product Information Guide NOTICE To avoid electrostatic discharge ground yourself by using a wrist grounding strap or by periodically touching an unpainted metal surface such as the back panel on the comput...

Page 32: ...u perform any of the procedures in this section follow the safety instructions in the Product Information Guide NOTICE To avoid electrostatic discharge ground yourself by using a wrist grounding strap or by periodically touching an unpainted metal surface such as the back panel on the computer NOTICE The card connector is keyed to ensure correct insertion If you feel resistance realign the card NO...

Page 33: ...em with the screw hole and press the modem into the connector on the system board 3 Replace the M2 x 3 mm screw and secure the modem to the system board 4 Replace the palm rest see Replacing the Palm Rest Back to Contents Page CAUTION Before you begin the following procedure follow the safety instructions in the Product Information Guide NOTICE To avoid electrostatic discharge ground yourself by u...

Page 34: ......

Page 35: ...ia bay 4 Push the new device into the media bay until it clicks If you swapped the device with the computer running the operating system automatically recognizes the device Back to Contents Page NOTE You do not need to install the device security screw unless you want to prevent the media from being easily removed CAUTION Before you begin any of the procedures in this section follow the safety ins...

Page 36: ... installed see Removing the Card With Bluetooth Wireless Technology 8 Remove the twelve M2 5 x 5 mm screws from the bottom of the computer 9 Turn the computer over and remove the three M2 5 x 5 mm screws securing the top of the palm rest 10 Disconnect the touch pad connector from the system board CAUTION Before you begin the following procedure follow the safety instructions in the Product Informa...

Page 37: ...s Technology 7 Replace the display assembly see Replacing the Display Assembly 8 Replace the keyboard see Replacing the Keyboard 9 Replace the hinge cover see Replacing the Hinge Cover 10 Replace the hard drive see Replacing the Hard Drive 11 Replace the media bay device see Removing and Installing Media Bay Devices Back to Contents Page 1 touch pad connector 2 speaker connector 3 palm rest 4 comp...

Page 38: ... computer Follow these precautions when using extended PC Cards l Protect the exposed end of an installed card Striking the end of the card can damage the system board l Always remove an extended PC Card before you pack the computer in its carrying case Removing a PC Card or ExpressCard Press the release button and remove the card or blank You may be required to press the release button twice once...

Page 39: ...nsert the card 2 Slide the card into the slot until the card is completely seated in its connector If you encounter too much resistance do not force the card Check the card orientation and try again The computer recognizes most PC Cards and automatically loads the appropriate device driver If the configuration program tells you to load the manufacturer s drivers use the floppy disk or CD that came...

Page 40: ...rds and automatically loads the appropriate device driver If the configuration program tells you to load the manufacturer s drivers use the floppy disk or CD that came with the ExpressCard Back to Contents Page 1 adapter slot 2 ExpressCard ...

Page 41: ...the Hinge Cover 6 Remove the keyboard see Removing the Keyboard 7 Remove the display assembly see Removing the Display Assembly 8 Remove the palm rest see Removing the Palm Rest 9 Remove all memory modules see Removing a Memory Module 10 Remove the Mini Card see Removing the Mini Card 11 Remove the modem see Removing the Modem 12 Remove the processor thermal cooling assembly see Removing the Proce...

Page 42: ...thermal cooling assembly see Replacing the Processor Thermal Cooling Assembly 7 Replace the modem see Replacing the Modem 8 Replace the Mini Card see Replacing the Mini Card 9 Replace all memory modules see Replacing a Memory Module 10 Replace the palm rest see Replacing the Palm Rest 11 Replace the display assembly see Replacing the Display Assembly 12 Replace the keyboard see Replacing the Keybo...

Page 43: ...he new system board with the computer Service Tag Back to Contents Page NOTICE Before turning on the computer replace all screws and ensure that no stray screws remain inside the computer Failure to do so may result in damage to the computer NOTE If you use a BIOS update program CD to flash the BIOS press F12 before inserting the CD in order to set the computer to boot from the CD for one time onl...

Page 44: ...o place 2 Align the five captive screws on the processor thermal cooling assembly with the screw holes on the system board 3 In sequential order tighten the five captive screws to secure the processor thermal cooling assembly to the system board 4 Connect the Mini Card antenna cables see Replacing the Mini Card 5 Replace the keyboard see Replacing the Keyboard 6 Replace the hinge cover see Replaci...

Page 45: ...Back to Contents Page ...

Page 46: ...stered trademark owned by Bluetooth SIG Inc and is used by Dell under license Other trademarks and trade names may be used in this document to refer to either the entities claiming the marks and names or their products Dell Inc disclaims any proprietary interest in trademarks and trade names other than its own April 2007 Rev A00 Back to Contents Page NOTE A NOTE indicates important information tha...

Reviews: