background image

Chipset driver

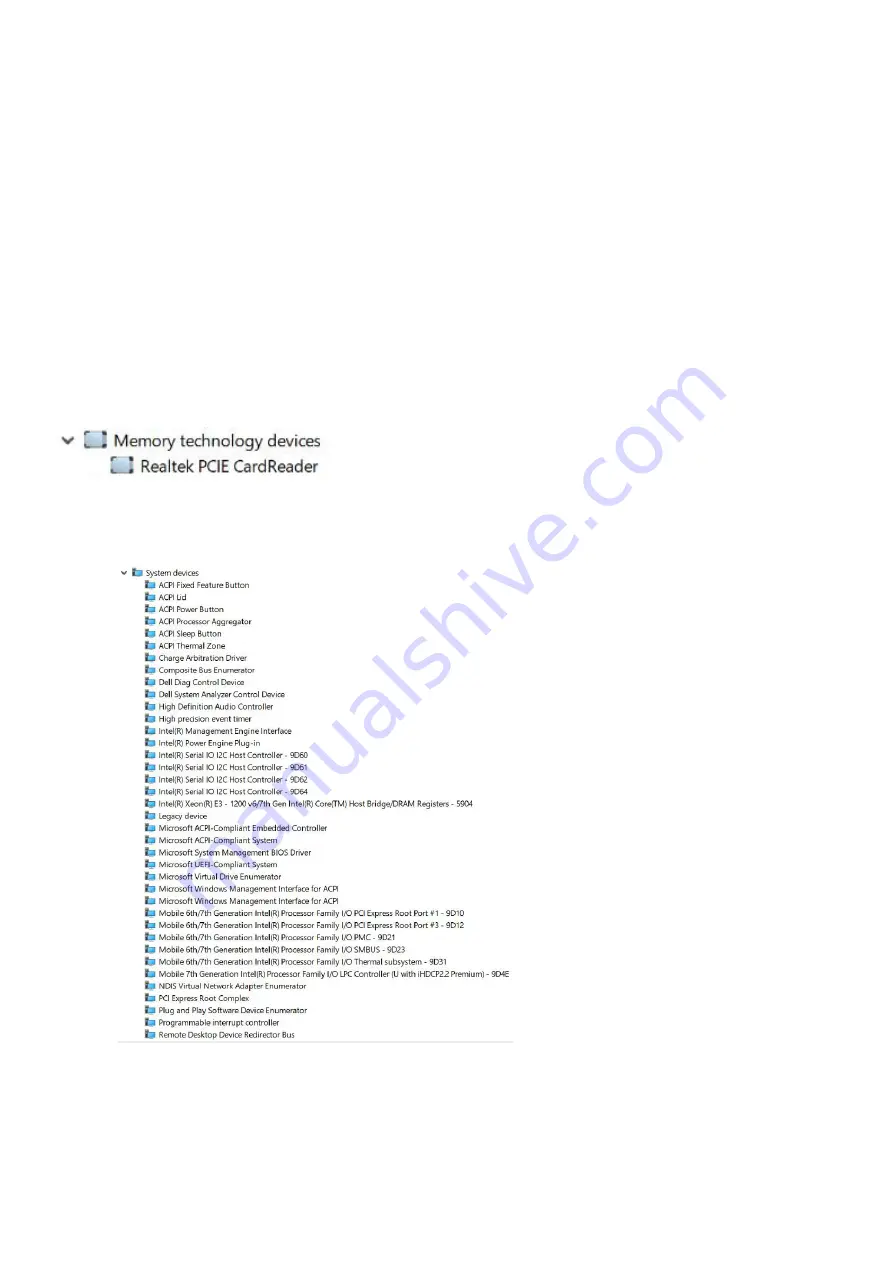
The chipset driver helps the system identify the components and install necessary drivers accurately. Verify that the chipset
was installed in the system by checking the below controllers. Many of the common devices are visible under Other Devices if
no drivers are installed. The unknown devices disappear once you install the chipset driver.

Make sure to install the following drivers, some of them may exist by default.

Intel HID Event Filter Driver

Intel Dynamic Platform and Thermal Framework Driver

Intel serial IO driver

Intel Thunderbolt(TM) Controller driver

Management Engine

Realtek PCI-E memory card

Realtek PCIE drivers

Verify if the Realtek PCIe drivers are already installed in the computer.

Management Engine Interface

Verify if the Intel Management Engine Interface drivers are already installed in the

computer.

50

Software

Summary of Contents for Latitude 7380

Page 1: ...Dell Latitude 7380 Owner s Manual Regulatory Model P28S Regulatory Type P28S001 February 2021 Rev A03 ...

Page 2: ...tial damage to hardware or loss of data and tells you how to avoid the problem WARNING A WARNING indicates a potential for property damage personal injury or death 2017 2021 Dell Inc or its subsidiaries All rights reserved Dell EMC and other trademarks are trademarks of Dell Inc or its subsidiaries Other trademarks may be trademarks of their respective owners ...

Page 3: ...IM card tray removal 13 Base cover 14 Removing base cover 14 Installing base cover 15 Battery 15 Lithium ion battery precautions 15 Removing 3 cell battery 16 Installing 3 cell battery 16 Removing 4 cell battery 17 Installing 4 cell battery 17 PCIe Solid State Drive SSD 17 Removing PCIe SSD 17 Installing PCIe SSD 18 M2 SATA Solid State Drive SSD 19 Removing SATA SSD 19 Installing SATA SSD 19 Speak...

Page 4: ...splay assembly 33 Display hinge cap 33 Removing display hinge Cap 33 Installing display hinge Cap 34 System board 35 Removing system board 35 Installing system board 39 Keyboard assembly 39 Removing keyboard assembly 39 Installing keyboard assembly 41 Keyboard lattice and Keyboard 42 Removing keyboard from keyboard tray 42 Installing keyboard to keyboard tray 42 Palm rest 43 Replacing palm rest 43...

Page 5: ...setup options 62 General screen options 62 System Configuration screen options 63 Video screen options 64 Security screen options 64 Secure Boot screen options 65 Intel Software Guard Extensions screen options 66 Performance screen options 66 Power Management screen options 67 POST Behavior screen options 68 Virtualization support screen options 69 Wireless screen options 69 Maintenance screen opt...

Page 6: ...Real Time Clock reset 74 6 Contents ...

Page 7: ...cting two or more grounding conductors to the same electrical potential This is done through the use of a field service electrostatic discharge ESD kit When connecting a bonding wire ensure that it is connected to bare metal and never to a painted or non metal surface The wrist strap should be secure and in full contact with your skin and ensure that you remove all jewelry such as watches bracelet...

Page 8: ... wire Never use wireless wrist straps Always be aware that the internal wires of a wrist strap are prone to damage from normal wear and tear and must be checked regularly with a wrist strap tester in order to avoid accidental ESD hardware damage It is recommended to test the wrist strap and bonding wire at least once per week ESD Wrist Strap Tester The wires inside of an ESD strap are prone to dam...

Page 9: ...CAUTION To avoid electrostatic discharge ground yourself by using a wrist grounding strap or by periodically touching an unpainted metal surface at the same time as touching a connector on the back of the computer 7 Remove any installed ExpressCards or Smart Cards from the appropriate slots Turning off your computer Turning off your Windows CAUTION To avoid losing data save and close all open file...

Page 10: ... Do not use batteries designed for other Dell computers 1 Connect any external devices such as a port replicator or media base and replace any cards such as an ExpressCard 2 Connect any telephone or network cables to your computer CAUTION To connect a network cable first plug the cable into the network device and then plug it into the computer 3 Connect your computer and all attached devices to th...

Page 11: ...Touchpad Display Assembly Display hinge cap System board Keyboard assembly Keyboard lattice and Keyboard Palm rest Recommended tools The procedures in this document require the following tools Phillips 0 screwdriver Phillips 1 screwdriver Small plastic scribe Screw size list Table 1 Latitude 7380 screw size list Component M2 5 x 6 M2 x 5 M2 5 x 3 5 M2 x 3 M2 5 x 4 M2 x 2 5 M2 x 2 Back cover 8 capt...

Page 12: ...SIM card or SIM card tray NOTE SIM card or SIM card tray removal is only available on systems that are shipped with WWAN module Hence removing procedure is only applicable for systems that are shipped with WWAN module CAUTION Removing the SIM card when the computer is On may cause data loss or damage the card Ensure that your computer is turned off or the network connections are disabled 1 Insert ...

Page 13: ...IM card tray removal For models shipped with a WWAN card the SIM card tray be removed from the system before removing the system board To remove the SIM card tray from the system see removing SIM card tray For models shipped with a Wireless card only a dummy SIM card tray must be removed before removing the system board The following are the steps for removing the dummy SIM card tray 1 Push the re...

Page 14: ... the screwdriver to match the head of the front corners of screw to avoid a possible stripped screw head b Use a plastic scribe to release the base cover from the edge of the computer as show in the figure 2 CAUTION Exercise caution when loosening the screws Angle the screwdriver to match the head of the screw front corners on the laptop base cover to avoid a possible stripped screw head 3 Lift th...

Page 15: ...attery precautions CAUTION Exercise caution when handling Lithium ion batteries Discharge the battery completely before removing it Disconnect the AC power adapter from the system and operate the computer solely on battery power the battery is fully discharged when the computer no longer turns on when the power button is pressed Do not crush drop mutilate or penetrate the battery with foreign obje...

Page 16: ... 1 Follow the procedure in Before working inside your computer 2 Remove the base cover 3 To remove the battery a Disconnect the battery cable from the connector on the system board 1 b Remove the M2 x 5 screw 1 that secure the battery to the computer 2 c Lift the battery from the computer 3 Installing 3 cell battery 1 Insert the battery into the slot on the computer 2 Route the battery cable throu...

Page 17: ...he battery into the slot on the computer 2 Route the battery cable through the routing clip and connect the battery cable to the connector on the system board NOTE Route the battery cable if the cable at the base of the battery is un routed 3 Tighten the M2 x 5 screws 2 to secure the battery to the computer 4 Install the base cover 5 Follow the procedure in After working inside your computer PCIe ...

Page 18: ... the connector 2 Install the SSD bracket over the PCIe SSD card NOTE When installing the SSD bracket ensure that the tab on the bracket is held securely with the tab on the palm rest NOTE Ensure to install the bracket is the system is shipped with bracket 3 Tighten the M2 x 3 screws to secure it the SSD bracket 4 Connect the battery cable to the connector on the system board 5 Install the base cov...

Page 19: ... SSD a Remove the M2 x 3 screw that secures the SSD 1 b Slide and lift the SSD to disconnect it from the connector 2 Installing SATA SSD 1 Insert the SATA SSD card into the connector 2 Tighten the screw to secure the SATA SSD to the system board 3 Connect the battery cable to the connector on the system board 4 Install the base cover 5 Follow the procedure in After working inside your computer Dis...

Page 20: ...ribe to release the cable from the connector Do not pull the cable as it may result in breakage b Un route the speaker cable from the routing clips 2 c Remove the tape that secures the speaker cables to the touchpad board 3 5 To remove the speaker module a Remove the M2 0x3 0 screws 4 that secure the speaker module to the computer 1 b Remove the M2 0x3 0 screws that secure the speaker module to th...

Page 21: ...he base cover 7 Follow the procedure in After working inside your computer Coin cell battery Removing the coin cell battery 1 Follow the procedure in Before working inside your computer 2 Remove the base cover 3 Disconnect the battery cable from the connector on the system board 4 To remove the coin cell battery a Disconnect the coin cell battery cable from the connector on the system board 1 NOTE...

Page 22: ...de your computer WWAN card Removing WWAN card 1 Follow the procedure in Before working inside your computer 2 Remove the base cover base cover 3 Disconnect the battery cable from the connector on the system board 4 To remove the WWAN card a Remove the M2 0 x 3 0 screw that secures the metal bracket to the WWAN card b Lift the metal bracket that secures the WWAN card c Disconnect the WWAN cables fr...

Page 23: ...ing inside your computer NOTE The IMEI number can also be found on the WWAN card WLAN card Removing WLAN card 1 Follow the procedure in Before working inside your computer 2 Remove the base cover base cover 3 Disconnect the battery cable from the connector on the system board 4 To remove the WLAN card a Remove the M2 0 x 3 0 screw that secures the metal bracket to the WLAN card 1 b Lift the metal ...

Page 24: ...the procedure in After working inside your computer Memory modules Removing memory module 1 Follow the procedure in Before working inside your computer 2 Remove the base cover base cover 3 Disconnect the battery cable from the connector on the system board 4 To remove the memory module a Pull the clips securing the memory module until the module snaps out 1 b Remove the memory module from the conn...

Page 25: ...rd 4 To remove the heat sink assembly NOTE To identify the number of screws see screw list a Disconnect the fan cable from the system board 1 NOTE After removing the heat sink assembly ensure to disconnect the fan cable b Remove the M2 0 x 5 0 screws that secure the heat sink and the M2 0 x 3 0 screws that secure the fan to the system board 2 NOTE Remove the screws in the order of the callout numb...

Page 26: ...connector port 1 Follow the procedure in Before working inside your computer 2 Remove the base cover 3 Disconnect the battery cable from the connector on the system board 4 To remove the power connector port a Disconnect the power connector port cable from the system board 1 NOTE Ensure to remove the adhesive tape that covers the connector NOTE Use a plastic scribe to release the cable from the co...

Page 27: ...computer LED board Removing LED board 1 Follow the procedure in Before working inside your computer 2 Disconnect the battery cable from the connector on the system board 3 To remove the LED board a Disconnect the LED cable from the LED board 1 CAUTION Avoid pulling the cable as it would result in breaking the cable connector Instead use a scribe to release the LED cable from its connector b Unrout...

Page 28: ...ow the procedure in Before working inside your computer 2 Remove the base cover 3 Disconnect the battery cable from the connector on the system board 4 Remove the PCIe SSD card 5 To disconnect the smart card cable a Disconnect the smart card cable 1 NOTE Ensure to gently push the connector to avoid damage to the smart card head b Lift the smart card cable that is affixed to the touchpad module 2 N...

Page 29: ...n the system board 6 Install the base cover 7 Follow the procedure in After working inside your computer Touchpad Removing touchpad buttons board 1 Follow the procedure in Before working inside your computer 2 Remove the base cover 3 Disconnect the battery cable from the connector on the system board 4 To disconnect the smart card cable a Disconnect the smart card cable 1 b Lift the smart card cab...

Page 30: ...he touchpad buttons board cable from the touchpad board 1 NOTE The touchpad buttons board cable is below the smart card cable Ensure to lift the latch to release the touchpad button board cable b Remove screws 2 that secure the touchpad buttons board 2 c Lift the touchpad buttons board from the computer 3 30 Disassembly and reassembly ...

Page 31: ...he connector on the computer 5 Install the speaker 6 Install the base cover 7 Follow the procedure in After working inside your computer Display Assembly Removing display assembly 1 Follow the procedure in Before working inside your computer 2 Remove the base cover 3 Remove the WLAN card 4 Remove the WWAN card NOTE To identify the number of screws see screw list 5 To remove the display assembly a ...

Page 32: ... the adhesive tape that secures the eDP cable 5 NOTE In touch configuration system you will find both eDP cable and touch display cable that is secured with adhesive tape 6 To remove the display assembly a Open the display of the computer and lay it on a flat surface at 180 degree angle b Remove the M2 5 x 4 0 screws 6 that secure the display hinge to the display assembly 1 c Lift the display asse...

Page 33: ...play cable secure it with tapes along with the eDP cable 5 Connect the eDP cable to the connector on the system board NOTE For touch configuration system connect the touch display cable to its connector on the system board 6 Install the eDP metal bracket on the eDP cable and tighten the M2 x 3 screws 7 Route the WLAN and WWAN cables through the routing channels 8 Install the WLAN card 9 Install th...

Page 34: ... Remove the display hinge cap Installing display hinge Cap 1 Insert the display hinge cap to the display assembly 2 Push the display hinge cap to the left to secure it 3 Install the a display assembly b WLAN card c WWAN card d base cover 4 Follow the procedure in After working inside your computer 34 Disassembly and reassembly ...

Page 35: ...ent 2 Remove the SIM card 3 Remove the base cover 4 Disconnect the battery cable from the connector on the system board 5 Remove the memory module 6 Remove the PCIe SSD 7 Remove the WLAN card 8 Remove the WWAN card 9 Remove the heat sink assembly 10 Remove the M2 0 x 3 0 screw that secures the memory module bracket to the system board 1 11 To disconnect the eDP cable Disassembly and reassembly 35 ...

Page 36: ...nnect the eDP cable from the system board 4 e Lift the tape that secures the eDP cable to the system board 5 12 To disconnect the cables NOTE To disconnect the speaker LED board coin cell battery and the power connector port cables use a plastic scribe to release the cable from the connector Do not pull the cable as it may result in breakage a speaker cable 1 b LED board cable 2 c coin cell batter...

Page 37: ...13 To remove the system board a Disconnect the M2 0x3 0 screws that secure the system board to computer 1 b Lift the system board away from the computer Disassembly and reassembly 37 ...

Page 38: ...move the M2 0x5 0 screws that secure the USB Type C bracket 15 Flip the system board peel off the tapes securing the bracket and remove the USB Type C port from the system board 38 Disassembly and reassembly ...

Page 39: ...puter NOTE If your computer has a WWAN card then SIM card tray installation is a requirement 8 Install the heat sink 9 Install the WLAN card 10 Install the WWAN card 11 Install the SSD card 12 Install the memory module 13 Connect the battery cable to the connector on the system board 14 Install the base cover 15 Follow the procedure in After working inside your computer Keyboard assembly Removing ...

Page 40: ... and USH board cables 1 b keyboard backlight cable 2 c keyboard cable 3 12 To remove the keyboard assembly NOTE To identify the screws see screw list a Remove the M2 x 2 5 screws 19 that secure the keyboard 1 b Lift the keyboard assembly from the chassis 2 40 Disassembly and reassembly ...

Page 41: ...computer 2 Tighten the M2 0 x 2 5 screws that secure the keyboard to the chassis 3 Connect the keyboard cable keyboard backlight cable touchpad cable and USH cable to the connectors on the touchpad buttons board 4 Install the system board 5 Install the heat sink 6 Install the WLAN card 7 Install the WWAN card 8 Install the SSD card 9 Install the memory module 10 Connect the battery cable to the co...

Page 42: ...ssembly 3 Remove the M2 0 x 2 0 screws that secure the keyboard to the keyboard assembly 1 4 Lift the keyboard away from the keyboard tray 2 Installing keyboard to keyboard tray 1 Align the keyboard with the screw holders on the keyboard tray 2 Tighten the five M2 0 x 2 0 screws to secure the keyboard to the keyboard tray 42 Disassembly and reassembly ...

Page 43: ...e procedure in Before working inside your computer 2 Remove the a base cover b battery c memory module d PCIe SSD e WLAN card f WWAN card g power connector port h heat sink assembly i coin cell battery j speaker k display assembly l system board Disassembly and reassembly 43 ...

Page 44: ...4 Install the a keyboard b system board c display assembly d speaker e coin cell battery f heatsink g power connector port h WLAN card i WWAN card j PCIe SSD k memory l battery m base cover 5 Follow the procedure in After working inside your computer 44 Disassembly and reassembly ...

Page 45: ...an its predecessor In a nutshell USB 3 1 Gen 1 features are as follows Higher transfer rates up to 5 Gbps Increased maximum bus power and increased device current draw to better accommodate power hungry devices New power management features Full duplex data transfers and support for new transfer types Backward USB 2 0 compatibility New connectors and cable The topics below cover some of the most c...

Page 46: ...tive it s easy to imagine that with 5 10 times the bandwidth available USB video solutions should work that much better Single link DVI requires almost 2Gbps throughput Where 480Mbps was limiting 5Gbps is more than promising With its promised 4 8Gbps speed the standard will find its way into some products that previously weren t USB territory like external RAID storage systems Listed below are som...

Page 47: ...es a USB Type C connector port to connect to supported peripherals 1 Thunderbolt 3 uses USB Type C connector and cables It is compact and reversible 2 Thunderbolt 3 supports speed up to 40 Gbps 3 DisplayPort 1 2 compatible with existing DisplayPort monitors devices and cables 4 USB Power Delivery Up to 130W on supported computers Key Features of Thunderbolt 3 over USB Type C 1 Thunderbolt USB Disp...

Page 48: ...ng the way for true 3D gaming and 3D home theater applications Content Type Real time signaling of content types between display and source devices enabling a TV to optimize picture settings based on content type Additional Color Spaces Adds support for additional color models used in digital photography and computer graphics 4K Support Enables video resolutions far beyond 1080p supporting next ge...

Page 49: ...guration Services Available with Intel 6thGen Core I only Other Ubuntu 16 04 LTS SP1 64 bit NeoKylin v6 0 64 bit OS media support Dell com support to download eligible Windows OS USB media available as upsell Downloading Windows drivers 1 Turn on the 2 Go to Dell com support 3 Click Product Support enter the Service Tag of your and then click Submit NOTE If you do not have the Service Tag use the ...

Page 50: ... you install the chipset driver Make sure to install the following drivers some of them may exist by default Intel HID Event Filter Driver Intel Dynamic Platform and Thermal Framework Driver Intel serial IO driver Intel Thunderbolt TM Controller driver Management Engine Realtek PCI E memory card Realtek PCIE drivers Verify if the Realtek PCIe drivers are already installed in the computer Managemen...

Page 51: ... and are installed Figure 2 Serial IO driver Graphics controller driver Verify if the graphics controller driver is already installed in the computer Table 5 Graphics controller driver Before Installation After Installation USB drivers Verify if the USB drivers are already installed in the computer Software 51 ...

Page 52: ...dio Verify if audio drivers are already installed in the computer Table 7 Realtek audio Before Installation After Installation Serial ATA drivers Install the latest Intel Rapid Storage driver for best performance Using the default Windows storage drivers is not recommended Verify if the default serial ATA drivers are installed in the computer 52 Software ...

Page 53: ... security devices in the Device Manager Security device drivers Verify if the security device drivers are installed in the computer Fingerprint sensor drivers Verify if the Fingerprint sensor drivers are installed in the computer Software 53 ...

Page 54: ...fications Audio specifications Battery specifications AC adapter specifications Port and connector specifications Communication specifications Touchpad specifications Camera specifications Display Dimensions and Weight Environmental specifications Processor specifications Table 8 Processor specifications Feature Specifications Intel 6th generation i3 i5 i7 series Intel 7th generation i3 i5 i7 seri...

Page 55: ...s NOTE Supports one VGA DisplayPort HDMI through the docking station connected to optional Thunderbolt 3 controller Audio specifications Feature Specification Types Four channel high definition audio Controller Realtek ALC3246 Stereo conversion 24 bit analog to digital and digital to analog Internal interface High definition audio External interface Microphone in stereo headphones and headset comb...

Page 56: ...to 65 C 4 F to 149 F Coin cell battery 3 V CR2032 lithium coin cell AC adapter specifications Feature Specification Type 7 4 mm Barrel Type 65 W or 90 W NOTE The system is shipped with 65 W adapter and also supports 90 W adapter for fast charging Input voltage 100 V AC to 240 V AC Input current maximum 1 7 A 2 5 A Input frequency 50 Hz to 60 Hz Output current 3 34 A and 4 62 A Rated output voltage...

Page 57: ...nnector USB Two USB 3 1 Gen1 ports one PowerShare capableType C USB 3 1 DisplayPort optional Thunderbolt 3 controller Memory card reader one Micro SD 4 0 Micro Subscriber Identity Module SIM card one Docking port None Express Card None AC adapter E5 65 W E5 65 W rug Only for India E5 90 W E4 65 W HF BFR PVC Free Power Companion 45 W Dura Ace Hybrid Power Bank and adapter 45 W 12 inches only not 14...

Page 58: ... Video Up to 1280x720 0 92MP Up to 1280x720 0 92MP Up to 1280x720 0 92MP Resolution Still Image Up to 1280 x 720 0 92MP Up to 1280 x 720 0 92MP Up to 1280 x 720 0 92MP Imaging Rate Up to 30 frames per second Up to 30 frames per second Up to 30 frames per second Display Table 12 13 3 16 9 AG FHD Non Touch WLED 300 nits eDP 1 3 WVA Feature Specification Type FHD Anti Glare Luminance typical 300 nits...

Page 59: ...nsumption maximum 5 2 W Dimensions and Weight Table 14 Dimensions Dimensions Inches Millimeter Width 12 00 304 80 Depth 8 19 207 95 Height front full for NT FHD and Touch FHD 0 657 16 7 Height front full for NT Thin Bezel FHD 0 67 16 95 Height front for NT FHD and Touch FHD 0 44 11 16 Height front for NT Thin Bezel FHD 0 45 11 41 Height rear full for all configurations 0 785 19 95 Height rear for ...

Page 60: ...ecifications Operating 10 to 90 non condensing Storage 5 to 95 non condensing Table 18 Altitude maximum specifications Temperature Specifications Operating 15 2 m to 3048 m 50 to 10 000 ft Non operating 15 24 m to 10 668 m 50 ft to 35 000 ft Storage 5 to 95 non condensing Airborne contaminant level G2 or lower as defined by ISA S71 04 1985 60 System specifications ...

Page 61: ...ion support screen options Wireless screen options Maintenance screen options System Log screen options Updating the BIOS in Windows Updating your system BIOS using a USB flash drive System and setup password Boot menu Press F12 when the Dell logo appears to initiate a one time boot menu with a list of the valid boot devices for the system Diagnostics and BIOS Setup options are also included in th...

Page 62: ...ate Manufacture Date Express Service Code the Signed Firmware update enabled by default Memory Information Displays Memory Installed Memory Available Memory Speed Memory Channels Mode Memory Technology DIMM A Size and DIMM B Size Processor Information Displays Processor Type Core Count Processor ID Current Clock Speed Minimum Clock Speed Maximum Clock Speed Processor L2 Cache Processor L3 Cache HT...

Page 63: ...Reporting USBConfiguratio n This is an optional feature This field configures the integrated USB controller If Boot Support is enabled the system is allowed to boot any type of USB Mass Storage Devices HDD memory key floppy If USB port is enabled device attached to this port is enabled and available for OS If USB port is disabled the OS cannot see any device attached to this port The options are E...

Page 64: ...ly Default setting Not set System Password Allows you to set change or delete the system password NOTE Successful password changes take effect immediately Default setting Not set Mini SATA SSD 2 Password Allows you to set change or delete the password on the mini card Solid State Drive SSD NOTE Successful password changes take effect immediately Default setting Not set Strong Password Allows you t...

Page 65: ...ce software The options are Deactivate Disable Activate default NOTE The Activate and Disable options will permanently activate or disable the feature and no further changes will be allowed CPU XD Support Allows you to enable the Execute Disable mode of the processor Enable CPU XD Support default OROM Keyboard Access Allows you to set an option to enter the Option ROM Configuration screens using h...

Page 66: ...tion Description Multi Core Support This field specifies whether the process has one or all cores enabled The performance of some applications improves with the additional cores This option is enabled by default Allows you to enable or disable multi core support for the processor The installed processor supports four cores If you enable Multi Core Support four cores are enabled If you disable Mult...

Page 67: ...re that powers on the computer from the Off state when triggered by a LAN signal Disabled default WLAN Only LAN Only LAN or WLAN Block Sleep This option lets you to block entering to sleep S3 state in OS environment When enabled system wont go to sleep Intel Rapid Start will be disabled automatically and OS Power option will be blank if it was set to Sleep S3 state Block Sleep S3 State option is d...

Page 68: ...le the Numlock option when the computer boots This option is enabled by default Fn Key Emulation Allows you to set the option where the Scroll Lock key is used to simulate the Fn key feature Enable Fn Key Emulation default Fn Lock Options Allows you to let hot key combinations Fn Esc toggle the primary behavior of F1 F12 between their standard and secondary functions If you disable this option you...

Page 69: ...reless technology The options are WWAN GPS on WWAN Module WLAN WiGig Bluetooth All the options are enabled by default NOTE For WLAN and WiGig enable or disable controls are tied together and they cannot be enabled or disabled independently Wireless Device Enable Allows you to enable or disable the internal wireless devices WWAN GPS WLAN WiGig Bluetooth All the options are enabled by default Mainte...

Page 70: ...ions 9 Identify the latest BIOS file and click Download 10 Select your preferred download method in the Please select your download method below window click Download File The File Download window appears 11 Click Save to save the file on your computer 12 Click Run to install the updated BIOS settings on your computer Follow the instructions on the screen Updating your system BIOS using a USB flas...

Page 71: ...ord feature is disabled Assigning a system setup password You can assign a new System or Admin Password only when the status is in Not Set To enter the system setup press F2 immediately after a power on or reboot 1 In the System BIOS or System Setup screen select Security and press Enter The Security screen is displayed 2 Select System Admin Password and create a password in the Enter the new pass...

Page 72: ...tem BIOS or System Setup screen select System Security and press Enter The System Security screen is displayed 2 In the System Security screen verify that Password Status is Unlocked 3 Select System Password alter or delete the existing system password and press Enter or Tab 4 Select Setup Password alter or delete the existing setup password and press Enter or Tab NOTE If you change the System and...

Page 73: ... 1 5 second pause with the LED off and then a second group of LED blinks 1 through 9 in white This is then followed by a three second pause with the LED off before repeating over again Each LED blink takes 0 5 seconds The system will not shutdown when displaying the Diagnostic Error Codes Diagnostic Error Codes will always supersede any other use of the LED For instance on Notebooks battery codes ...

Page 74: ...the power button Go to how to reset real time clock NOTE If AC power is disconnected from the system during the process or the power button is held longer than 40 seconds the RTC reset process is aborted The RTC reset will reset the BIOS to Defaults un provision Intel vPro and reset the system date and time The following items are unaffected by the RTC reset Service Tag Asset Tag Ownership Tag Adm...

Reviews: