background image

Replacing the display assembly

NOTE: 

Before working inside your computer, read the safety information that shipped with your computer and follow 

the steps in 

Before working inside your computer

. After working inside your computer, follow the instructions in 

After 

working inside your computer

. For more safety best practices, see the Regulatory Compliance home page at 

www.dell.com/regulatory_compliance

.

Procedure

1.

CAUTION: 

Place the computer on a soft and clean surface to avoid scratching the display.

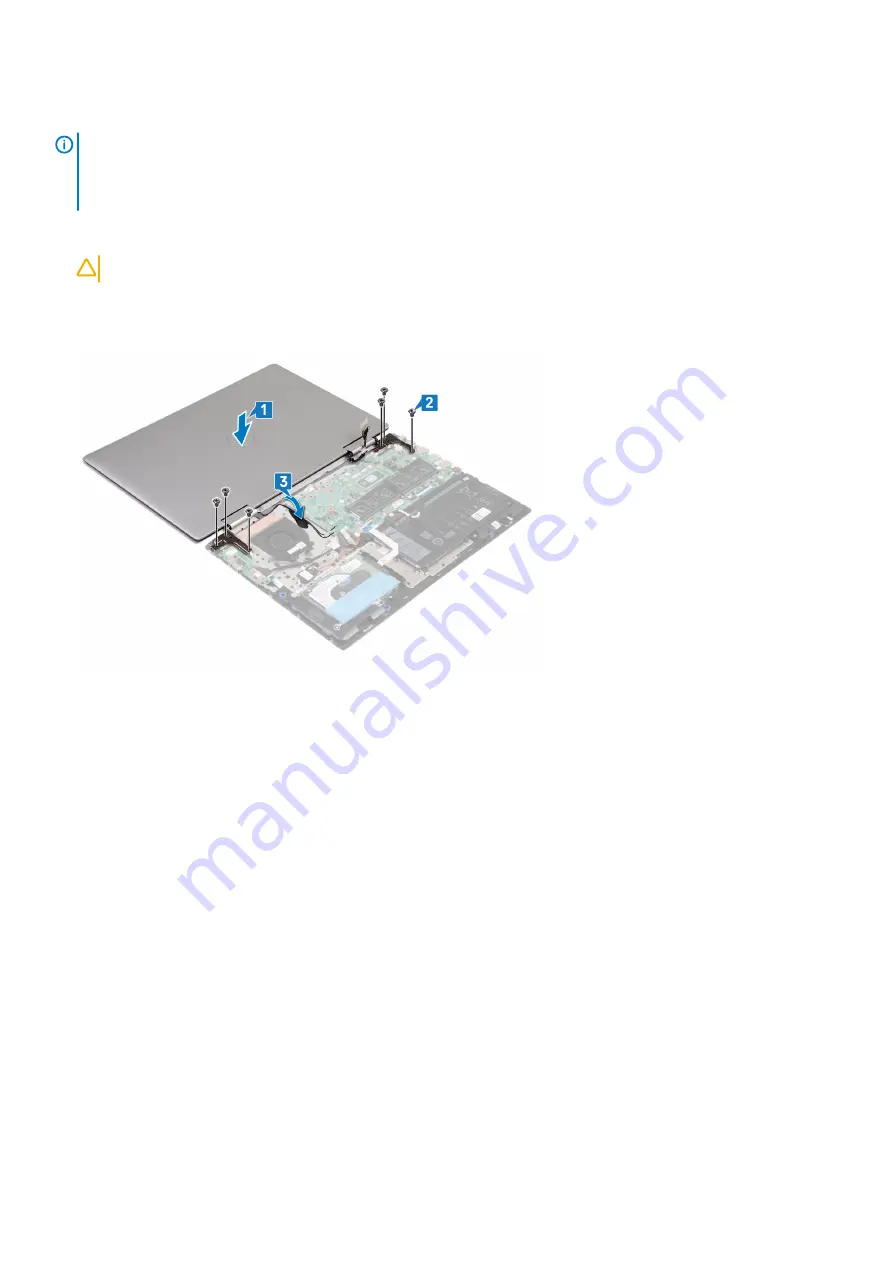
Align the screw holes on the display assembly with the screw holes on the palm-rest and keyboard assembly.

2. Replace the six screws (M2.5x5) that secure the display assembly to the palm-rest and keyboard assembly.
3. Route the antenna cables through the routing guides on the palm-rest and keyboard assembly.

4. Close the display, and turn the computer over.
5. Adhere the tape that secures the antenna cable to the palm-rest and keyboard assembly.
6. Connect the fan cable to the system board.
7. Adhere the tape that secures the fan cable to the palm-rest and keyboard assembly.
8. Slide the I/O cable into the slot on the system board and close the latches to secure the cable.
9. Slide the touchscreen cable into the slot on the system board and close the latch to secure the cable.
10. Slide the display cable into the slot on the system board and close the latch to secure the cable.
11. Adhere the tape that secures the touchscreen cable to the system board.
12. Adhere the tape that secures the display cable to the system board.

Removing and installing components

35

Summary of Contents for Inspiron 5591 2n1

Page 1: ...Inspiron 5591 2n1 Service Manual Regulatory Model P78F Regulatory Type P78F001 ...

Page 2: ...amage to hardware or loss of data and tells you how to avoid the problem WARNING A WARNING indicates a potential for property damage personal injury or death 2019 Dell Inc or its subsidiaries All rights reserved Dell EMC and other trademarks are trademarks of Dell Inc or its subsidiaries Other trademarks may be trademarks of their respective owners 2019 07 Rev A00 ...

Page 3: ...y 14 Memory modules 16 Solid state drive Intel Optane 18 Hard drive 22 Heat sink 25 Fan 26 Speakers 28 I O board 29 Power adapter port 30 Wireless card 32 Display assembly 33 Power button 36 System board 38 Touchpad 41 Palm rest and keyboard assembly 43 3 Device drivers 46 Intel Chipset Software Installation Utility 46 Video drivers 46 Intel Serial IO driver 46 Intel Trusted Execution Engine Inter...

Page 4: ...oot System Assessment ePSA diagnostics 57 Running the ePSA diagnostics 57 System diagnostic lights 57 Recovering the operating system 58 Flashing BIOS USB key 58 Flashing the BIOS 59 Enabling Intel Optane memory 59 Disabling Intel Optane memory 59 WiFi power cycle 59 Flea power release 60 6 Getting help and contacting Dell 61 4 Contents ...

Page 5: ...nside your computer ground yourself by using a wrist grounding strap or by periodically touching an unpainted metal surface such as the metal at the back of the computer While you work periodically touch an unpainted metal surface to dissipate static electricity which could harm internal components CAUTION When you disconnect a cable pull on its connector or on its pull tab not on the cable itself...

Page 6: ...ield Service kit includes three main components anti static mat wrist strap and bonding wire Components of an ESD field service kit The components of an ESD field service kit are Anti Static Mat The anti static mat is dissipative and parts can be placed on it during service procedures When using an anti static mat your wrist strap should be snug and the bonding wire should be connected to the mat ...

Page 7: ...orming service and that they use anti static bags for transporting sensitive components Transporting sensitive components When transporting ESD sensitive components such as replacement parts or parts to be returned to Dell it is critical to place these parts in anti static bags for safe transport Lifting equipment Adhere to the following guidelines when lifting heavy weight equipment CAUTION Do no...

Page 8: ...e when replacing a component NOTE Screw color may vary with the configuration ordered Table 1 Screw list Component Secured to Screw type Quantity Screw image Base cover Palm rest and keyboard assembly M2x7 6 Battery Palm rest and keyboard assembly M2x3 2 Hard drive assembly Palm rest and keyboard assembly M2x3 3 Hard drive bracket Hard drive M3x3 4 Solid state drive Palm rest and keyboard assembly...

Page 9: ... that shipped with your computer and follow the steps in Before working inside your computer After working inside your computer follow the instructions in After working inside your computer For more safety best practices see the Regulatory Compliance home page at www dell com regulatory_compliance Procedure 1 Remove the six screws M2x7 that secure the base cover to the palm rest and keyboard assem...

Page 10: ...ety information that shipped with your computer and follow the steps in Before working inside your computer After working inside your computer follow the instructions in After working inside your computer For more safety best practices see the Regulatory Compliance home page at www dell com regulatory_compliance Procedure 1 Close the display and turn the computer over Connect the battery cable to ...

Page 11: ...d assembly and snap the base cover into place 5 Tighten the three captive screws that secure the base cover to the palm rest and keyboard assembly 6 Replace the six screws M2x6 that secure the base cover to the palm rest and keyboard assembly Removing and installing components 11 ...

Page 12: ...nstructions in After working inside your computer For more safety best practices see the Regulatory Compliance home page at www dell com regulatory_compliance Prerequisites Remove the base cover Procedure 1 Peel off the tape that secures the battery cable to the battery 2 Peel the tape that secures the battery cable to the battery cable connector 3 Disconnect the battery cable from the system boar...

Page 13: ...steps in Before working inside your computer After working inside your computer follow the instructions in After working inside your computer For more safety best practices see the Regulatory Compliance home page at www dell com regulatory_compliance Procedure 1 Align the screw holes on the battery with the screw holes on the palm rest and keyboard assembly 2 Replace the two screws M2x3 that secur...

Page 14: ...formation that shipped with your computer and follow the steps in Before working inside your computer After working inside your computer follow the instructions in After working inside your computer For more safety best practices see the Regulatory Compliance home page at www dell com regulatory_compliance CAUTION Removing the coin cell battery resets the BIOS setup program s settings to default I...

Page 15: ...th your computer and follow the steps in Before working inside your computer After working inside your computer follow the instructions in After working inside your computer For more safety best practices see the Regulatory Compliance home page at www dell com regulatory_compliance Procedure 1 Adhere the coin cell battery to the palm rest and keyboard assembly 2 Route the coin cell battery cable t...

Page 16: ...ry modules 2 Use your fingertips to carefully spread apart the securing clips on each end of the memory module slot until the memory module pops up 3 Remove the memory module from the memory module slot Replacing the memory modules NOTE Before working inside your computer read the safety information that shipped with your computer and follow the steps in Before working inside your computer After w...

Page 17: ...ly into the slot at an angle 4 Press the memory module down until it clicks into place NOTE If you do not hear the click remove the memory module and reinstall it 5 Release the mylar that covers the memory modules on the system board Post requisites Replace the base cover Removing and installing components 17 ...

Page 18: ...de your computer For more safety best practices see the Regulatory Compliance home page at www dell com regulatory_compliance Prerequisites CAUTION You need to disable the Intel Optane memory before removing Intel Optane memory module from your computer For more information about disabling the Intel Optane memory see Disabling Intel Optane memory Remove the base cover Procedure 1 Locate the solid ...

Page 19: ...ION Solid state drives are fragile Exercise care when handling the solid state drive Procedure NOTE Follow the procedure to change the location of the screw mount in case if you are replacing the solid state drive of a different form factor 1 Align the notch on the solid state drive Intel Optane memory module with the tab on the solid state drive Intel Optane memory module slot 2 Slide the solid s...

Page 20: ...er supports two solid state drive form factors M 2 2230 M 2 2280 If you are replacing the solid state drive of a different form factor other than the one removed see the following procedure to move the location of the screw mount 1 Remove the screw mount from the palm rest and keyboard assembly 2 Turn the screw mount to 180 degrees 3 Insert the screw mount into the other screw mount slot on the pa...

Page 21: ...lot 5 Slide the solid state drive Intel Optane memory module firmly into the solid state drive slot at an angle 6 Press the other end of the solid state drive Intel Optane memory module and replace the screw M2x3 that secures the solid state drive to the palm rest assembly Removing and installing components 21 ...

Page 22: ...For more safety best practices see the Regulatory Compliance home page at www dell com regulatory_compliance CAUTION Hard drives are fragile Exercise care when handling the hard drive CAUTION To avoid data loss do not remove the hard drive while the computer is in sleep or on state Prerequisites 1 Remove the base cover 2 Remove the battery Procedure 1 Open the latch and disconnect the hard drive c...

Page 23: ...h your computer and follow the steps in Before working inside your computer After working inside your computer follow the instructions in After working inside your computer For more safety best practices see the Regulatory Compliance home page at www dell com regulatory_compliance CAUTION Hard drives are fragile Exercise care when handling the hard drive Procedure 1 Align the screw holes on the ha...

Page 24: ...holes on the palm rest and keyboard assembly 5 Replace the three screws M2x3 that secure the hard drive assembly to the palm rest and keyboard assembly 6 Connect the hard drive cable to the connector on the system board Post requisites 1 Replace the battery 2 Replace the base cover 24 Removing and installing components ...

Page 25: ...m board NOTE The number of screws may vary depending on the configuration ordered 2 Lift the heat sink off the system board Replacing the heat sink NOTE Before working inside your computer read the safety information that shipped with your computer and follow the steps in Before working inside your computer After working inside your computer follow the instructions in After working inside your com...

Page 26: ...follow the instructions in After working inside your computer For more safety best practices see the Regulatory Compliance home page at www dell com regulatory_compliance Prerequisites Remove the base cover Procedure 1 Peel off the tape that secures the fan cable to the palm rest and keyboard assembly 2 Disconnect the fan cable from the system board 3 Remove the two screws M2x3 that secure the fan...

Page 27: ...ty best practices see the Regulatory Compliance home page at www dell com regulatory_compliance Procedure 1 Align the screw holes on the fan with the screw holes on the palm rest and keyboard assembly 2 Replace the two screws M2x3 securing the fan to the palm rest and keyboard assembly 3 Connect the fan cable to the system board 4 Adhere the tape that secures the fan cable to the palm rest and key...

Page 28: ...speakers along with the cable from the palm rest and keyboard assembly Replacing the speakers NOTE Before working inside your computer read the safety information that shipped with your computer and follow the steps in Before working inside your computer After working inside your computer follow the instructions in After working inside your computer For more safety best practices see the Regulator...

Page 29: ...actices see the Regulatory Compliance home page at www dell com regulatory_compliance Prerequisites Remove the base cover Procedure 1 Peel off the tape that secures the I O board cable to the palm rest and keyboard assembly 2 Open the latch and disconnect the I O board cable from the I O board 3 Disconnect the fingerprint reader board cable from the I O board 4 Remove the two screws M2x3 that secu...

Page 30: ...ide the I O board cable into the connector on the I O board and close the latch to secure the cable 5 Adhere the tape that secures the I O board cable to the palm rest and keyboard assembly Post requisites Replace the base cover Power adapter port Removing the power adapter port NOTE Before working inside your computer read the safety information that shipped with your computer and follow the step...

Page 31: ... see the Regulatory Compliance home page at www dell com regulatory_compliance Procedure 1 Place the power adapter port into the slot on the palm rest and keyboard assembly and then align the screw hole on the power adapter port with the screw hole on the palm rest and keyboard assembly 2 Replace the screw M2x3 that secures the power adapter port to the palm rest and keyboard assembly 3 Connect th...

Page 32: ...e safety best practices see the Regulatory Compliance home page at www dell com regulatory_compliance Prerequisites Remove the base cover Procedure 1 Locate the wireless card on the system board 2 Remove the screw M2x3 that secures the wireless card bracket and wireless card to the system board 3 Lift the wireless card bracket off the wireless card 4 Disconnect the antenna cables from the wireless...

Page 33: ...a cable color scheme for the wireless card supported by your computer Table 2 Antenna cable color scheme Connectors on the wireless card Antenna cable color Main white triangle White Auxiliary black triangle Black 3 Align the screw hole on the wireless card bracket with the screw hole on the wireless card and the system board 4 Replace the screw M2x3 that secures the wireless card bracket and wire...

Page 34: ...n the system board 6 Open the latch and disconnect the touchscreen cable from the system board 7 Open the latch and disconnect the display cable from the system board 8 Turn the computer over and open the display as far as possible Then place the computer face down on a flat surface CAUTION Place the computer on a soft and clean surface to avoid scratching the display 9 Remove the antenna cables f...

Page 35: ...e palm rest and keyboard assembly 3 Route the antenna cables through the routing guides on the palm rest and keyboard assembly 4 Close the display and turn the computer over 5 Adhere the tape that secures the antenna cable to the palm rest and keyboard assembly 6 Connect the fan cable to the system board 7 Adhere the tape that secures the fan cable to the palm rest and keyboard assembly 8 Slide th...

Page 36: ...s 1 Remove the base cover 2 Remove the I O board 3 Remove the wireless card 4 Remove the display assembly Procedure 1 NOTE Your computer is shipped with either a power button or power button with fingerprint reader depending on the configuration ordered Remove the two screws M2x2 5 that secure the power button to the palm rest and keyboard assembly 2 NOTE This step is applicable only on the comput...

Page 37: ...ance Procedure 1 Place the power button or power button with fingerprint reader into the slot on the palm rest and keyboard assembly 2 NOTE This step is applicable only on the computers that are shipped with fingerprint reader Open the power button cable connector latch reconnect the fingerprint reader cable and close the latch 3 Replace the two screws M2x2 5 that secure the power button to the pa...

Page 38: ...o that you can reconnect the cables correctly after you replace the system board Prerequisites 1 Remove the base cover 2 Remove the battery 3 Remove the memory modules 4 Remove the coin cell battery 5 Remove the solid state drive Intel Optane memory module 6 Remove the fan 7 Remove the heat sink 8 Remove the wireless card 9 Remove the display assembly Procedure 1 Open the latch and disconnect the ...

Page 39: ...nside your computer follow the instructions in After working inside your computer For more safety best practices see the Regulatory Compliance home page at www dell com regulatory_compliance NOTE Your computer s Service Tag is stored in the system board You must enter the Service Tag in the BIOS setup program after you replace the system board NOTE Replacing the system board removes any changes yo...

Page 40: ...ith the screw holes on the system board 6 Replace the two screws M2x3 that secure the USB Type C port bracket to the system board 7 Connect the speaker cable to the system board 8 Slide the keyboard cable into the connector on the system board and close the latch to secure the cable 9 Slide the touchpad cable into the connector on the system board and close the latch to secure the cable 10 Slide t...

Page 41: ...best practices see the Regulatory Compliance home page at www dell com regulatory_compliance Prerequisites 1 Remove the base cover 2 Remove the battery Procedure 1 Open the latch and disconnect the touchpad cable from the system board 2 Peel the tapes that secure the touchpad to the palm rest and keyboard assembly 3 Remove the three screws M2x3 that secure the touchpad bracket to the palm rest and...

Page 42: ...ance Procedure 1 Align the screw holes on the touchpad with the screw holes on the palm rest and keyboard assembly 2 Replace the four screws M2x2 that secure the touchpad to the palm rest and keyboard assembly 3 Align the screw holes on the touchpad bracket with the screw holes on the touchpad 4 Replace the three screws M2x3 that secure the touchpad bracket to the touchpad 5 Adhere the tapes that ...

Page 43: ...atory_compliance Prerequisites 1 Remove the base cover 2 Remove the battery 3 Remove the memory modules 4 Remove the coin cell battery 5 Remove the solid state drive Intel Optane memory module 6 Remove the hard drive 7 Remove the fan 8 Remove the I O board 9 Remove the speakers 10 Remove the power adapter port 11 Remove the wireless card 12 Remove the display assembly 13 Remove the system board NO...

Page 44: ... dell com regulatory_compliance Procedure Place the palm rest and keyboard assembly on a clean and flat surface Post requisites 1 Replace the touchpad 2 Replace the system board NOTE The system board can be removed and installed together with the heat sink attached when replacing the palm rest assembly 3 Replace the display assembly 4 Replace the wireless card 5 Replace the power adapter port 6 Re...

Page 45: ...11 Replace the coin cell battery 12 Replace the memory modules 13 Replace the battery 14 Replace the base cover Removing and installing components 45 ...

Page 46: ...l com support Intel Trusted Execution Engine Interface In the Device Manager check if the Intel Trusted Execution Engine Interface driver is installed Install the driver update from www dell com support Intel Virtual Button driver In the Device Manager check if the Intel Virtual Button driver is installed Install the driver updates from www dell com support Wireless and Bluetooth drivers In the De...

Page 47: ...his prompt can appear very quickly so you must watch for it and then press F2 If you press F2 before the F2 prompt this keystroke is lost If you wait too long and the operating system logo appears continue to wait until you see the desktop Then turn off your computer and try again Navigation keys NOTE For most of the System Setup options changes that you make are recorded but do not take effect un...

Page 48: ...cture date of the computer Ownership Date Displays the ownership date of the computer Express Service Code Displays the express service code of the computer Ownership Tag Displays the ownership tag of the computer Signed Firmware Update Displays whether the signed firmware update is enabled Battery Displays the battery health information Primary Displays the primary battery Battery Level Displays ...

Page 49: ...anel Type of the computer Native Resolution Displays the native resolution of the computer Audio Controller Displays the audio controller information of the computer Wi Fi Device Displays the wireless device information of the computer Bluetooth Device Displays the Bluetooth device information of the computer Table 4 System setup options Boot options menu Boot options Advanced Boot Options Enable ...

Page 50: ...ore Technology Drives Enables or disables various onboard drives M 2 PCIe SSD 0 SATA 2 Default ON SATA 0 Default ON Drive Information Displays the information of various onboard drives Miscellaneous Devices Enables or disables various onboard devices Enable Camera Enables or disables the camera Default ON Keyboard Illumination Configures the operating mode of the keyboard illumination feature Defa...

Page 51: ...interface of the optional Computrace R Service from Absolute Software Intel Platform Trust Technology On Enables or disables Platform Trust Technology PTT visibility to the operating system Default ON PPI Bypass for Clear Commands Enables or disables the operating system to skip BIOS Physical Presence Interface PPI user prompts when issuing the Clear command Default OFF Clear Enables or disables t...

Page 52: ...e keys in the PK KEK db and dbx security key databases to be modified Default OFF Custom Mode Key Management Selects the custom values for expert key management Default PK Table 11 System setup options Performance menu Performance Intel Hyper Threading Technology Enables or disables the Intel Hyper Threading Technology to use processor resources more efficiently Default ON Intel SpeedStep Enables ...

Page 53: ...computer will not go to sleep Intel Rapid Start will be disabled automatically and the operating system power option will be blank if it was set to Sleep Enable USB Wake Support Enables the USB devices to wake the computer from Standby mode Default OFF Enable Intel Speed Shift Technology Enables or disables Intel Speed Shift Technology support which enables the operating system to select the appro...

Page 54: ...Virtualization menu Virtualization Intel Virtualization Technology Enables the computer to run a virtual machine monitor VMM Default ON VT for Direct I O Enables the computer to perform Virtualization Technology for Direct I O VT d VT d is an Intel method that provides virtualization for memory map I O Default ON Table 16 System setup options Maintenance menu Maintenance Asset Tag Creates a system...

Page 55: ...m setup options SupportAssist menu SupportAssist Dell Auto OS Recovery Threshold Controls the automatic boot flow for SupportAssist System Resolution Console and for Dell operating system Recovery tool Default 2 SupportAssist OS Recovery Enables or disables the boot flow for SupportAssist operating system Recovery tool in the even of certain system errors Default ON Clearing CMOS settings CAUTION ...

Page 56: ...NOTE For information on how to reset Windows or application passwords refer to the documentation accompanying Windows or your application 56 System setup ...

Page 57: ...ont page is displayed 5 Click the arrow in the lower right corner to go to the page listing The items detected are listed 6 To run a diagnostic test on a specific device press Esc and click Yes to stop the diagnostic test 7 Select the device from the left pane and click Run Tests 8 If there are any issues error codes are displayed Note the error code and validation number and contact Dell System d...

Page 58: ...ng system It consists of tools to diagnose and troubleshoot issues that may occur before your computer boots to the operating system It enables you to diagnose hardware issues repair your computer back up your files or restore your computer to its factory state You can also download it from the Dell Support website to troubleshoot and fix your computer when it fails to boot into their primary oper...

Page 59: ...y NOTE Applications may take up to three subsequent launches after enablement to see the full performance benefits Disabling Intel Optane memory CAUTION After disabling Intel Optane memory do not uninstall the driver for Intel Rapid Storage Technology as it will result in a blue screen error The Intel Rapid Storage Technology user interface can be removed without uninstalling the driver NOTE Disab...

Page 60: ...at remains on the computer even after it has been powered off and the battery has been removed The following procedure provides the instructions on how to conduct flea power release 1 Turn off your computer 2 Disconnect the power adapter from your computer 3 Press and hold the power button for 15 seconds to drain the flea power 4 Connect the power adapter to your computer 5 Turn on your computer 6...

Page 61: ...d articles Learn and know the following information about your product Product specifications Operating system Setting up and using your product Data backup Troubleshooting and diagnostics Factory and system restore BIOS information See Me and My Dell at www dell com support manuals To locate the Me and My Dell relevant to your product identify your product through one of the following Select Dete...

Reviews: