background image

Removing the wireless card

NOTE: 

Before working inside your computer, read the safety information that shipped with your computer and follow 

the steps in 

Before working inside your computer

. After working inside your computer, follow the instructions in 

After 

working inside your computer

. For more safety best practices, see the Regulatory Compliance home page at 

www.dell.com/regulatory_compliance

.

Prerequisites

Remove the 

base cover

.

Procedure

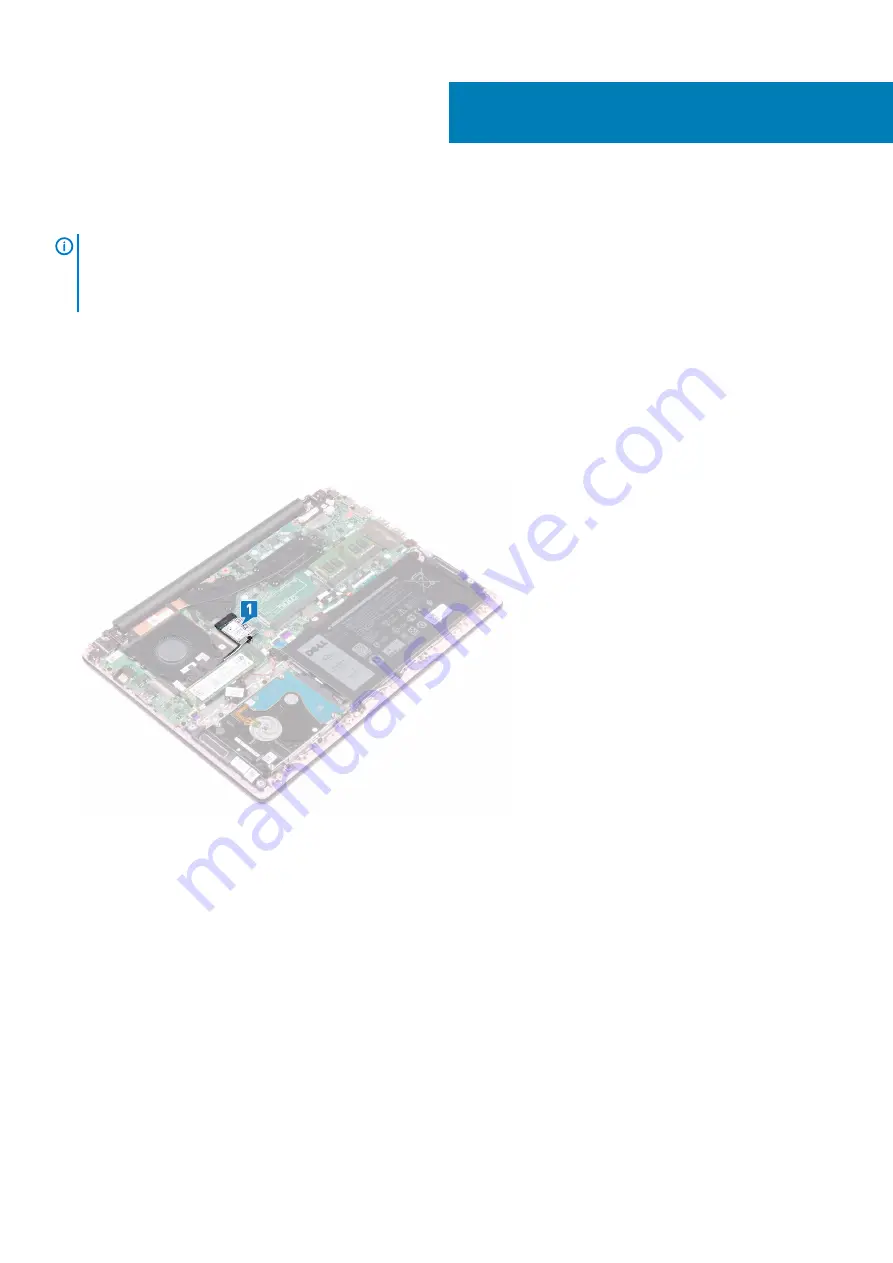
1. Locate the wireless card.

2. Remove the screw (M2x3) that secures the wireless-card bracket to the wireless card and the system board.
3. Remove the wireless-card bracket from the wireless card.
4. Using a plastic scribe, disconnect the antenna cables from the wireless card.
5. Slide and remove the wireless card from the wireless-card slot.

12

Removing the wireless card

25

Summary of Contents for Inspiron 5485

Page 1: ...Inspiron 5485 Service Manual Regulatory Model P92G Regulatory Type P92G002 ...

Page 2: ...age to hardware or loss of data and tells you how to avoid the problem WARNING A WARNING indicates a potential for property damage personal injury or death 2018 2019 Dell Inc or its subsidiaries All rights reserved Dell EMC and other trademarks are trademarks of Dell Inc or its subsidiaries Other trademarks may be trademarks of their respective owners 2019 05 Rev A01 ...

Page 3: ...base cover 15 Procedure 15 7 Replacing the base cover 17 Procedure 17 8 Removing the battery 19 Lithium ion battery precautions 19 Prerequisites 19 Procedure 19 9 Replacing the battery 21 Procedure 21 Post requisites 22 10 Removing the memory modules 23 Prerequisites 23 Procedure 23 11 Replacing the memory modules 24 Procedure 24 Post requisites 24 12 Removing the wireless card 25 Prerequisites 25...

Page 4: ...the solid state drive 32 Prerequisites 32 Procedure 32 19 Replacing the solid state drive 34 Procedure 34 Post requisites 34 20 Removing the hard drive 35 Prerequisites 35 Procedure 35 21 Replacing the hard drive 37 Procedure 37 Post requisites 38 22 Removing the I O board 39 Prerequisites 39 Procedure 39 23 Replacing the I O board 40 Procedure 40 Post requisites 40 24 Removing the touchpad 41 Pre...

Page 5: ... graphics card 49 Procedure applicable only to computers shipped with discrete graphics card 49 Post requisites 50 30 Removing the display assembly 51 Prerequisites 51 Procedure 51 31 Replacing the display assembly 54 Procedure 54 Post requisites 55 32 Removing the power button with fingerprint reader 56 Prerequisites 56 Procedure 56 33 Replacing the power button with fingerprint reader 57 Procedu...

Page 6: ...vers 67 Video drivers 67 Wireless and Bluetooth drivers 67 41 System setup 68 System setup 68 Entering BIOS setup program 68 Navigation keys 68 Boot Sequence 68 System setup options 69 Clearing CMOS settings 72 Clearing BIOS System Setup and System passwords 73 42 Troubleshooting 74 Enhanced Pre Boot System Assessment ePSA diagnostics 74 Running the ePSA diagnostics 74 System diagnostic lights 74 ...

Page 7: ... Start Power Shut down NOTE If you are using a different operating system see the documentation of your operating system for shut down instructions 3 Disconnect your computer and all attached devices from their electrical outlets 4 Disconnect all attached network devices and peripherals such as keyboard mouse and monitor from your computer 5 Remove any media card and optical disc from your compute...

Page 8: ...y screws remain inside your computer 2 Connect any external devices peripherals or cables you removed before working on your computer 3 Replace any media cards discs or any other parts that you removed before working on your computer 4 Connect your computer and all attached devices to their electrical outlets 5 Turn on your computer 2 8 After working inside your computer ...

Page 9: ...itive components such as expansion cards processors memory DIMMs and system boards Very slight charges can damage circuits in ways that may not be obvious such as intermittent problems or a shortened product life span As the industry pushes for lower power requirements and increased density ESD protection is an increasing concern Due to the increased density of semiconductors used in recent Dell p...

Page 10: ...test plug the wrist strap s bonding wire into the tester while it is strapped to your wrist and push the button to test A green LED is lit if the test is successful a red LED is lit and an alarm sounds if the test fails Insulator Elements It is critical to keep ESD sensitive devices such as plastic heat sink casings away from internal parts that are insulators and often highly charged Working Envi...

Page 11: ... mechanical lifting device 1 Get a firm balanced footing Keep your feet apart for a stable base and point your toes out 2 Tighten stomach muscles Abdominal muscles support your spine when you lift offsetting the force of the load 3 Lift with your legs not your back 4 Keep the load close The closer it is to your spine the less force it exerts on your back 5 Keep your back upright whether lifting or...

Page 12: ...Recommended tools The procedures in this document may require the following tools Phillips screwdriver 1 Plastic scribe 4 12 Recommended tools ...

Page 13: ...d assembly M2x5 6 Battery Palm rest and keyboard assembly M2x3 4 Fan Palm rest and keyboard assembly M2x3 2 Hard drive assembly Palm rest and keyboard assembly M2x3 4 Hard drive bracket Hard drive M3x3 4 Hinges Palm rest and keyboard assembly M2 5x5 4 I O board Palm rest and keyboard assembly M2x3 2 Power adapter port Palm rest and keyboard assembly M2x3 1 Power button with fingerprint reader opti...

Page 14: ...M2x3 1 Power button with fingerprint reader optional Palm rest and keyboard assembly M2x2 1 Solid state drive Palm rest and keyboard assembly M2x2 2 1 System board Palm rest and keyboard assembly M2x4 1 Touchpad Palm rest and keyboard assembly M2x2 4 Wireless card bracket System board M2x3 1 14 Screw list ...

Page 15: ...s see the Regulatory Compliance home page at www dell com regulatory_compliance Procedure 1 Loosen the three captive screws that secure the base cover to the palm rest and keyboard assembly 2 Remove the 6 screws M2x5 that secure the base cover to the palm rest and keyboard assembly 3 Using a plastic scribe pry the base cover off the palm rest and keyboard assembly starting from the top left corner...

Page 16: ...l the tape that secures the battery cable to the system board 6 Peel the tape that secures the battery cable connection to the system board 7 Disconnect the battery cable from the system board 8 Press and hold the power button for five seconds to ground the computer and drain the flea power 16 Removing the base cover ...

Page 17: ...atory Compliance home page at www dell com regulatory_compliance Procedure NOTE Steps 1 and 2 are applicable only if you have disconnected the battery prior to removing other components from your computer 1 Connect the battery cable to the system board 2 Adhere the tape that secures the battery cable connection to the system board 3 Adhere the tape that secures the battery cable to the system boar...

Page 18: ...the three captive screws that secure the base cover to the palm rest and keyboard assembly 7 Replace the 6 screws M2x5 that secure the base cover to the palm rest and keyboard assembly 18 Replacing the base cover ...

Page 19: ...y Do not use tools of any kind to pry on or against the battery Ensure any screws during the servicing of this product are not lost or misplaced to prevent accidental puncture or damage to the battery and other system components If a battery gets stuck in a device as a result of swelling do not try to free it as puncturing bending or crushing a Lithium ion battery can be dangerous In such an insta...

Page 20: ...ecure the battery to the palm rest and keyboard assembly 5 Lift the battery off the palm rest and keyboard assembly 6 Press and hold the power button for five seconds to ground the computer and drain the flea power 20 Removing the battery ...

Page 21: ...ces see the Regulatory Compliance home page at www dell com regulatory_compliance Procedure 1 Align the screw holes on the battery with the screw holes on the palm rest and keyboard assembly 2 Replace the four screws M2x3 that secure the battery to the palm rest and keyboard assembly 3 Connect the battery cable to the system board 4 Adhere the tape that secures the battery cable connection to the ...

Page 22: ...Post requisites Replace the base cover 22 Replacing the battery ...

Page 23: ...After working inside your computer For more safety best practices see the Regulatory Compliance home page at www dell com regulatory_compliance Prerequisites Remove the base cover Procedure 1 Open the flap on the memory module 2 Use your fingertips to carefully spread apart the securing clips on each end of the memory module slot until the memory module pops up 3 Remove the memory module from the ...

Page 24: ...ompliance home page at www dell com regulatory_compliance Procedure 1 Lift the flap from the memory module slot 2 Align the notch on the memory module with the tab on the memory module slot NOTE The number of memory modules may vary with the configuration that you ordered 3 Slide the memory module firmly into the slot at an angle 4 Press the memory module down until it clicks into place NOTE If yo...

Page 25: ...est practices see the Regulatory Compliance home page at www dell com regulatory_compliance Prerequisites Remove the base cover Procedure 1 Locate the wireless card 2 Remove the screw M2x3 that secures the wireless card bracket to the wireless card and the system board 3 Remove the wireless card bracket from the wireless card 4 Using a plastic scribe disconnect the antenna cables from the wireless...

Page 26: ...26 Removing the wireless card ...

Page 27: ...s to the wireless card The following table provides the antenna cable color scheme for the wireless card supported by your computer Table 2 Antenna cable color scheme Connectors on the wireless card Antenna cable color Main white triangle White Auxiliary black triangle Black 2 Slide the wireless card at an angle into the wireless card slot 3 Align the screw hole on the wireless card bracket with t...

Page 28: ...st practices see the Regulatory Compliance home page at www dell com regulatory_compliance CAUTION Removing the coin cell battery resets the BIOS setup program s settings to default It is recommended that you note the BIOS setup program s settings before removing the coin cell battery Prerequisites Remove the base cover Procedure 1 Disconnect the coin cell battery cable from the system board 2 Pee...

Page 29: ...inside your computer follow the instructions in After working inside your computer For more safety best practices see the Regulatory Compliance home page at www dell com regulatory_compliance Procedure 1 Adhere the coin cell battery assembly to the palm rest and keyboard assembly 2 Connect the coin cell battery to the system board Post requisites Replace the base cover 15 Replacing the coin cell b...

Page 30: ... see the Regulatory Compliance home page at www dell com regulatory_compliance Prerequisites Remove the base cover Procedure 1 Peel the tape off the heat sink 2 Disconnect the fan cable from the system board Note the cable routing and remove the fan cable and the antenna cable from the routing guides on the fan 3 Peel the tapes off the fan 4 Remove the two screws M2x3 that secure the fan to the pa...

Page 31: ...ulatory Compliance home page at www dell com regulatory_compliance Procedure 1 Align the screw holes on the fan with the screw holes on the palm rest and keyboard assembly 2 Replace the two screws M2x3 that secure the fan to the palm rest and keyboard assembly 3 Route the I O board cable and antenna cables through the routing guides on the fan and adhere the tapes to the fan 4 Connect the fan cabl...

Page 32: ... Compliance home page at www dell com regulatory_compliance CAUTION Solid state drives are fragile Exercise care when handling the solid state drive CAUTION To avoid data loss do not remove the solid state drive while the computer is in sleep or on state Prerequisites Remove the base cover Procedure 1 Locate the solid state drive 2 Remove the screw M2x3 that secures the solid state drive to the pa...

Page 33: ...Removing the solid state drive 33 ...

Page 34: ...liance home page at www dell com regulatory_compliance CAUTION Solid state drives are fragile Exercise care when handling the solid state drive Procedure 1 Align the notch on the solid state drive with the tab on the solid state drive slot 2 Slide the solid state drive firmly into the solid state drive slot at an angle 3 Press the other end of the solid state drive and replace the screw M2x3 that ...

Page 35: ...iance CAUTION Hard drives are fragile Exercise care when handling the hard drive CAUTION To avoid data loss do not remove the hard drive while the computer is in sleep or on state Prerequisites 1 Remove the base cover 2 Remove the battery Procedure 1 Open the latch and disconnect the hard drive cable from the system board 2 Remove the four screws M2x3 that secure the hard drive assembly to the pal...

Page 36: ...5 Remove the four screws M3x3 that secure the hard drive bracket to the hard drive 6 Lift the hard drive bracket off the hard drive 36 Removing the hard drive ...

Page 37: ...agile Exercise care when handling the hard drive Procedure 1 Align the screw holes on the hard drive bracket with the screw holes on the hard drive 2 Replace the four screws M3x3 that secure the hard drive bracket to the hard drive 3 Connect the interposer to the hard drive assembly 4 Align the screw holes on the hard drive assembly with the screw holes on the palm rest and keyboard assembly 5 Rep...

Page 38: ...Post requisites 1 Replace the battery 2 Replace the base cover 38 Replacing the hard drive ...

Page 39: ...mpliance Prerequisites 1 Remove the base cover 2 Remove the fan Procedure 1 Peel the tape off the I O board connector 2 Open the latch and disconnect the I O board cable from the I O board NOTE If necessary use a plastic scribe to open the latch 3 Disconnect the fingerprint reader cable from the I O board NOTE Applicable only to computers that are shipped with power button with fingerprint reader ...

Page 40: ...compliance Procedure 1 Align the screw holes on the I O board with the screw holes on the palm rest and keyboard assembly 2 Replace the two screws M2x3 that secure the I O board to the palm rest and keyboard assembly 3 Connect the fingerprint reader cable to the I O board and close the latch NOTE Applicable only to computers that are shipped with power button with fingerprint reader 4 Adhere the t...

Page 41: ...l off the tapes that secure the touchpad to the palm rest and keyboard assembly 2 Peel off the tape that secures the speaker cable to the touchpad 3 Open the latch and disconnect the hard drive cable from the system board 4 Open the latch and disconnect the touchpad cable from the system board 5 Remove the three screws M2x2 Big Head that secure the touchpad bracket to the palm rest and keyboard as...

Page 42: ...42 Removing the touchpad ...

Page 43: ...ce the four screws M2x2 Big Head that secure the touchpad to the palm rest and keyboard assembly 3 Align the screw holes on the touchpad bracket with the screw holes on the palm rest and keyboard assembly 4 Replace the three screws M2x2 Big Head that secure the touchpad bracket to the palm rest and keyboard assembly 5 Adhere the tape that secures the speaker cable to the touchpad 6 Adhere the tape...

Page 44: ...Post requisites 1 Replace the battery 2 Replace the base cover 44 Replacing the touchpad ...

Page 45: ... safety best practices see the Regulatory Compliance home page at www dell com regulatory_compliance Prerequisites 1 Remove the base cover 2 Remove the battery Procedure 1 Disconnect the speaker cable from the system board 2 Peel the tape off the touchpad bracket 3 Remove the speaker cable from the routing guides on the palm rest and keyboard assembly 4 Remove the speakers from the alignment posts...

Page 46: ... more safety best practices see the Regulatory Compliance home page at www dell com regulatory_compliance Procedure 1 Using the alignment posts align and place the speakers on the palm rest and keyboard assembly 2 Route the speaker cable through the routing guides on the palm rest and keyboard assembly 3 Adhere the tape to the touchpad bracket 4 Connect the speaker cable to the system board Post r...

Page 47: ...cooling of the processor do not touch the heat transfer areas on the heat sink The oils in your skin can reduce the heat transfer capability of the thermal grease Prerequisites Remove the base cover Procedure applicable only to computers shipped with integrated graphics card 1 In reverse sequential order as indicated on the heat sink loosen the four captive screws that secure the heat sink to the ...

Page 48: ...48 Removing the heat sink ...

Page 49: ...at sink is replaced use the thermal pad paste provided in the kit to ensure that thermal conductivity is achieved Procedure applicable only to computers shipped with integrated graphics card 1 Align the screw holes on the heat sink with the screw holes on the system board 2 In sequential order as indicated on the heat sink tighten the four captive screws that secure the heat sink to the system boa...

Page 50: ...Post requisites Replace the base cover 50 Replacing the heat sink ...

Page 51: ...ulatory_compliance Prerequisites 1 Remove the base cover 2 Remove the wireless card Procedure 1 Peel off the tape that secures the I O board cable to the I O board 2 Note the routing and remove the I O board cable from the routing guides 3 Peel off the tape that secures the display cable to the display cable connector 4 Open the latch and disconnect the display cable from the system board 5 Remove...

Page 52: ...7 Open the display at an angle of 90 degrees 8 Lift the display assembly off the palm rest and keyboard assembly 52 Removing the display assembly ...

Page 53: ...Removing the display assembly 53 ...

Page 54: ...st practices see the Regulatory Compliance home page at www dell com regulatory_compliance Procedure 1 Slide the palm rest and keyboard assembly at an angle under the hinges on the display assembly 2 Align the screw holes on the display hinges with the screw holes on the palm rest and keyboard assembly 3 Replace the four screws M2 5x5 that secure the display assembly to the palm rest and keyboard ...

Page 55: ...pe to secure the display cable to the system board 7 Slide the I O board cable into the connector on the I O board and close the latch to secure the cable 8 Adhere the tape to secure the I O board cable to the I O board Post requisites 1 Replace the wireless card 2 Replace the base cover Replacing the display assembly 55 ...

Page 56: ...dell com regulatory_compliance NOTE Applicable only for computers that are shipped with fingerprint reader Prerequisites 1 Remove the base cover 2 Remove the fan 3 Remove the display assembly 4 Remove the I O board Procedure 1 Remove the two screws M2x3 that secure the power button with fingerprint reader to the palm rest and keyboard assembly 2 Peel the fingerprint reader cable and the fingerprin...

Page 57: ...e NOTE Applicable only for computers that are shipped with fingerprint reader Procedure 1 Align the screw holes on the power button with fingerprint reader with the screw holes on the palm rest and keyboard assembly 2 Replace the two screws M2x3 that secure the power button with fingerprint reader to the palm rest and keyboard assembly 3 Adhere the fingerprint reader cable and the fingerprint read...

Page 58: ...g inside your computer For more safety best practices see the Regulatory Compliance home page at www dell com regulatory_compliance Prerequisites Remove the base cover Procedure 1 Disconnect the power adapter port cable from the system board 2 Remove the screw M2x3 that secures the power adapter port to the palm rest and keyboard assembly 3 Lift the power adapter port along with the cable off the ...

Page 59: ... your computer For more safety best practices see the Regulatory Compliance home page at www dell com regulatory_compliance Procedure 1 Align the screw hole on the power adapter port with the screw hole on the palm rest and keyboard assembly 2 Replace the screw M2x3 that secures the power adapter port to the palm rest and keyboard assembly 3 Connect the power adapter port cable to the system board...

Page 60: ...m board removes any changes you have made to the BIOS using the BIOS setup program You must make the appropriate changes again after you replace the system board NOTE Before disconnecting the cables from the system board note the location of the connectors so that you can reconnect the cables correctly after you replace the system board Prerequisites 1 Remove the base cover 2 Remove the battery 3 ...

Page 61: ...and disconnect the keyboard backlight cable optional from the system board NOTE Applicable only if your computer is shipped with a backlit keyboard 11 Open the latch and disconnect the touchpad cable from the system board 12 Open the latch and disconnect the hard drive cable from the system board 13 Disconnect the coin cell battery cable from the system board 14 Remove the four screws M2x2 that se...

Page 62: ...n the palm rest and keyboard assembly 2 Replace the four screws M2x2 that secure the system board to the palm rest and keyboard assembly 3 Connect the power adapter port cable to the system board 4 Align the screw holes on the USB Type C port bracket with the screw holes on the system board 5 Replace the two screws M2x3 that secure the USB Type C port bracket to the system board 6 Connect the spea...

Page 63: ...ble to the system board Post requisites 1 Replace the solid state drive 2 Replace the fan 3 Replace the wireless card 4 Replace the memory modules 5 Replace the battery 6 Replace the base cover Entering the Service Tag in the BIOS setup program 1 Turn on or restart your computer Replacing the system board 63 ...

Page 64: ...ayed to enter the BIOS setup program 3 Navigate to the Main tab and enter the Service Tag in the Service Tag Input field NOTE Service tag is the alphanumeric identifier located at the back side of your computer 64 Replacing the system board ...

Page 65: ...pliance Prerequisites 1 Remove the base cover 2 Remove the battery 3 Remove the memory modules 4 Remove the wireless card 5 Remove the coin cell battery 6 Remove the fan 7 Remove the solid state drive 8 Remove the hard drive 9 Remove the I O board 10 Remove the touchpad 11 Remove the speakers 12 Remove the display assembly 13 Remove the power adapter port 14 Remove the power button with fingerprin...

Page 66: ...ory_compliance Procedure Place the palm rest and keyboard assembly on a clean and flat surface Post requisites 1 Replace the system board 2 Replace the power button with fingerprint reader optional 3 Replace the power adapter port 4 Replace the display assembly 5 Replace the speakers 6 Replace the touchpad 7 Replace the I O board 8 Replace the hard drive 9 Replace the solid state drive 10 Replace ...

Page 67: ...ate from www dell com support Wireless and Bluetooth drivers In the Device Manager check if the network card driver is installed Install the driver updates from www dell com support In the Device Manager check if the Bluetooth driver is installed Install the driver updates from www dell com support 40 Device drivers 67 ...

Page 68: ...his prompt can appear very quickly so you must watch for it and then press F2 If you press F2 before the F2 prompt this keystroke is lost If you wait too long and the operating system logo appears continue to wait until you see the desktop Then turn off your computer and try again Navigation keys NOTE For most of the System Setup options changes that you make are recorded but do not take effect un...

Page 69: ...the service tag of your computer Asset Tag Displays the asset tag of your computer CPU Type Displays the processor type CPU Speed Displays the processor speed CPU ID Displays the processor identification code CPU Cache L1 Cache Displays the processor L1 cache size L2 Cache Displays the processor L2 cache size L3 Cache Displays the processor L3 cache size First HDD Displays the type of hard drive i...

Page 70: ...ault Enabled Function Key Behavior Allows you to set function key or multimedia key as the default function key behavior Default Multimedia key Keyboard Illumination Selects the operating mode of the keyboard illumination feature Default Bright Keyboard Backlight with AC Selects the timeout value for the keyboard backlight when an AC adapter is plugged into the computer Default 1 minute Keyboard B...

Page 71: ... clear or set Default Not Set HDD2 Password Status Displays if the HDD password is clear or set Default Not Set Service Tag Set your system s Service Tag Admin Password Allows you to set the administrator password The administrator password controls access to the system setup utility System Password Allows you to set the system password The system password controls access to the computer at boot H...

Page 72: ...ture Default Disabled Load Legacy Option ROMs Enables or disables the Load Legacy Option ROMs Default Disabled Boot List Option Displays the available boot options Default UEFI Attempt Legacy Boot Enables or disables legacy boot Default Disabled File Browser Add Boot Option Allows you to add the boot options Table 7 System setup options Exit menu Exit Exit Saving Changes Allows you to exit system ...

Page 73: ...se cover Clearing BIOS System Setup and System passwords To clear the system or BIOS passwords contact Dell technical support as described at www dell com contactdell NOTE For information on how to reset Windows or application passwords refer to the documentation accompanying Windows or your application System setup 73 ...

Page 74: ...e boot menu screen select the Diagnostics option 4 Click the arrow at the bottom left corner Diagnostics front page is displayed 5 Click the arrow in the lower right corner to go to the page listing The items detected are listed 6 To run a diagnostic test on a specific device press Esc and click Yes to stop the diagnostic test 7 Select the device from the left pane and click Run Tests 8 If there a...

Page 75: ...ip failure 3 3 Recovery image not found 3 4 Recovery image found but invalid Camera status light Indicates whether the camera is in use Solid white Camera is in use Off Camera is not in use Caps Lock status light Indicates whether Caps Lock is enabled or disabled Solid white Caps Lock enabled Off Caps Lock disabled Flashing BIOS USB key 1 Follow the procedure from step 1 to step 7 in Flashing the ...

Page 76: ...iFi connectivity issues a WiFi power cycle procedure may be performed The following procedure provides the instructions on how to conduct a WiFi power cycle NOTE Some ISPs Internet Service Providers provide a modem router combo device 1 Turn off your computer 2 Turn off the modem 3 Turn off the wireless router 4 Wait for 30 seconds 5 Turn on the wireless router 6 Turn on the modem 7 Turn on your c...

Reviews: