background image

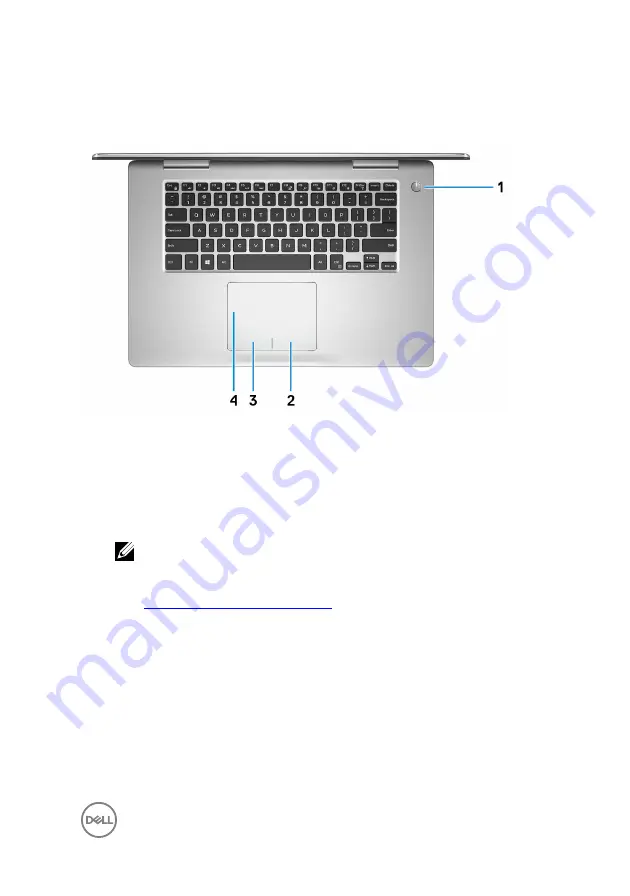
Base

1

Buton de alimentare

Apăsaţi pentru a porni computerul dacă acesta este oprit, se află în stare de 
repaus sau de hibernare.
Apăsaţi pentru a plasa computerul în stare de repaus dacă este pornit.
Apăsaţi continuu timp de 4 secunde pentru a forţa închiderea computerului.

NOTE: Puteţi particulariza comportamentul butonului de alimentare în 
Power Options (Opţiuni alimentare). Pentru informaţii suplimentare, 
consultaţi 

Me and My Dell

 (Eu şi computerul meu Dell) la adresa 

www.dell.com/support/manuals

.

2

Zonă de clic dreapta

Apăsaţi pentru a face clic dreapta.

3

Zonă de clic stânga

Apăsaţi pentru a face clic stânga.

4

Touchpadul

Mutaţi degetul pe touchpad pentru a deplasa indicatorul mouse-ului. Atingeţi 
uşor pentru a face clic stânga şi atingeţi uşor cu două degete pentru a face clic 
dreapta.

13

Summary of Contents for Inspiron 15 7000 Series

Page 1: ...Inspiron 15 7000 Setup and Specifications Computer Model Inspiron 15 7570 Regulatory Model P70F Regulatory Type P70F001 ...

Page 2: ...dere de date şi vă arată cum să evitaţi problema AVERTISMENT Un AVERTISMENT indică un pericol potenţial de deteriorare a bunurilor de vătămare corporală sau de deces Copyright 2017 Dell Inc sau filialele sale Toate drepturile rezervate Dell EMC şi alte mărci comerciale sunt mărci comerciale ale Dell Inc sau ale filialelor sale Alte mărci comerciale pot fi mărci comerciale deţinute de proprietarii ...

Page 3: ...ws using a USB recovery drive 8 Views 10 Front 10 Left 11 Right 12 Base 13 Display touchscreen 14 Display non touchscreen 15 Bottom 16 Specifications 17 System information 17 Computer model 17 Dimensions and weight 17 Operating system 18 Memory 18 Ports and connectors 18 Communications 19 3 ...

Page 4: ...20 Storage 20 Media card reader 21 Keyboard 21 Camera 22 Touchpad 22 Power adapter 23 Battery 23 Display 24 Video 25 Computer environment 25 Keyboard shortcuts 26 Getting help and contacting Dell 28 Self help resources 28 Contacting Dell 29 4 ...

Page 5: ...Set up your computer 1 Connect the power adapter and press the power button 5 ...

Page 6: ...a network NOTE If you are connecting to a secured wireless network enter the password for the wireless network access when prompted b Sign in to your Microsoft account or create a new account For Ubuntu Follow the instructions on the screen to finish setup 6 ...

Page 7: ...ter Dell Help Support SupportAssist Check and update your computer 4 Create recovery drive for Windows It is recommended to create a recovery drive to troubleshoot and fix problems that may occur with Windows For more information see Create a USB recovery drive for Windows 7 ...

Page 8: ...dow is displayed 4 Click Yes to continue The Recovery Drive window is displayed 5 Select Back up system files to the recovery drive and click Next 6 Select the USB flash drive and click Next A message appears indicating that all data in the USB flash drive will be deleted 7 Click Create NOTE This process may take several minutes to complete 8 Click Finish Reinstall Windows using a USB recovery dri...

Page 9: ...a screen to Choose the keyboard layout is displayed 5 Choose your keyboard layout 6 In the Choose an option screen click Troubleshoot 7 Click Recover from a drive 8 Choose one of the following options Just remove my files to do a quick format Fully clean the drive to do a complete format 9 Click Recover to start the recovery process This will take several minutes to complete and your computer will...

Page 10: ...ui Se aprinde atunci când computerul citeşte de pe sau scrie pe hard disk Indicator luminos de stare a alimentării şi a bateriei Indică starea de alimentare şi de încărcare a bateriei Alb constant adaptorul de alimentare este conectat şi bateria are un nivel de încărcare de peste 5 Portocaliu computerul funcţionează pe baterie şi bateria are un nivel de încărcare de sub 5 Off Dezactivat Adaptorul ...

Page 11: ...Connect peripherals such as storage devices and printers Provides data transfer speeds up to 5 Gbps PowerShare enables you to charge your USB devices even when your computer is turned off NOTE If your computer is turned off or in hibernate state you must connect the power adapter to charge your devices using the PowerShare port You must enable this feature in the BIOS setup program NOTE Certain US...

Page 12: ...uritate pentru a împiedica deplasarea neautorizată a computerului 2 Port de reţea Conectaţi un cablu Ethernet RJ45 de la un router sau de la un modem de bandă largă pentru acces la reţea sau internet 3 USB 3 1 Gen 1 port Connect peripherals such as storage devices and printers Provides data transfer speeds up to 5 Gbps 4 Fantă de cartelă SD Citeşte de pe şi scrie pe cartela SD 12 ...

Page 13: ...iza comportamentul butonului de alimentare în Power Options Opţiuni alimentare Pentru informaţii suplimentare consultaţi Me and My Dell Eu şi computerul meu Dell la adresa www dell com support manuals 2 Zonă de clic dreapta Apăsaţi pentru a face clic dreapta 3 Zonă de clic stânga Apăsaţi pentru a face clic stânga 4 Touchpadul Mutaţi degetul pe touchpad pentru a deplasa indicatorul mouse ului Ating...

Page 14: ...fiaţi şi să înregistraţi clipuri video 4 Cameră în infraroşu Caracteristica de detectare în profunzime a camerei îmbunătăţeşte securitatea atunci când este asociată cu funcţia de autentificare facială pentru Windows Hello 5 Emiţător în infraroşu Emite lumină în infraroşu ceea ce permite camerei în infraroşu să detecteze profunzimea şi să urmărească mişcarea 6 Microfon stânga Asigură intrare de sun...

Page 15: ...udio şi apeluri vocale 2 Indicator luminos de stare a camerei Se aprinde atunci când camera este în uz 3 Cameră Vă permite să conversaţi prin chat video să fotografiaţi şi să înregistraţi clipuri video 4 Microfon stânga Asigură intrare de sunet digital pentru înregistrare audio şi apeluri vocale 15 ...

Page 16: ...ă de service Eticheta de service reprezintă un identificator alfanumeric unic care permite tehnicienilor de service Dell să identifice componentele hardware din computer şi să acceseze informaţiile privind garanţia 3 Right speaker Provides audio output 16 ...

Page 17: ...70 Dimensions and weight Table 4 Dimensions and weight Non touchscreen Touchscreen Weight maximum 2 16 kg 4 76 lb 2 31 kg 5 09 lb Weight minimum 1 995 kg 4 40 lb 2 15 kg 4 74 lb Height 18 81 mm 0 74 in FHD 18 81 mm 0 74 in UHD 18 91 mm 0 74 in Width 361 36 mm 14 23 in Depth 244 50 mm 9 63 in NOTE The weight of your computer varies depending on the configuration ordered and the manufacturing variab...

Page 18: ...DDR4 Speed 2400 MHz Configurations supported Per slot 4 GB 8 GB and 16 GB Total memory 4 GB 8 GB 12 GB 16 GB and 32 GB NOTE Your computer is shipped with maximum 16 GB memory Order additional memory separately to increase the total memory to 32 GB Ports and connectors Table 7 Ports and connectors External Network One RJ 45 port USB Two USB 3 1 Gen 1 port One USB 3 1 Gen 1 port with PowerShare 18 ...

Page 19: ...r SSD One M 2 slot for WiFi Bluetooth Communications Table 9 Supported Communications Ethernet 100 1000 Mbps Ethernet controller integrated on system board Wireless WiFi 802 11a b g n ac Bluetooth 4 2 NOTE Windows 10 currently supports up to Bluetooth 4 1 Wireless Table 10 Wireless Transfer rate Up to 867 Mbps Frequency Bands 2 4 GHz 5 GHz Encryption 64 bit 128 bit WEP AES CCMP TKIP 19 ...

Page 20: ...th Windows 10 64 bit and above installed Table 11 Intel Optane memory Interface PCIe NVMe 3 0 x2 Connector M 2 Configurations supported 16 GB and 32 GB Audio Table 12 Audio specifications Controller Realtek ALC3254 CG with Waves MaxxAudio Pro Speakers Two Speaker output 2 W Microphone Digital array microphones Volume controls Media control shortcut keys Storage Table 13 Storage specifications Inte...

Page 21: ...ions Type Backlit keyboard Shortcut keys Some keys on your keyboard have two symbols on them These keys can be used to type alternate characters or to perform secondary functions To type the alternate character press Shift and the desired key To perform secondary functions press Fn and the desired key NOTE Press Fn Esc to switch the primary behavior of the function keys F1 F12 between two modes mu...

Page 22: ... HD at 30 fps Infrared camera touchscreen 640 x 480 VGA Diagonal viewing angle Camera Non touchscreen 74 6 degrees Touchscreen 88 degrees Infrared camera touchscreen 82 9 degrees Touchpad Table 17 Touchpad Resolution Horizontal 1228 Vertical 928 Dimensions Height 80 mm 3 15 in Width 105 mm 4 14 in 22 ...

Page 23: ...70 C 40 F to 158 F Battery Table 19 Battery specifications Type 3 cell smart lithium ion 42 WHr 4 cell smart lithium ion 56 WHr Dimension Width 97 15 mm 3 82 in 98 20 mm 3 87 in Depth 184 15 mm 7 25 in 233 37 mm 9 19 in Height 5 90 mm 0 23 in 5 90 mm 0 23 in Weight maximum 0 2 kg 0 44 lb 0 25 kg 0 55 lb Voltage 11 40 VDC 15 20 VDC Charging time approximate 4 hours when the computer is off Operatin...

Page 24: ...UHD touchscreen Resolution maximum 1920 X 1080 3840 x 2160 Viewing angle Left Right Up Down 80 80 80 80 80 80 80 80 Pixel pitch 0 17925 mm x 0 17925 mm 0 09 mm x 0 09 mm Height excluding bezel 193 59 mm 7 62 in 194 40 mm 7 65 in Width excluding bezel 344 16 mm 13 55 in 345 60 mm 13 60 in Diagonal excluding bezel 396 24 mm 15 6 in 396 24 mm 15 6 in Refresh rate 60 Hz Operating angle 0 degrees close...

Page 25: ... to 35 C 32 F to 95 F 40 C to 65 C 40 F to 149 F Relative humidity maximum 10 to 90 non condensing 0 to 95 non condensing Vibration maximum 0 66 GRMS 1 30 GRMS Shock maximum 110 G 160 G Altitude maximum 15 2 m to 3048 m 50 ft to 10 000 ft 15 2 m to 10 668 m 50 ft to 35 000 ft Measured using a random vibration spectrum that simulates user environment Measured using a 2 ms half sine pulse when the h...

Page 26: ...main the same across all language configurations Table 23 List of keyboard shortcuts Keys Description Mute audio Decrease volume Increase volume Play previous track chapter Play Pause Play next track chapter Switch to external display Search Toggle keyboard backlight Decrease brightness Increase brightness Turn off on wireless 26 ...

Page 27: ...lock Toggle between power and battery status light hard drive activity light NOTE Hard drive activity light is supported only on computers shipped with a hard drive System request Open application menu Toggle Fn key lock Page up Page down Home End 27 ...

Page 28: ... instructions product specifications technical help blogs drivers software updates and so on 1 1 Go to www dell com support 1 2 At the top right corner enter Knowledge Base in the search box Enter the subject keyword to retrieve the related articles Learn and know about the following information about your product Product specifications Operating system Setting up and using your product Data backu...

Page 29: ...ct Dell for sales technical support or customer service issues see www dell com contactdell NOTE Availability varies by country and product and some services may not be available in your country NOTE If you do not have an active internet connection you can find contact information on your purchase invoice packing slip bill or Dell product catalog 29 ...

Reviews: