background image

Typically, a right button action will activate a new dialog box for some function similar to mouse right button click. When that dialog box is touched, or any 
other touch on the touch monitor is made, this touch will be a left button event. Simultaneously, the mouse button shading in the RMBT will toggle back to the 
left button. 

After activating the right-button state, touch the RMBT again to display the menu that allows you to: 

Launch the Dell Touch screen Properties dialog, close the right button utility. 

You can drag the RMBT to any location on the desktop by touching it and holding the touch until the crossed arrows appear.  

l


The RMBT may also be dragged with the standard mouse. 


l


The RMBT cannot be resized. 


l


The RMBT can be run for every touchmonitor from the Dell Control Panel " Properties tab. 


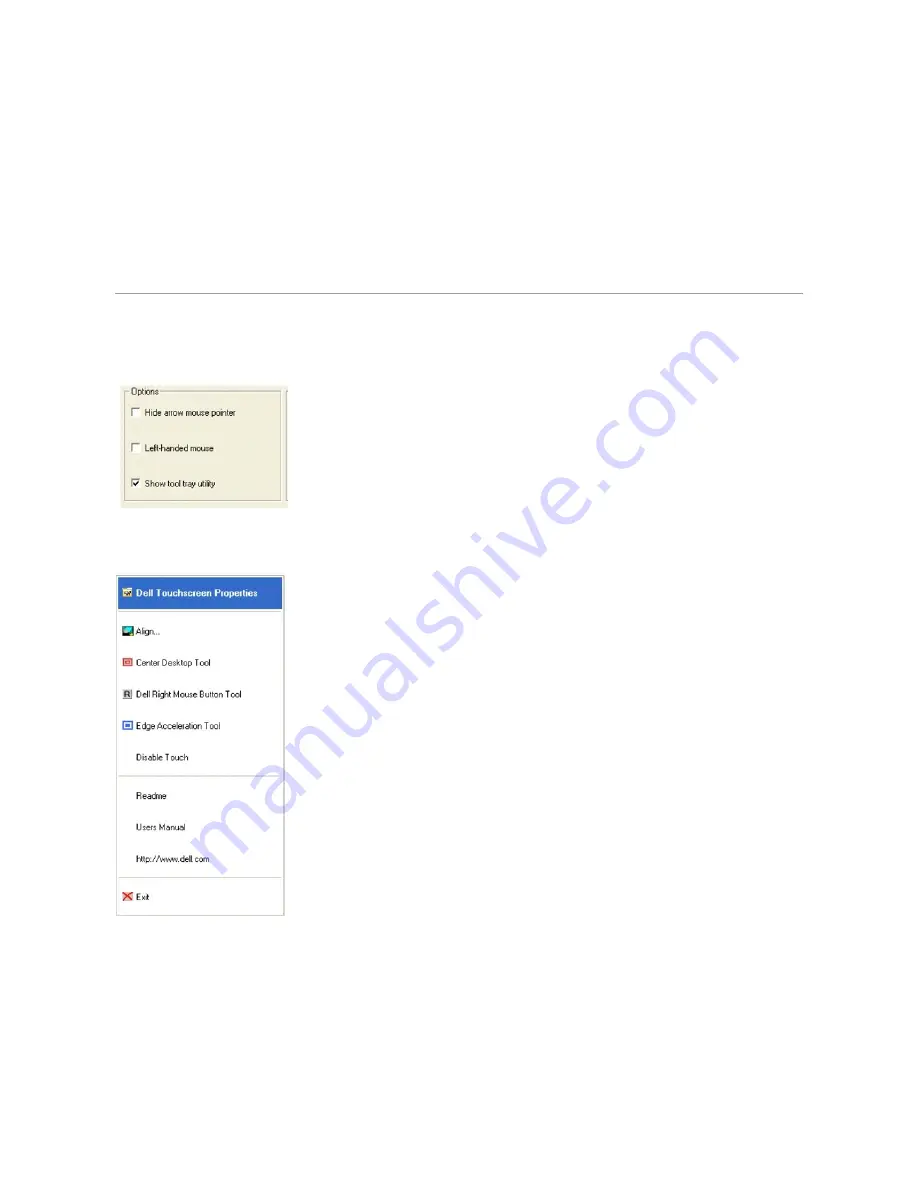
Tool Tray  

The Tool Tray application offers a convenient way to access commonly used functions of the driver from the operating system desktop. For the Tool Tray icon to 
appear in the Windows system tray, you enabled it from the Mode tab in the Control Panel.  


You can launch the Tool Tray application with a single left or righ- click.  


The Tool Tray application provides the following features: 

l


Access to Dell Touch screen Properties.  


l


Align - Launches EloVA, the Dell Video Alignment program.  


l


Center Desktop Tool - Launches Center Desktop Tool. 


l


Dell Right Mouse Button Tool (RMBT) - Launches Right Mouse Button Tool for all touch monitors that have been calibrated.  


l


Edge Acceleration Tool - Launches Edge Acceleration tool.  


l


Disable/Enable Touch - When the driver is loaded and running, clicking this segment of the Tool Tray menu will disable the driver, stopping all touch 

reports from being sent from the driver to the mouse handler (MouClass)  
 

Summary of Contents for E157FPT

Page 1: ...w Back View Side View Bottom view Specifications Caring for Your Monitor Setting Up Your Monitor Connecting Your Monitor Using the OSD On Screen Menu Display OSD Special OSD Functions OSD Warning Messages Setting the Optimal Resolution Using the Touch Screen Software About Your Touch Screen Software Installing Touch Screen Software Uninstalling Touch Screen Software Using the Touch Screen Control ...

Page 2: ...u 2 Adjust up Contrast button Adjusts screen contrast increases value of the selected OSD item and moves the OSD selection cursor in the clockwise direction 3 Adjust down Volume button Adjusts volume decreases value of the selected OSD item and moves the OSD selection cursor in the counter clockwise direction 4 Select button Enters an OSD item for adjustment 5 Power button Enables disables monitor...

Page 3: ...1 Cable holder 2 Monitor stand 3 Tilt adjust knob 4 Mounting holes for optional Magnetic Stripe Reader MSR device 5 Cable cover 6 Optional MSR device 7 USB cable holder ...

Page 4: ...al connector 6 USB connector 7 AC power Side View To adjust monitor angle 1 Loosen tilt adjust knob 2 Position monitor as desired range is from 30o to 90o 3 Tighten tilt adjust knob Do not over tighten Bottom view Specifications The following tables provide information about your touch screen monitor ...

Page 5: ...pical Luminance output 230 cd m2 typical Contrast ratio 500 1 typical LCD surface coating Hardness 3H antiglare treatment Horizontal scan range 30 kHz to 61 kHz automatic Vertical scan range 56 Hz to 76 Hz automatic Optimal preset resolution 1024 x 768 at 60 Hz Highest preset resolution 1024 x 768 at 75 Hz Display mode Horizontal Frequency kHz Vertical Frequency Hz Pixel Clock MHz Sync Polarity Ho...

Page 6: ...th 8 90 inches 226 mm Dimensons without stand Height 11 10 inches 282 mm Width 13 98 inches 355 mm Depth 2 40 inches 61 mm Stand dimensions Height 5 47 inches 139 mm Width 9 76 inches 248 mm Depth 3 58 inches 91 mm Weight with packaging 18 04 lb 8 2 kg max Weight with stand assembly and video cable 14 08 lb 6 4 kg max Weight without stand assembly For wall mount or VESA mount considerations 10 56 ...

Page 7: ...l level l To avoid risk of electric shock do not disassemble the monitor The unit is not user serviceable l Unplug the monitor from the power outlet before cleaning l For cleaning do not use alcohol methyl ethyl or isopropyl or any strong solvent Do not use thinner or benzene abrasive cleaners or compressed air l To clean the display unit cabinet use a cloth dampened with a mild detergent l Avoid ...

Page 8: ...that occurs during shipping by a carrier selected by you is your responsibility You must notify Dell within 21 days of the date of your invoice or acknowledgement if you believe any part of your purchase is missing wrong or damaged Unless you provide Dell with a valid and correct tax exemption certificate applicable to your purchase of Product and the Product ship to location you are responsible f...

Page 9: ...rranty came with your hardware product s see your packing slip or invoice What is covered by this limited warranty This limited warranty covers defects in materials and workmanship in your our end user customer s Dell branded hardware products including Dell branded peripheral products What is not covered by this limited warranty This limited warranty does not cover l Software including the operat...

Page 10: ...any Dell branded hardware products returned to us that prove to be defective in materials or workmanship If we are not able to repair the product we will replace it with a comparable product that is new or refurbished When you contact us we will issue a Return Material Authorization Number for you to include with your return You must return the products to us in their original or equivalent packag...

Page 11: ...roducts limited warranties service or support or the accuracy of the listings of products you purchase from a third party Dell Return Policy U S Only Dell values our relationship with you and offers a return policy for most products that you purchase directly from Dell Under this policy you may return to Dell within the applicable return policy period products that you purchased directly from Dell...

Page 12: ...in a wet basement l Do not use AC powered equipment during an electrical storm Battery powered devices may be used if all cables have been disconnected l If your device includes an integrated or optional PC card modem disconnect the modem cable if an electrical storm is approaching to avoid the remote risk of electric shock from lightning via the telephone line l If your device includes a modem th...

Page 13: ...ter plugs that bypass the grounding feature or remove the grounding feature from the plug or adapter l Norway and Sweden If this product is provided with a 3 prong power cable connect the power cable to a grounded electrical outlet only l If you use an extension power cable ensure that the total ampere rating of the products plugged in to the extension power cable does not exceed the ampere rating...

Page 14: ...round the adapter in the same direction as shown in the following picture Failure to wrap the cords in the correct direction can result in damage to the cords not covered by the adapter warranty Never use an AC adapter that shows signs of damage or excessive wear CAUTION When using the AC plug adapter do not permit contact between the green ground wire and power leads because electrical shock fire...

Page 15: ...ock do not attempt to remove any cover or touch the inside of the monitor Only a qualified service technician should open the monitor case Contacting Dell You can contact Dell through the Internet and by phone l For support through the web go to support dell com l For worldwide support through the web use the Choose A Country Region menu near the bottom of the page or see the web addresses listed ...

Page 16: ...ll com support ap dell com contactus Technical Support Technical Support for XPS computers only toll free 1300 790 877 Home and Home Office toll free 1300 655 533 Medium and Large Business toll free 1800 633 559 Small Business Education Local Government toll free 1800 060 889 Customer Service toll free 1300 662 196 Austria Vienna International Access Code 900 Country Code 43 City Code 1 Online Sup...

Page 17: ...6 Computers for Small Medium Large Business Government toll free 1 800 387 5757 Printers Projectors Televisions Handheld Digital Jukebox and Wireless 1 877 335 5767 Sales Home and Home Office Sales toll free 1 800 999 3355 Small Business toll free 1 800 387 5752 Medium Large Business Government toll free 1 800 387 5755 Spare Parts and Extended Service 1 866 440 3355 Cayman Islands Online Support l...

Page 18: ... only 7010 0074 Technical Support 7023 0182 Customer Service Relational 7023 0184 Home Small Business Customer Service 3287 5505 Switchboard Relational 3287 1200 Switchboard Fax Relational 3287 1201 Switchboard Home Small Business 3287 5000 Switchboard Fax Home Small Business 3287 5001 Dominica Online Support www dell com dm la techsupport dell com Technical Support Customer Service Sales toll fre...

Page 19: ...11 Sales 2108129800 Fax 2108129812 Grenada Online Support www dell com gd la techsupport dell com Technical Support Customer Service Sales toll free 1 866 540 3355 Guatemala Online Support www dell com gt la techsupport dell com Technical Support Customer Service Sales 1 800 999 0136 Guyana Online Support la techsupport dell com Technical Support Customer Service Sales toll free 1 877 270 4609 Hon...

Page 20: ...iness 1850 200 646 Large Business 1850 200 646 Sales E mail Dell_IRL_Outlet dell com Customer Service Home and Small Business 01 204 4014 Business greater than 200 employees 1850 200 982 General Fax Sales Fax 01 204 0103 Switchboard 01 204 4444 U K Customer Service dial within U K only 0870 906 0010 Corporate Customer Service dial within U K only 0870 907 4499 U K Sales dial within U K only 0870 9...

Page 21: ...0283 Technical Support Customer Service toll free 080 200 3800 Technical Support Dimension PDA Electronics and Accessories toll free 080 200 3801 Sales toll free 080 200 3600 Fax 2194 6202 Switchboard 2194 6000 Latin America Customer Technical Support Austin Texas U S A 512 728 4093 Customer Service Austin Texas U S A 512 728 3619 Fax Technical Support and Customer Service Austin Texas U S A 512 7...

Page 22: ... dell com ni la techsupport dell com Technical Support Customer Service Sales 001 800 220 1377 Norway Lysaker International Access Code 00 Country Code 47 Online Support support euro dell com Technical Support for XPS computers only 815 35 043 Technical Support 671 16882 Relational Customer Service 671 17575 Home Small Business Customer Service 23162298 Switchboard 671 16800 Fax Switchboard 671 16...

Page 23: ...nternational Access Code 00 Country Code 421 Online Support support euro dell com czech_dell dell com Technical Support 02 5441 5727 Customer Service 420 22537 2707 Fax 02 5441 8328 Tech Fax 02 5441 8328 Switchboard Sales 02 5441 7585 South Africa Johannesburg International Access Code 09 091 Country Code 27 City Code 11 Online Support support euro dell com dell_za_support dell com Gold Queue 011 ...

Page 24: ... toll free 1800 0060 07 Technical Support PowerApp PowerEdge PowerConnect and PowerVault toll free 1800 0600 09 Customer Service toll free 1800 006 007 option 7 Corporate Sales toll free 1800 006 009 Transaction Sales toll free 1800 006 006 Trinidad Tobago Online Support www dell com tt la techsupport dell com Technical Support Customer Service Sales toll free 1 888 799 5908 Turks and Caicos Islan...

Page 25: ...355 Medium and Large Business toll free 1 877 671 3355 State and Local Government toll free 1 800 981 3355 Federal Government toll free 1 800 727 1100 Healthcare toll free 1 800 274 1550 K 12 Education toll free 1 888 977 3355 Higher Education toll free 1 800 274 7799 Printers Projectors PDAs and MP3 Players toll free 1 877 459 7298 Customer Service toll free 1 800 624 9897 Automated Order Status ...

Page 26: ...ffairs One Dell Way Round Rock TX 78682 USA 512 338 4400 Recycling Information Dell recommends that customers dispose of their used computer hardware monitors printers and other peripherals in an environmentally sound manner Potential methods include reuse of parts or whole products and recycling of products components and or materials For specific information on Dell s worldwide recycling program...

Page 27: ...fasten the MSR to the monitor using the two screws provided in the MSR Kit Connect the USB cable from the MSR Kit to the USB connector on the lower end of the MSR tab Run the USB cable through the cable holder on the back of the monitor Connect the other end of the USB cable to a USB connector on the back of your computer 3 Place the monitor face down then remove the cable cover below the stand 4 ...

Page 28: ...trol function If pressed while the OSD menu is showing this button either increases the value of the OSD item being adjusted or it moves the OSD item selection cursor clockwise around the OSD menu 3 Adjust Down Volume If pressed before the OSD appears this button directly accesses the Volume adjustment function If pressed while the OSD menu is showing this button either decreases the value of the ...

Page 29: ...ng Auto Adjustment you can further tune your monitor by using the Pixel Clock and Phase controls in the OSD NOTE Auto Adjust will not occur if you press the button while there are no active video input signals or attached cables Volume With the menu off press the button to display the Volume adjustment function The Volume function adjusts the sound level from the internal speakers increase volume ...

Page 30: ...nges 5 Press the Select button to return to the main menu and select another function Or press the Menu button to exit from the OSD Icon Menu Name Description CONTRAST The CONTRAST function varies the intensity difference between dark and light areas on the screen Pressing will increase the contrast Pressing will decrease the contrast Minimum is 0 Maximum is 100 BRIGHTNESS The BRIGHTNESS function ...

Page 31: ...the factory values The COLOR TEMP function allows selection between several white color temperatures Choices are 9300K 6500K 5500K 7500K and USER Higher numbers will yield a blue tint and lower numbers will yield a red tint Selection is a matter of personal preference With the selection cursor highlighting the COLOR TEMP icon press Select to enter the function Pressing or will now move the selecti...

Page 32: ...or decrease that color s intensity lengthen or shorten its color bar and change the whole screen s tint Press Select to save the color s adjustment Press or to move the selection cursor to another color When satisfied with all color adjustments move the selection cursor over the Exit icon and press Select For each color bar minimum is 0 and maximum is 100 VOLUME The VOLUME function varies the audi...

Page 33: ...0 CLOCK The CLOCK function allows for manual fine adjustment of the monitor s dot clock This function is recommended only for advanced users It is normally adjusted automatically by the AUTO ADJUST function If a manual setting for improved performance cannot be determined using this function use the AUTO ADJUST function described below to set CLOCK automatically Minimum is 0 Maximum is 100 The OSD...

Page 34: ...s the length of time the OSD Menu window remains visible after the last time a button was pressed Pressing will increase the OSD Menu time Pressing will decrease the OSD Menu time Minimum is 45 sec Maximum is 255 sec The AUTO ADJUST function allows your monitor to automatically optimize its display settings for use with your computer s video output In most cases use of the AUTO ADJUST function wil...

Page 35: ...ection cursor highlighting the OSD LANGUAGE icon press Select to enter the function Pressing or will now move the selection cursor between the choices Select the desired choice by pressing Select TIMING INFO The TIMING INFO function simply displays information about the video signal which your computer is sending to the monitor Screen resolution horizontal scan rate FH and vertical refresh rate FV...

Page 36: ...e steps again releasing both buttons when the window shows OSD UNLOCK POWER LOCK and UNLOCK Operation of the Power Button may be disabled thereby preventing unauthorized personnel from switching the monitor power off To Lock disable the Power Button 1 Press Menu and buttons at the same time A small window will appear showing the present state of Power Button operation 2 Continue holding Menu and b...

Page 37: ...ble by this monitor Recommended mode is 1024 X 768 60Hz Occasionally no warning message appears but the screen is blank This could also indicate that the monitor is not synchronizing with the computer SeeSolving Problems for more information Setting the Optimal Resolution For optimal display performance while using the Microsoft Windows operating systems set the display resolution to 1024 x 768 pi...

Page 38: ... UNLOCK Out of Range display Check to see if the resolution or vertical frequency of your computer is higher than that of the LCD display Resolution should be set to 1024 x 768 Vertical refresh frequency should be set to 60 Hz Problem Suggestion Touch doesn t work Make sure cable is securely attached at both ends Video alignment doesn t recognize video resolution If you are running an expanded des...

Page 39: ...t notice 2006 Dell Inc All rights reserved Reproduction in any manner whatsoever without the written permission of Dell Inc is strictly forbidden Trademarks used in this text Dell the DELL logo Inspiron Dell Precision Dimension OptiPlex Latitude PowerEdge PowerVault PowerApp and Dell OpenManage are trademarks of Dell Inc Intel Pentium and Celeron are registered trademarks of Intel Corporation Micr...

Page 40: ...lick l A Video Alignment calibration utility that lets you calibrate the touch screen directly without opening the Touch screen software control panel l A Touch screen Software Uninstall utility that automatically deletes all Touch screen software components from your computer and removes all Touch screen software entries from the system files Installing Touch Screen Software You can install the D...

Page 41: ... program to time out as indicated by the progress bar reaching maximum Multiple Monitors with USB controllers 1 Follow the procedure for Single monitor USB controller installation above 2 The driver files will install When the Setup Complete screen appears you may choose to run calibration the Video Alignment program EloVA immediately or wait until later If you choose not to run this program now y...

Page 42: ...ated by the progress bar reaching maximum The program will continue until all controllers and or ports have been calibrated Performing a Silent Install If you have to perform several installations you may want to take advantage of the Touch Screen software silent install facility You can run a silent install from diskettes a CD hard drive or network drive To begin you must create a silent install ...

Page 43: ...hed to the system click on the Change option from the Add or Remove programs in the Control Panel Dell entry Uninstalling Touch Screen Software The Uninstall program removes all touch screen software components from your computer These components include touch screen software files directories program folders and folder items The Uninstall program also removes all touch screen software entries fro...

Page 44: ...n l Right click the Dell icon in the Windows system tray and choose Dell Touch screen Properties General You can use the General tab on the Dell Touch Screen Properties dialog to align or calibrate your touchmonitor to ensure that the mouse cursor appears at the position of touch Dell uses a three point calibration sequence that accepts touchscreens with any orientation of the X or Y axis in lands...

Page 45: ...s the full image area of the screen Ensure that you can touch and activate all icons and menus across the entire screen l If you need to recalibrate the screen make sure to touch the targets carefully It is possible that one of your touches did not register properly or you accidentally touched the screen in the wrong place during calibration For example if you touch beyond the targets or into the ...

Page 46: ...p message at the point of untouch l Double clicks on an object when the screen is touched twice in rapid succession at the same location l The speed to achieve double click is identical to the speed of a successful double click with the mouse l Double click speed is set from the Mouse Properties control panel Mouse Properties Buttons Double click speed l Double click area graphically sets the dime...

Page 47: ...ng the appropriate slider in this tab with the touch screen or mouse or by using the keyboard arrow keys You must click Apply to activate the changes made on the Sound tab Properties A Properties page is created for each touch screen controller installed by EloSetup and for each serial port reserved for a controller even if that controller is not present A number is assigned to each Properties pag...

Page 48: ...tton is touched l The EloVA icon will launch the video alignment program only for the monitor associated with the current Properties page Running EloVA from the Properties page avoids the need to align all monitors in a multiple monitor application when only a single monitor alignment is desired l If a serial port is reserved for a touch screen controller that is not actually installed the only in...

Page 49: ...ed on the delay value is set to a minimum of 25 milliseconds l To enable this feature select Enable right click on hold l To enable this feature for all touchscreens select the Apply to all touchscreens check box Right click delay defines the right click delay value in milliseconds The right click delay allows the users to perform other touch screen operations normally Right click Area defines the...

Page 50: ... Dell Control Panel Properties tab Tool Tray The Tool Tray application offers a convenient way to access commonly used functions of the driver from the operating system desktop For the Tool Tray icon to appear in the Windows system tray you enabled it from the Mode tab in the Control Panel You can launch the Tool Tray application with a single left or righ click The Tool Tray application provides ...

Page 51: ...djust in a multiple monitor configuration l Can be launched from the Tool Tray for single monitor or command line for multiple monitors l Configuration syntax menu is available by running eloalmon h Only one monitor may be adjusted for each execution of the program l Program terminates when green check mark is touched or clicked with the mouse or from the keyboard by pressing Esc Enter or Space Se...

Page 52: ...n l Enable cursor acceleration l Apply to all touchscreens These parameters can be configured using the mouse to resize or move the bounds rectangle or by entering the values directly in the dialog box You must click Apply to activate the changes made in this dialog This applies to all touchmonitors unless run with appropriate command line options To view the options available run EloAccel using E...

Reviews: