background image

Using Computer Hardware

4-7

To adjust keyboard operation, such as the character repeat rate, double-click the 

Keyboard

 icon in the 

Control Panel

 (refer to “Control Panel” in Chapter 2).

0RXVH

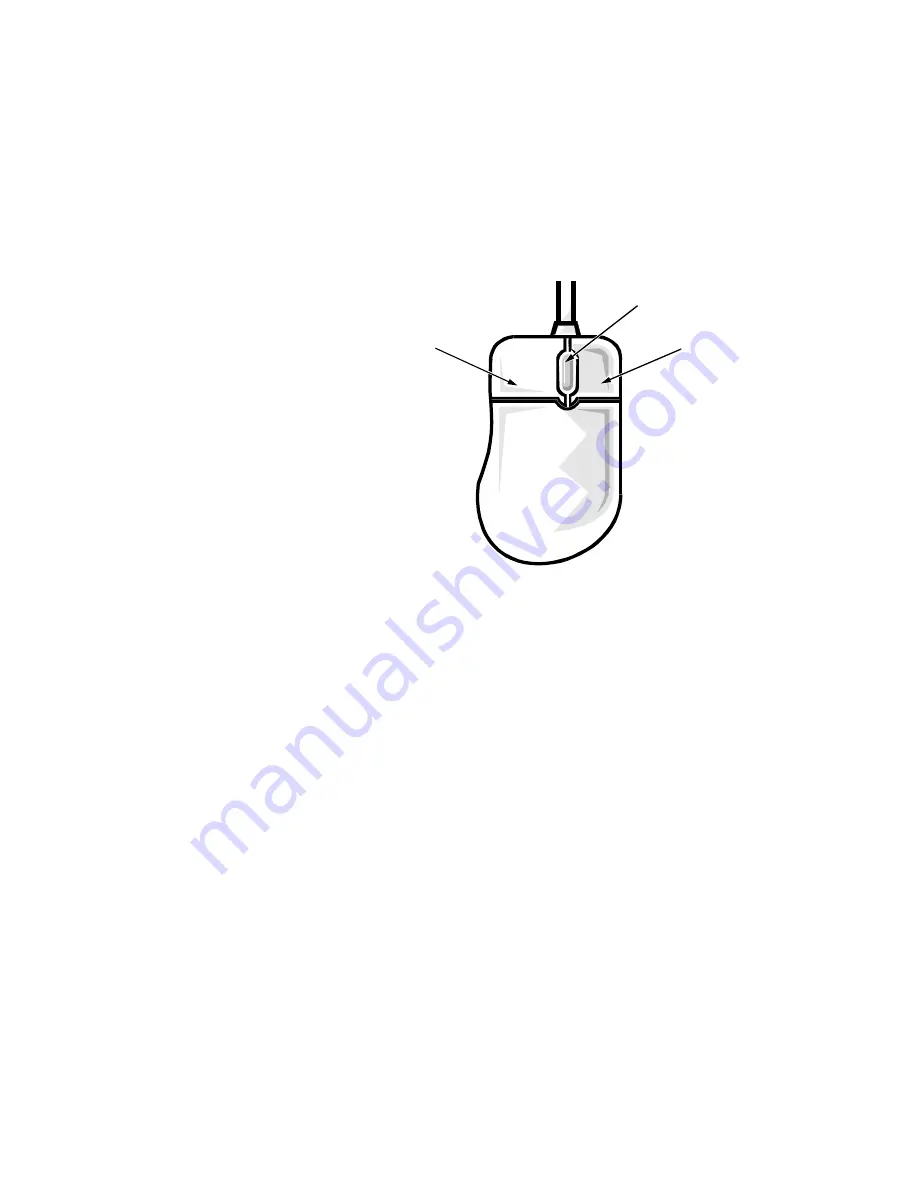
The mouse that came with your Dell computer probably looks similar to the one 
shown in Figure 4-5.

)LJXUH  0LFURVRIW ,QWHOOL0RXVH

The mouse’s left button is typically used to select options from menus, activate but-
tons, and highlight text in various programs. The right button frequently activates 
menus with shortcuts for performing various tasks. If you have a Microsoft 
IntelliMouse (see Figure 4-5), it includes a wheel that you can rotate forward and back 
or press like a button to perform a number of operations.

The following software is required for using the IntelliMouse wheel:

‡

Windows 98 or Windows NT Workstation

‡

IntelliPoint 2.

x

‡

Application programs that support the wheel; for example, Microsoft Office or 
Internet Explorer

The application programs being used determine how the wheel works. If you do not 
have all the necessary software, the IntelliMouse functions as a standard two-button 
mouse.

To adjust mouse operation, such as the pointer speed and right/left-handed button 
configuration, double-click the 

Mouse

 icon in the 

Control Panel

 (refer to “Control 

Panel” in Chapter 2). For more information, refer to the mouse documentation that 
came with your system.

left button

right button

wheel

Summary of Contents for Dimension XPS R Series

Page 1: ... ZZZ GHOO FRP HOO LPHQVLRQ 36 5 6 VWHPV 6 783 8 ...

Page 2: ... DELL logo and Dell Dimension are registered trademarks and DellWare is a registered service mark of Dell Computer Corporation MS DOS Microsoft Windows and Windows NT are registered trademarks of Microsoft Corporation Other trademarks and trade names may be used in this document to refer to either the entities claiming the marks and names or their products Dell Computer Corporation disclaims any p...

Page 3: ...t this guide The Reference and Troubleshooting Guide provides detailed safety information EEUHYLDWLRQV FURQ PV DQG 7HUPV Abbreviations acronyms and computer terms are identified or defined as they are used in this guide For a complete listing refer to the Glossary in the Online Guide 1RWDWLRQDO RQYHQWLRQV 51 1 51 1 LQGLFDWHV WKH SRWHQWLDO IRU ERGLO KDUP DQG WHOOV RX KRZ WR DYRLG WKH SUREOHP 87 21 ...

Page 4: ... The Reference and Troubleshooting Guide provides maintenance informa tion instructions on installing upgrades like memory and troubleshooting procedures for solving common problems The Online Guide replicates important information from both the Setup Guide and Reference and Troubleshooting Guide It is provided for those who prefer online documents to printed ones To open the guide click the Start...

Page 5: ...ws 98 Screen 2 1 Major Features of the Windows Desktop 2 2 Working Within Program Windows 2 4 Control Panel 2 5 Setting Up Display Properties 2 6 Changing the Wallpaper 2 6 Changing the Screen Saver 2 7 Changing Desktop Themes 2 8 Web View 2 9 Shortcuts 2 9 Creating a Shortcut on the Windows Desktop 2 10 Arranging and Positioning Shortcuts 2 10 Using Windows Help 2 11 KDSWHU 8VLQJ DQG QVWDOOLQJ 6R...

Page 6: ...ing the Refresh Rate in Windows 98 4 3 Changing the Display Resolution in Windows NT 4 4 Changing the Refresh Frequency in Windows NT 4 5 Keyboard 4 5 Mouse 4 7 CD ROM and DVD ROM Drives 4 8 Speakers 4 9 Microphone 4 9 Adding a Printer 4 9 Using Plug and Play Devices 4 10 System Upgrades 4 11 KDSWHU UHTXHQWO VNHG 4XHVWLRQV General Questions 5 1 Program Diskette Maker Questions 5 2 Software Questio...

Page 7: ...Explorer 3 3 Figure 3 3 Find All Files Window 3 3 Figure 3 4 Shut Down Windows Window 3 6 Figure 4 1 Windows 98 Display Properties Window 4 2 Figure 4 2 Windows 98 Advanced Display Properties Window 4 3 Figure 4 3 Windows NT Display Properties Window 4 4 Figure 4 4 Typical Keyboard 4 6 Figure 4 5 Microsoft IntelliMouse 4 7 Figure 4 6 Properly Inserting a Disc 4 8 7DEOHV Table 2 1 Major Features of...

Page 8: ...x ...

Page 9: ...cess is customized according to which computer components you have 87 21 7R SUHYHQW SRVVLEOH FRQIOLFWV ZLWK LQGRZV GR QRW FRQQHFW GHYLFHV VXFK DV SULQWHUV RU LQVWDOO LWHPV VXFK DV H SDQVLRQ FDUGV EHIRUH RX FRPSOHWH RXU LQGRZV VHWXS 7KHVH GHYLFHV VKRXOG RQO EH FRQQHFWHG RU LQVWDOOHG DIWHU WKH RSHUDWLQJ V VWHP VHWXS LV FRPSOHWHG 87 21 R QRW LQWHUUXSW WKH LQGRZV VHWXS SURFHVV RLQJ VR PD UHQGHU RXU FR...

Page 10: ...Your system restarts automatically 5 When the Regional Settings window appears select the regional setting for your location and then click Next This setting tells Windows 98 how to display numbers dates time and currency 6 In the Keyboard Layout window accept the default highlighted keyboard from the list and then click Next NOTE If you are located outside of the U S click the keyboard for your l...

Page 11: ...may appear listing which items Windows 98 is setting up 12 If the Enter Windows Password window appears enter your user name and if applicable your password Then click OK The Username field must be completed the Password field is optional Depending on your system s configuration windows may appear listing which items Windows 98 is setting up 13 In the Date Time Properties window see Figure 1 2 cli...

Page 12: ...e Welcome to Windows 98 screen appears click the X in the upper right corner of the screen The Welcome to Windows 98 screen is described in Chapter 2 Customizing the Windows Desktop 18 Click anywhere inside the Welcome to Your New Dell Computer window to view a brief multimedia presentation When the presentation ends close the window by clicking the X in the upper right corner RPSOHWLQJ HOO 6HWXS ...

Page 13: ...re it in a safe place NOTE Dell s Express Service Code may not be available in all countries 4 Type x to continue The setup program examines your computer s hardware and copies to your hard disk drive the files needed to run Windows NT After several minutes the system reboots and the Microsoft software license agreement appears 5 Read the license agreement and then click the I Agree button You mus...

Page 14: ...15 characters and click Next 14 If you have a modem installed the Install New Modem window appears Con tinue with step 15 If you do not have a modem installed click Cancel and proceed to step 20 15 Click Next to let Windows NT detect any installed modem Dell recommends that you let Windows NT detect your modem However you can click the Don t Detect My Modem I Will Select From a List radio button a...

Page 15: ... Information window type the administrator password you entered in step 9 and click OK UHDWLQJ D LQGRZV 17 PHUJHQF 5HSDLU LVNHWWH The emergency repair diskette saves your original configuration and can be used to restore your system to its initial setup state if files become corrupted It should not be used as a backup tool To create the emergency repair diskette follow these steps 1 Click the Star...

Page 16: ...Chapter 4 provides basic information and tips on using your computer hardware Also included are general instructions for adding a printer Chapter 5 offers answers to commonly asked questions about your computer system 2QOLQH XLGH For your convenience the information provided in Chapters 2 through 5 of this Setup Guide is available online The Online Guide can be a handy reference tool as you work o...

Page 17: ...Preparing Your Computer System for Use the First Time 1 9 ...

Page 18: ...1 10 Dell Dimension XPS Rxxx Systems Setup Guide ...

Page 19: ...al of Windows 98 select the Windows 98 Overview option Maintain Your Computer Configures your system for regular automated sys tem maintenance Newer versions of device drivers and other software should be downloaded from www dell com NOTE Dell provides support for your system as it was configured by Dell When you place the cursor over an option information about that option is displayed to the rig...

Page 20: ... on the left and a clock on the right You may also see other icons on the taskbar depend ing on your system s software and hardware features Start Button The Start button provides access to the contents of your computer Click the Start button to display a menu containing the system s main program and program group icons see Fig ure 2 2 Refer to Table 2 2 for descriptions of the Start menu options ...

Page 21: ...lays a list of installed programs you can start Favorites Displays a list of favorite Web content and sites Documents Displays a list of most recently opened documents Settings Displays a list of user configurable system components Find Displays a menu to help you find files folders or computers to which you are connected Refer to Finding Files in Chapter 3 for more information Help Opens the help...

Page 22: ...the maximize but ton to size the window to the screen and click the resize button to return the window to its original size Click the close button to close the document or program Each time you open a program a button for that program appears on the taskbar see Figure 2 4 You can click the buttons to toggle between open programs Run Displays a window for starting a program or file with an MS DOS c...

Page 23: ...tings and then click Control Panel see Figure 2 5 A window containing system setup icons appears LJXUH RQWURO 3DQHO LQGRZ Typical icons include Display Keyboard Mouse and Printers NOTE The icons in the Control Panel vary depending on the hardware and soft ware configuration of your computer system Click an icon to see a short description of its settings 2 Double click an icon to see the settings t...

Page 24: ...d click Control Panel 2 Double click the Display icon The Display Properties window opens with the Background tab selected by default see Figure 2 6 LJXUH DFNJURXQG 7DE RI WKH LVSOD 3URSHUWLHV LQGRZ KDQJLQJ WKH DOOSDSHU The wallpaper background appearance of the Windows desktop is changed on the Background tab of the Display Properties window Table 2 3 describes the various parts of this tab After...

Page 25: ...Q Preview window Displays the current wallpaper or pattern Wallpaper list Click the name of the wallpaper you want to display or click None if you prefer not to use a wallpaper image Click the Browse button to use images in a directory you specify Pattern button Click the Pattern button to display a list of patterns for your desktop or click None if you prefer not to use a pattern This option is n...

Page 26: ... Click the Start button point to Settings and click Control Panel 2 Double click the Desktop Themes icon The Desktop Themes window opens see Figure 2 8 3 Select a theme from the Theme pull down menu and click OK 7DEOH 6FUHHQ 6DYHU 7DE HDWXUHV HDWXUH XQFWLRQ Preview window Displays the current screen saver Screen Saver pull down menu Choose a screen saver from the pull down menu or click None if yo...

Page 27: ...esktop point to Active Desktop and then click View as Web Page Or click the Start button point to Settings click Active Desktop and then click View as Web Page To change the view of folders click the Start button point to Settings and then click Folder Options Select the General tab click the option you want Web style Clas sic style or Custom and click OK 6KRUWFXWV Shortcuts are icons that provide...

Page 28: ...indows desk top Then release the right mouse button A menu appears next to your cursor 4 Click Create Shortcut s Here An icon appears on your desktop that you can double click at any time to activate the shortcut UUDQJLQJ DQG 3RVLWLRQLQJ 6KRUWFXWV To individually move shortcuts point your mouse cursor at the icon click it and drag it to the desired location To arrange all of your shortcut icons at...

Page 29: ...h tab lets you search for topics based on words you provide The Windows help system can help orient you to Windows 98 operations On the Contents tab click Getting Started Book Online Version and then click Microsoft Windows 98 Getting Started Book The Online Version Click the underlined words indicated in the right pane to open the Getting Started Book On the Contents tab click If You re New to Wi...

Page 30: ...2 12 Dell Dimension XPS Rxxx Systems Setup Guide ...

Page 31: ...e steps 1 Click the Start button and then point to Programs In the Programs menu a folder icon appears next to program groups with multiple programs 2 Click the program you want to start DVLF LOH 0DQDJHPHQW Windows 98 and Windows NT provide file management and browsing capabilities with Windows Explorer and My Computer 0 RPSXWHU My Computer contains various icons that represent the contents of you...

Page 32: ...s Each logi cal drive appears as a separate drive letter C and D For more information on My Computer refer to the Microsoft documentation that came with your system LQGRZV SORUHU Windows Explorer displays the contents of your computer as an ordered list or tree see Figure 3 2 You can use this program to locate files on any drive or folder in your computer To open Windows Explorer click the Start b...

Page 33: ...ional folders Click the plus icon to expand the view one level To collapse the view click the minus icon to the left of a drive or folder LQGLQJ LOHV To locate a particular file or folder follow these steps 1 Click the Start button point to Find and then click Files or Folders The Find All Files window opens with the Name Location tab selected and the cursor in the Named field see Figure 3 3 LJXUH...

Page 34: ...y 2 Click the file to select it 3 Click the Edit menu and then click Copy 4 Open the folder where you want to copy the file 5 Click the Edit menu and then click Paste 0RYLQJ LOHV 87 21 R QRW PRYH ILOHV WKDW DUH SDUW RI DQ LQVWDOOHG SURJUDP RLQJ VR PD UHQGHU WKH SURJUDP XQXVDEOH To move a file to a new location follow these steps 1 Use Windows Explorer or My Computer to locate the file you want to ...

Page 35: ...e in error and need to retrieve it from the Recycle Bin follow these steps 1 Double click the Recycle Bin icon located on the Windows desktop The Recycle Bin window opens and lists all deleted files their previous locations and the date you deleted them 2 Click the file you want to restore 3 Click the File menu and then click Restore The file disappears from the Recycle Bin and is restored to its ...

Page 36: ...indow see Figure 3 4 click Shut down and then click OK LJXUH 6KXW RZQ LQGRZV LQGRZ QVWDOOLQJ DQG RQILJXULQJ GGLWLRQDO 6RIWZDUH If you are unsure whether Dell installed a particular software package you ordered you can quickly check by clicking the Start button pointing to Programs and scan ning the programs listed in the Programs menu If the program is listed it has already been installed and you ...

Page 37: ...ick Disable 3 Install the software package according to the manufacturer s instructions 4 Right click the mouse on the virus scanning program icon and click Enable 5 Run the virus scanning program to check for viruses 5HPRYLQJ 6RIWZDUH To remove a program from your computer follow these steps 87 21 R QRW LQWHUUXSW RU VWRS WKLV SURFHVV RQFH EHJXQ RWKHUZLVH GDWD ORVV DQG FRUUXSWLRQ RI RXU RSHUDWLQJ ...

Page 38: ...anually Refer to the documentation that came with the device for driver installation instructions DFNLQJ 8S LOHV It is important to make backups copies of all your data files Data files are the files documents graphics records and so on you create with your programs NOTE No backups need be made for software packages or for your operating system You made your Dell installed software backups when yo...

Page 39: ...DFKLQJ DQ GHYLFHV 9LGHR LVSOD The video display system consists of the video card in the computer and the monitor connected to it They work together to produce the picture you see on your screen To display a program at a specific resolution maximum number of pixels that can be dis played both the video card and monitor must support it and the necessary video drivers must be installed KDQJLQJ WKH L...

Page 40: ...crease the resolution or to the right to increase the resolution NOTE As the resolution increases icons and text appear smaller on the screen 5 Click Apply A dialog box informs you that the process may take 15 seconds and that the screen may flicker while the resolution is changed 6 Click OK and then Yes to accept the new setting For more information on monitor adjustments refer to the documentati...

Page 41: ...gs tab 3 Click the Advanced button 4 Click the Adapter tab locate the Refresh rate section and click the pull down menu see Figure 4 2 LJXUH LQGRZV GYDQFHG LVSOD 3URSHUWLHV LQGRZ 5 Click the desired refresh rate Adapter default sets the monitor to 60 Hz Optimal sets the monitor to the highest refresh rate possible according to the resolution selected This setting is controlled by the horizontal sc...

Page 42: ...JXUH LQGRZV 17 LVSOD 3URSHUWLHV LQGRZ 3 Point the mouse cursor at the slidebar in the Desktop Area Then click and hold down the left mouse button 4 Move the slidebar to the left to decrease the resolution or to the right to increase the resolution NOTE As the resolution increases icons and text appear smaller on the screen 5 Click the Test button 6 Read the instructions that appear and then click ...

Page 43: ... the Refresh Frequency area 4 Click the desired refresh frequency 5 Click the Test button 6 Read the instructions that appear and then click OK 7 If you see a test bitmap pattern click Yes and proceed to step 9 Otherwise click No and go to step 8 8 Read the message and click OK Select a different refresh frequency and then repeat steps 3 through 7 9 Click the Apply button to change the refresh fre...

Page 44: ...WLRQ H RPELQDWLRQ Minimizes all open windows Maximizes all windows Opens Windows Explorer Opens the Run window Opens the Find All Files window Opens the Find Computer window if you are connected to a network Opens the System Properties window Windows logo key numeric keypad function keys Esc key Enter key ...

Page 45: ...cludes a wheel that you can rotate forward and back or press like a button to perform a number of operations The following software is required for using the IntelliMouse wheel Windows 98 or Windows NT Workstation IntelliPoint 2 x Application programs that support the wheel for example Microsoft Office or Internet Explorer The application programs being used determine how the wheel works If you do...

Page 46: ...he open close button or by lightly pressing the front edge of the tray the tray will automatically close NOTE High speed CD ROM drives spin the CD at a very high rotational speed and may be noisy If a CD has printing on only half of the disk or if there is a slight imbalance in the CD the imbalance is greatly magnified by the high speed and the noise is louder This effect is inherent in the high s...

Page 47: ... up on your screen that provides various audio controls For information on using this interface refer to the documentation that came with the speakers 0LFURSKRQH If your system came with a microphone connect it as illustrated on the Getting Started sheet that came with your system Experiment with microphone placement to achieve optimal recording levels GGLQJ D 3ULQWHU 87 21 7R PDLQWDLQ D VWURQJ VL...

Page 48: ...drive A or the CD into the CD ROM drive 10 Provide the printer name up to 31 characters and click Next 11 Indicate whether the printer will be shared with other network users by clicking either the Shared or Not shared option If the printer will be shared the Connect to Printer dialog box appears Continue to step 12 If the printer will not be shared go to step 14 12 Select your printer from the li...

Page 49: ... system When Windows 98 starts a New Hardware Found window appears indicating that the device has been detected and configured NOTE To install and configure a non Plug and Play device for use with Windows 98 click the Start button point to Settings and click Control Panel Double click the Add New Hardware icon and follow the instructions displayed 6 VWHP 8SJUDGHV You can purchase various upgrades ...

Page 50: ...4 12 Dell Dimension XPS Rxxx Systems Setup Guide ...

Page 51: ...cifications section of the Online Guide and in Appendix A Technical Specifications of the Reference and Trouble shooting Guide Specifications for installed devices can be found in the device manufacturer s documentation that came with your system Specifications also are available from Dell s World Wide Web site at www dell com RZ FDQ ILQG LQIRUPDWLRQ UHODWHG WR P V VWHP RQ WKH HOO HE VLWH From Del...

Page 52: ...ries and click Dell Diskmaker RHV WKH 3URJUDP LVNHWWH 0DNHU EDFN XS DOO WKH VRIWZDUH RQ P FRPSXWHU The Program Diskette Maker only backs up Dell specific device drivers and tools RZ PDQ GLVNHWWHV GR QHHG KDW W SH RI GLVNHWWHV VKRXOG XVH The number of diskettes needed varies depending on your system configuration To determine the total number required add the number of diskettes listed below each s...

Page 53: ...WLRQV 7KH IRUPDWWHG FDSDFLW RI P KDUG GLVN GULYH VHHPV WR EH VPDOOHU WKDQ ZKDW RUGHUHG KHUH LV WKH PLVVLQJ VSDFH The operating system reports drive capacity assuming that 1 MB equals 1 048 576 bytes This calculation is technically correct Drive manufacturers compute the size differently They consider 1 MB to equal 1 000 000 bytes This difference can cause confusion If the drive is advertised as 4 ...

Page 54: ...8 or Changing the Refresh Frequency in Windows NT in Chapter 4 0 PRQLWRU LV IODVKLQJ GLIIHUHQW FRORUV ZKHQ FKDQJH VFUHHQV RZ GR IL LW If your monitor is flashing different colors when you change screens follow these steps 1 Click the Start button point to Settings and then click Control Panel 2 In the Control Panel double click the Display icon Then click the Settings tab 3 Change the Color palett...

Page 55: ... not perform as expected For informa tion on these help tools see Chapter 8 Getting Help in the Reference and Troubleshooting Guide or the Contacting Dell section of the Online Guide If you need help with hardware or software that was not Dell installed contact the manufacturer of that item For DellWare items call 1 800 753 7201 to receive product support information ...

Page 56: ...5 6 Dell Dimension XPS Rxxx Systems Setup Guide ...

Page 57: ... changing 2 8 diagnosing problems 5 1 display properties refresh rate Windows 98 4 3 refresh rate Windows NT 4 5 resolution Windows 98 4 1 resolution Windows NT 4 4 screen saver 2 7 wallpaper 2 6 drivers 3 7 DVD ROM drives 4 8 files backing up 3 8 copying 3 4 deleting 3 5 finding 3 3 moving 3 4 renaming 3 4 fixing problems 5 4 frequently asked questions general 5 1 hardware 5 3 Program Diskette Ma...

Page 58: ... 4 10 printer adding 4 9 program diskette sets 1 5 programs accessing 3 1 adding 3 6 backing up 1 5 My Computer 3 1 removing 3 7 Windows Explorer 3 2 5 refresh rate changing Windows 98 4 3 Windows NT 4 5 resolution changing Windows 98 4 1 Windows NT 4 4 6 screen saver 2 7 service 5 4 setup completing Dell setup 1 4 display properties 2 6 printer 4 9 program diskette sets 1 5 shortcuts 2 9 Windows ...

Page 59: ...98 continued help 2 11 installing software 3 6 moving files 3 4 program diskette sets 1 5 removing software 3 7 renaming files 3 4 setting refresh rate 4 3 setting resolution 4 1 setting up 1 1 shutting down 3 6 Windows logo key 4 6 Windows desktop features 2 2 My Computer 3 1 Start button 2 2 Windows Explorer 3 2 Windows Help 2 11 Windows NT accessing programs 3 1 backing up files 3 8 copying fil...

Page 60: ...4 Dell Dimension XPS Rxxx Systems Setup Guide ...

Reviews: