background image

%)RU$QDORJ,QSXW

1.

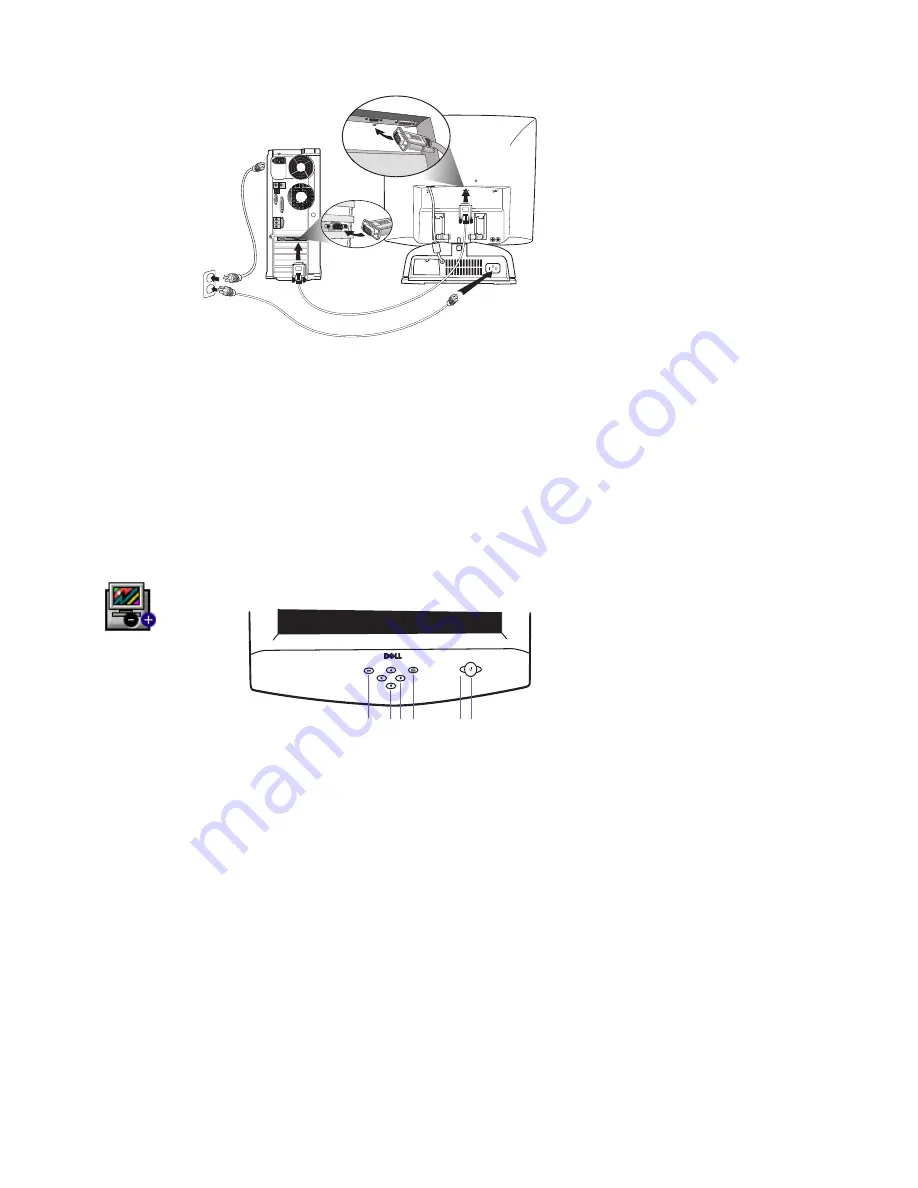
Turn off your computer and unplug your computer’s power cord.

2.

D-Sub cable (with blue connector) has to be connected to the back of your monitor.

3.

Attach the other end of Analog signal cable to analog output port on the back of your computer for analog video connection. 

4.

Connect power cord of your monitor to the power port on the back of the monitor.

5.

Plug power cords of your computer and your monitor into a nearby outlet.

6.

Turn on your monitor and computer.

7.

If your monitor displays an image, installation is complete. If it does not display an image, refer to the troubleshooting section 
of this guide.

0RQLWRU&RQWUROVDQG,QGLFDWRUV

1.

Power button switches your monitor on.

2.

Power Indicator

3.

OSD button which when pressed will take you to the OSD controls.

4.

LEFT and RIGHT buttons, like the UP and DOWN buttons, are also used in adjusting the OSD of your monitor.

5.

UP and DOWN buttons are used when adjusting the OSD of your monitor. These buttons are also direct access buttons for 
Brightness control.

6.

AUTO button which when pressed will perform the AUTO Adjustment to optimize the display settings for use with your 
computer.

1

3

4

5

6

2

3

4

5

2

Summary of Contents for 1501FP

Page 1: ...g or other soft surface Doing so may block the ventilation openings in the bottom of the cabinet If you put the monitor in a bookcase or some other enclosed space be sure to provide adequate ventilation Do not expose the monitor to rain or use it near water If the monitor accidentally gets wet unplug it and contact an authorized dealer immediately You can clean the exterior of the monitor with a d...

Page 2: ... your monitor displays an image installation is complete If it does not display an image refer to the troubleshooting section of this guide 0RQLWRU RQWUROV DQG QGLFDWRUV 1 Power button switches your monitor on 2 Power Indicator 3 OSD button which when pressed will take you to the OSD controls 4 LEFT and RIGHT buttons like the UP and DOWN buttons are also used in adjusting the OSD of your monitor 5...

Page 3: ...nsert the monitor CD into the CD ROM drive type d change the drive letter to match your CD ROM drive if it is not drive D in the Copy manufacturer s files from box and click OK 5 In the Select Device window click the appropriate monitor model and then click OK 6 In the Change Display Type window click Close 7 In the Display Properties window click OK Version 4 00 950B 1 Click Start Settings Contro...

Page 4: ... monitor and unplug the signal cable Check the cable connector for bent or broken pins With the signal cable still disconnected turn on the monitor If the monitor is working correctly a self test pattern appears Perform a monitor reset or recall 03257 17 HIRUH FRQWDFWLQJ HOO IRU WHFKQLFDO DVVLVWDQFH UHIHU WR WKH 7URXEOHVKRRWLQJ VHFWLRQ LQ WKH 8VHU V XLGH RQ RXU PRQLWRU 7KLV VHFWLRQ FRQWDLQV GHWDLO...

Reviews: