background image

Installing the M.2 SSD module on BOSS-S1 card

CAUTION: 

Many repairs may only be done by a certified service technician. You should only perform troubleshooting and simple 

repairs as authorized in your product documentation, or as directed by the online or telephone service and support team. 
Damage due to servicing that is not authorized by Dell is not covered by your warranty. Read and follow the safety instructions 
that are shipped with your product.

Align the M.2 SSD module connectors with the connectors on the card.

Tilt the M.2 SSD module downwards until the module is seated firmly on the card.

CAUTION: 

To avoid damage to the card, ensure that you do not over tighten the screw.

Tighten the screw to secure the M.2 SSD module to the card.

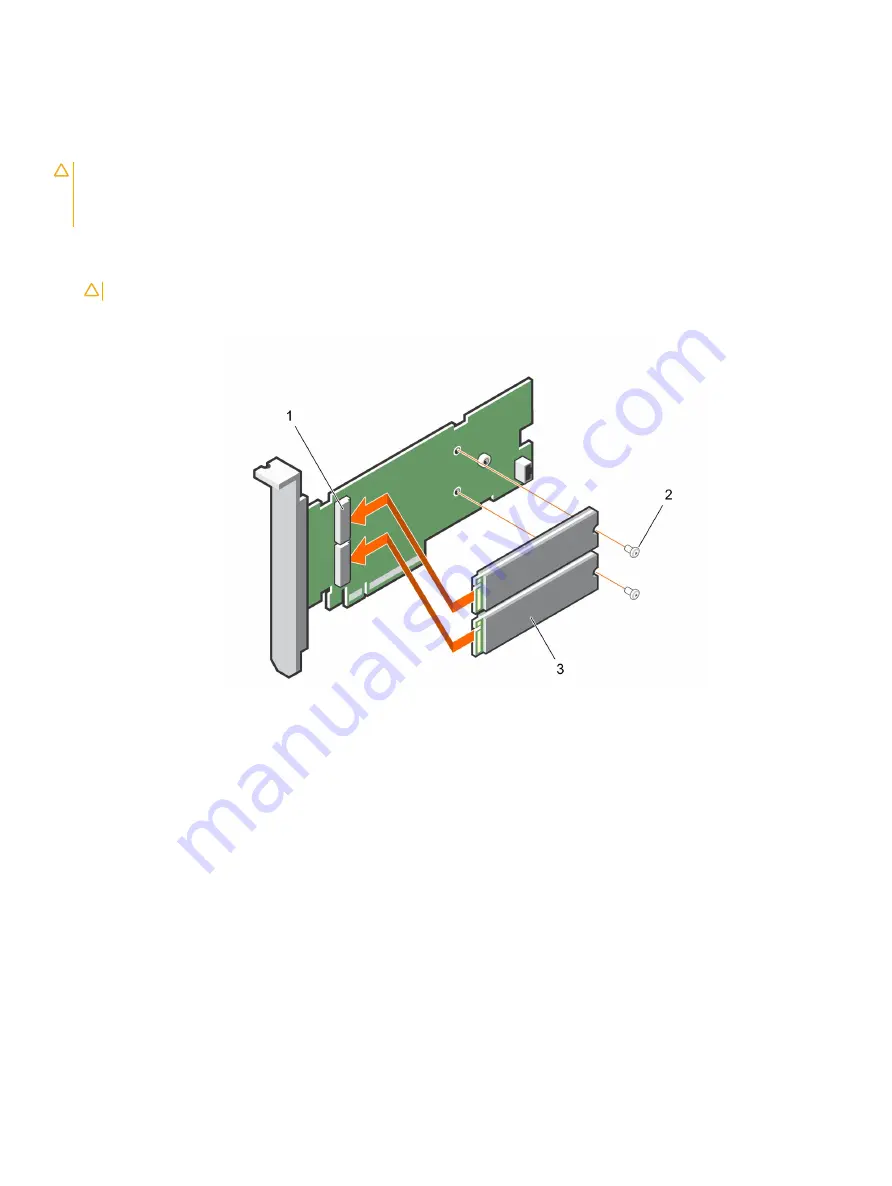
Figure 7. Installing M.2 SSD module on the BOSS-S1 card

1

module connector (2)

2

screw (2)

3

M.2 SSD module (2)

Deploying the BOSS-S1 card

17

Summary of Contents for Boot Optimized Server Storage-S1

Page 1: ...Dell EMC Boot Optimized Server Storage S1 User s Guide ...

Page 2: ...age to hardware or loss of data and tells you how to avoid the problem WARNING A WARNING indicates a potential for property damage personal injury or death 2017 2018 Dell Inc or its subsidiaries All rights reserved Dell EMC and other trademarks are trademarks of Dell Inc or its subsidiaries Other trademarks may be trademarks of their respective owners 2018 11 Rev A05 ...

Page 3: ...irmware update using iDRAC 11 Firmware update using Lifecycle Controller 11 Related documentation 11 2 Features 12 Foreign import 12 SMART info 12 Auto rebuild 13 Non RAID disk support 13 TRIM 13 Quick initialization 13 Erase physical disk 13 3 Deploying the BOSS S1 card 14 Removing the BOSS S1 card 14 Removing the M 2 SSD module from the BOSS S1 card 15 Installing the M 2 SSD module on BOSS S1 ca...

Page 4: ...re using iDRAC or LC fails 28 Physical disk size not updated in iDRAC 28 Physical disk Virtual disk missing in iDRAC 28 Back Ground Activity task progress in HII does not report real time status 29 Virtual disk state will be generated twice 29 Character limitation while naming a virtual disk 29 VMFS datastore is disabled on the 14th generation of PowerEdge systems that are shipped with VMware ESXi...

Page 5: ... modular card has a dedicated slot in modular servers NOTE BOSS S1 card allows you to create only one virtual disk from the available physical disks Specifying the size of a virtual disk is not supported NOTE There are no status LEDs on the BOSS S1 card Figure 1 Features of the BOSS S1 adaptercard 1 SATA drive connector 2 2 80 mm M 2 SATA drive 1 3 80 mm M 2 SATA drive 2 Figure 2 Features of the B...

Page 6: ...ux version 7 4 Red Hat Enterprise Linux version 6 10 Red Hat Enterprise Linux version 6 9 SUSE Linux Enterprise Server version 15 SUSE Linux Enterprise Server version 12 SP3 VMware ESXi 6 7 Update 1 VMware ESXi 6 7 VMware ESXi 6 5 Update 2 VMware ESXi 6 5 Update 1 VMware ESXi 6 0 Update 3 Ubuntu version 18 04 Ubuntu version 16 04 NOTE For the latest list of supported operating systems and driver i...

Page 7: ...cifications The following table lists the BOSS S1 card feature specifications Table 1 BOSS S1 card feature specifications Feature BOSS S1 card RAID levels RAID 1 Stripe size Supports default 64K stripe size only Battery backup unit No Non volatile cache No Virtual disk cache function Write through Maximum number of virtual disks 1 Maximum number of drives supported 2 Support for Non RAID disks Yes...

Page 8: ... disks and display controller Windows systems use the mvsetup utility while Linux systems use the mvcli utility The BOSS S1 CLI Utility also supports ESXi For more information about CLI commands see BOSS S1 CLI commands NOTE To use the mvsetup Windows utility the BOSS S1 management driver must first be installed You can download the latest Windows driver from Dell com support Linux ESXi mvcli does...

Page 9: ...n of the controller and package version refers to the DUP version 3 Click Yes to continue 4 Click Yes 5 Verify the installed firmware version in HII or using BOSS S1 CLI Firmware update using Linux DUP Perform the following steps to update using Linux NOTE Ensure that you have Root Sudo privileges for Linux ESXi 1 Download the latest Dell Update Package DUP for Linux from the Dell com support 2 Go...

Page 10: ...SS S1 supports multiple sub device ID Locate the correct sub device ID which is available in the iDRAC BOSS S1 HII and BOSS S1 OS CLI Info o hba Table 3 Supported SubDevice ID SubDevice ID Firmware Binary Link 1FD6 Monolithic ImageA1_1FD6 bin 1FE2 Monolithic ImageA1_1FE2 bin 1FDF Modular ImageA1 bin 4 Run mvsetup exe 5 To flash the firmware run the command flash a update f ImageA1_xxxx bin t raw i...

Page 11: ...S1 CLI Firmware update using Lifecycle Controller To update the firmware using the Lifecycle Controller 1 Download the DUP file from the Dell com support and copy the exe DUP file to a local drive Example of the file name SAS RAID_Firmware_xxxxx_xxxx_xxx exe 2 Open Virtual Console and boot into Lifecycle Controller by pressing F10 at boot time 3 Select Get the Latest firmware on the dashboard wind...

Page 12: ...ting two foreign drives to a controller you must do either of the following Clear the controller configuration if using unconfigured drives Clear Controller Configuration Import the virtual disk if using configured drives Virtual Disk Import SMART info SMART monitors certain physical aspects of the disk electronics to help detect predictable disk failures Data on SMART compliant physical disks can...

Page 13: ...erating system to delete a block of data that is no longer considered in use by SSDs For supported operating systems the TRIM command resolves the write amplification issue When an operating system deletes a file the file is marked for deletion in the file system but the contents on the disk are not actually erased As a result the SSDs do not know the Logical Block Addressing LBA previously occupi...

Page 14: ...ur warranty Read and follow the safety instructions that are shipped with your product 1 Turn off the system including any attached peripherals and disconnect the system from the electrical outlet and peripherals NOTE It is recommended that you always use a static mat and static strap while working on components in the interior of the system 2 Open the system 3 Locate the BOSS S1 card on the syste...

Page 15: ...d service technician You should only perform troubleshooting and simple repairs as authorized in your product documentation or as directed by the online or telephone service and support team Damage due to servicing that is not authorized by Dell is not covered by your warranty Read and follow the safety instructions that are shipped with your product 1 Turn off the system including any attached pe...

Page 16: ...oving the BOSS S1 card 4 Remove the screw that secures the M 2 SSD module to the BOSS S1 card 5 Slide and remove the M 2 SSD module away from the card Figure 5 Removing the M 2 SSD module from the BOSS S1 adapter card 1 module connector 2 2 screw 2 3 M 2 SSD module 2 Figure 6 Removing the M 2 SSD module from the BOSS S1 modular card 1 module connector 2 M 2 SSD module 16 Deploying the BOSS S1 card...

Page 17: ...ell is not covered by your warranty Read and follow the safety instructions that are shipped with your product 1 Align the M 2 SSD module connectors with the connectors on the card 2 Tilt the M 2 SSD module downwards until the module is seated firmly on the card 3 CAUTION To avoid damage to the card ensure that you do not over tighten the screw Tighten the screw to secure the M 2 SSD module to the...

Page 18: ...ff the system including any attached peripherals and disconnect the system from the electrical outlet and peripherals NOTE It is recommended that you always use a static mat and static strap while working on components in the interior of the system 2 Open the system 3 Hold the card by its edges and align the card connector with the connector on the system board CAUTION To prevent damage to the car...

Page 19: ...stalling the BOSS S1 adapter card 1 BOSS S1 card 2 card connector on the system board Figure 10 Installing the BOSS S1 modular card 1 modular card 2 card connector on the system board Deploying the BOSS S1 card 19 ...

Page 20: ...n executable application that updates drivers for specific devices A DUP supports command line interface and silent execution For more information see Dell com support Linux driver installation The Driver Update Disk DUD images are created only for those operating system releases in which the native or in box driver is insufficient for installation ESXi driver installation By default native AHCI d...

Page 21: ...he UEFI configuration utility Perform the following steps to boot to the UEFI configuration utility 1 Turn on the system 2 While the system is booting press F2 to enter System Setup 3 Click Device Settings Device Settings lists all the RAID controllers in the system To access the management menu for the controller use the arrow keys or the mouse NOTE For more information in all the options click H...

Page 22: ...sk information The Physical virtual disk information menu allows you to view physical disk properties and virtual disk properties Physical disk information To view physical disk information 1 Enter the BOSS S1 Configuration utility See Entering the BOSS S1 Configuration Utility 2 Click Physical Virtual disk information All available physical disks are displayed 3 Select a physical disk to view its...

Page 23: ...AID configuration 3 Select the virtual disk 4 Select Yes for the option Are you sure you want to delete the selected Virtual Disk 5 Click OK and then click Next to delete the selected virtual disk RAID rebuild You can manually rebuild a degraded virtual disk RAID rebuild is available only when a degraded RAID volume is present and there is an available target device If a foreign virtual disk is in...

Page 24: ...onfiguration Utility 2 Click Controller information The RAID adapter information is displayed Clear controller configuration The clear config operation is used to clear RAID metadata from the adapter NOTE The clear config operation does not delete any data on the virtual disk 1 Click Controller information 2 Select Clear Config 3 Click OK 24 UEFI or HII RAID configuration utility ...

Page 25: ...an run BOSS S1 CLI commands is displayed where you can run the BOSS S1 CLI commands Using CLI commands from Linux Follow these procedures to run the Command Line Interface CLI commands using the Linux operating system 1 Download the latest MVCLI BOSS S1 utility for Linux from Dell com support 2 Extract the content of the mvcli xxxx_Axx zip file on the system 3 Navigate to the directory to which yo...

Page 26: ...nformation mvsetup info o vd mvcli info o vd info o pd Display physical drive information mvsetup info o pd mvcli info o pd smart p PD_ID Display SMART information of physical drive mvsetup smart p 0 mvcli smart p 0 NOTE SMART reports the health status of the M 2 disks Refer to the SMART status return once the command is executed event Display controller events mvsetup event mvcli event NOTE There...

Page 27: ...stalled on BOSS S1 Physical disk not visible to operating system Virtual disk not visible to operating system Drive replacement Controller replacement Controller failure Unable to boot to M 2 drive installed in slot 1 CLI reports unsupported features Failure to install ESXi on RAID 1 System not responding Management port not responding ROM version for BOSS reported as firmware version in iDRAC int...

Page 28: ...sing iDRAC LC fails Probable Cause The systems management support is not enabled in the firmware version A00 iDRAC LC update is supported only on the firmware version A01 and later Corrective Action Use UEFI OS DUP or BOSS S1 CLI to update firmware Physical disk size not updated in iDRAC Probable Cause When Collect System Inventory on Reboot CSIOR is disabled iDRAC displays partial information abo...

Page 29: ...the 14th generation of PowerEdge systems that are shipped with VMware ESXi installed on BOSS S1 Issue Installation of ESXi on a BOSS S1 device does not have VMFS datastore enabled by default and disables VMFS if you use a custom image for installation This issue occurs when using ESXi version 6 5 x or later on the BOSS S1 card Corrective Action When you have VMware ESXi installed on BOSS S1 it is ...

Page 30: ...entry not appearing Probable Cause This is either a firmware or a hardware fault Corrective Action Flash the latest firmware on the BOSS adapter If the problem persists shutdown the server and unplug the BOSS S1 adapter Plug the BOSS S1 adapter into the PCIe slot Boot the system and check the UEFI configuration utility menu again If the issue persists see Controller Failure NOTE Ensure that the sy...

Page 31: ...al disk containing an ESXi partition is used in a virtual disk any attempts to install a partition of ESXi on this virtual disk will raise an error due to failure to clear out the previous partition Corrective Action Delete the existing RAID 1 run erase physical disk on both drives re create the RAID 1 with quick initialization ON then attempt to reinstall ESXi on the virtual disk System not respo...

Page 32: ...rom the drop down menu on the lower right corner of the page 3 For customized support a Enter your system Service Tag in the Enter your Service Tag field b Click Submit The support page that lists the various support categories is displayed 4 For general support a Select your product category b Select your product segment c Select your product The support page that lists the various support catego...

Reviews: