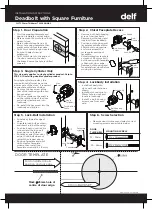


54mm
DOOR TEMPLATE
60mm BACKSET
Fold on dotted line &
position on door edge
Mark 25mm hole at
centre of door edge.
DELF ARCHITECTURAL
T
1300 362 625
F
1300 362 643
E
W
www.delfarchitectural.com.au
Step 7. Escutcheon Installation
INTERIOR
SIDE
OF DOOR
Step 8. Interior Escutcheon Installation
Ÿ
Position interior escutcheon over mounting
plate.
Ÿ
While holding interior escutcheon squarely
on door face, tighten hex screw on underside
of escutcheon to secure onto door.
This step only applies to single cylinder product.
Skip to STEP 10 if installing double cylinder
product.
For single cylinder product:
Ÿ
Install turn-button onto shaft on interior side of
door. Orientate hex hole with flat on shaft.
Ÿ
Tighten hex screw with allen key provided.
Step 9. Single Cylinder only
Step 10. Strike Plate Installation
Strike Plate
Screw
Strike Plate
Door Jamb
Ÿ
Extend the lock-bolt.
Ÿ
Gently close the door until the lock-bolt rests on the door
jamb.
Ÿ
Mark centre of lock-bolt on door jamb, this mark can be used
to position strike plate.
Ÿ
Mark and drill 25mm hole inside the jamb to a depth of 25mm
on marked bolt centre position.
Ÿ
Position the strike plate and mark around. Chisel recess until
strike plate sits flush with door jamb face.
Ÿ
Fasten strike plate to door jamb with two strike plate screws
(#8 x 25mm)
Shaft
Turn-Button
Flat on Shaft
INSERT SCREWS
THROUGH HOLES
WITH ARROWS
Exterior
Escutcheon
Mounting
Plate
Mounting
Screws
Mounting
Plate
Hex
Screw
Interior
Escutcheon
Ÿ
Position exterior escutcheon on exterior side of door.
Ÿ
Position mounting plate on interior side of door.
Ÿ
Hold exterior escutcheon squarely on door then insert
correct mounting screws selected in STEP 6 through the
holes with arrows in mount plate and tighten.
Ÿ
Ensure screws are not overtightened.
Ÿ
Check lock function, if lock-bolt is not retracting and
extending then repeat from STEP 5.


