HD Multi SeaCam
®
Operator’s Manual
6
gases. If a camera appears flooded upon
removal from the water, it should be treated
as potentially dangerous. Point the camera
away from persons and valuable equipment
and make sure that the power is disconnected.
See the Flooding Repair Procedure for more
information.
Integration Procedure
Integrating Instruction
1. Prepare a power supply with 10-36 V DC output.
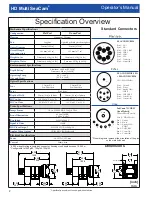
2. Connect the camera power, HD-SDI video, analog
video, and control signals to their respective
interfaces per the pinout specified for the camera.
3. Prepare the camera bulkhead connector as
required, verifying proper lubrication of all O-rings
and seal surfaces with a silcone lubricant (spray
recommended).
4. Mate the female underwater connector to the male
bulkhead using a smooth linear motion, making
sure the connectors are fully seated and seals are
engaged.
5. Screw the locking sleeves together firmly (hand
tight-do not use tools). The camera is now ready
for operation; switch the power supply ON to
power the camera. The camera draws a max of
2W during operation and will work when supplied
with 10-36 VDC.
Video Output
The HD Multi-SeaCam is capable of producing an
incredible wide field of view both in and out of water.
However, depending on the camera model, there will be
slight barrel distortion to the image. The optics of the HD
Multi-SeaCam are optimized for use in water and models
with a dome port may not achieve full sharpness in air.
The digital HD video output from the camera is a SMPTE
292M compliant uncompressed HD-SDI data stream at
1.485 Gb/s. This camera is available with field selectable
1080p/30, 1080p/25, 720p/60, and 720p/50 image
formats.
As an auxiliary output this camera also has a 1Vp-p 75
ohm CVBS analog video signal available in either NTSC
or PAL formats. This can be used for diagnositc purposes
or as a redundant, backup standard definition video feed.
Flooding Repair Procedure
For safety reasons, always assume the camera
has flooded if it stops working while underwater and
take necessary precautions. When working on a poten-
tially flooded camera, it is important to use appropriate
personal protective equipment to include, at a mini-
mum, eye and hand protection.
1. Immediately turn off the power to the unit.
2. Open the housing by first removing the connector
for the device.
3. Remove the rear end cap-retaining ring. Do so
by separating the two components using a linear
motion. If required gently twist components while
separating.
4. Pour out any water trapped in the housing.
5. If the camera is completely flooded, rinse the
internal components with clean fresh water in
order to minimize contamination and corrosion.
6. Allow parts to dry in air or a convection oven set
to 60° C (140° F).
Troubleshooting
1. If the camera stops working while underwater,
always assume that it has been flooded. See
Flooding Repair procedure.
2. Once it has been determined that the camera is
not flooded, or if it does not turn on during pre-
deployment checks, troubleshoot in the following
sequence:
a. Check the cable/inline connector to make
sure that correct voltage and current are
being supplied, and that the pinout matches
the camera being used. See page 2 of this
manual for electrical specs and standard
connector pin-outs.
b. Remove the endcap to access the bulkhead
connector. Inspect the assembly for visual
signs of wear. Use a multi-meter check for
continuity or shorts in the connector. Try a
spare connector, if available.
c. If the camera still does not work, return it to
DSPL using the RMA Procedure.
RMA Procedure for Repair
Should it be necessary to return your camera to the
factory, follow the procedure for the Flooded Camera
Repair above, and by leaving the connector partially
unscrewed. For warranty and non-warranty repairs please
contact DeepSea Power & Light for a RMA number prior to
returning your item. Please have your light model number,
serial number and any other pertinent information along
with a description of the problem, on hand when you call,
or include them in a fax or e-mail. When shipping your
item, be sure that the freight is pre-paid (CODs will not be
accepted) and that the RMA number is clearly printed on
the outside of the box. All shipments should be sent to the
address below:


