


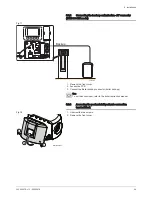


2. Turn the grille anticlockwise.
3. Remove the fan grille.
4. Unscrew the two screws from the compressor support part.
5. Remove the compressor support part and discard it.
6. Put the grille back in place.
7. Turn the grille clockwise to fit it back into its housing.
8. Put the retaining screws in place.
5.5.2
Positioning the appliance
See
Instructions affixed to the appliance packaging.
5.5.3
Levelling the appliance
Important
To improve condensate evacuation, we recommend tilting the
appliance slightly backwards.
1. Level the appliance using the adjustable feet.
(1) Adjustable feet, basic dimension 4 mm
Can be adjusted from 4 mm to 21 mm
5.6
Water connections
Caution
Before attaching the water connections, it is essential to flush the
circuits to remove any particles which risk causing damage to
certain components (safety valve, pumps, valves, etc.). If flushing
has to be done using an aggressive product, neutralise the rinsing
water before disposing of it in the waste water network.
Important
Using hoses which are too short or too rigid encourages the
transmission of vibrations and the production of noises.
TWH 300 EH: Make all the hydraulic connections for the DHW tank using
flexible pipes.
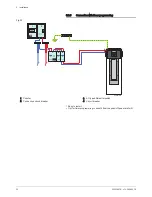
5.6.1
Connecting the tank to the domestic water circuit
(secondary circuit)
During connection, all standards and corresponding local directives must
be respected.
Specific precautions
Before attaching the connections, flush the domestic water inlet pipes to
prevent metal or other particles from entering the appliance's tank.
Fig.13
C
0
0
3
1
8
7
-F
B
21
(1)
19
3°
5 Installation
24
300026515 - v10 - 28082018


