


CARE & CLEANING
Warning! Always unplug your appliance before any maintenance work. Never pull on
the power cord, but only on the plug itself.
Cleaning
For hygiene reasons, regularly clean the appliance (sidewalls and interior and exterior accessories).
Important!
Ethereal oils and organic solvents can damage plastic parts, e.g. lemon juice, butyric
acid or acetic acid.
•
Do not allow such substances to come into contact with appliance parts.
•
Do not use any abrasive cleansers.
•
Remove food from the appliance. Store it in a cool place and keep well covered.
•
Clean the appliance and the interior accessories with a cloth and lukewarm water with a diluted
white vinegar or bicarbonate of soda solution. Do not wash the accessories in a dishwasher.
•
After cleaning them, rinse surfaces with clear water and dry them.
•
After everything is dry, plug the appliance back into the plug.
•
Make sure that no water enters the lamp housing and other electrical components.
•
Clean the condenser with a brush at least twice a year. This will help you to save energy costs
and increase productivity.
Never clean the appliance with a steam cleaner.
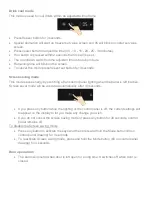
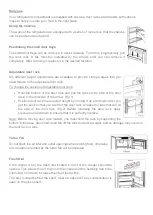
Cleaning the drain
To stop the defrost water from running into the refrigerator, clean the drain at
the back of the refrigerator part from time to time. To do this, use a cleaning
product as shown in the diagram on the right.
Replacing the light
This product contains a light source whose the energy efficiency class is F.
The light inside the fridge uses a LED. To replace it, please contact your after sales service or an
approved technician.
You will find all the information you need to contact our authorized technicians and our after-sales
service in the “CONTACTS & INFORMATION” section.
Summary of Contents for DRC1775EN
Page 1: ...R frig rateur Refrigerator Ref DRC1775EN FR GUIDE D UTILISATION EN GUIDE TO INSTALLATION...
Page 13: ...Installation de l appareil Kits d installation Selon mod le Outils n cessaires...
Page 14: ...Instruction d installation...
Page 15: ...1 Assurez vous que la taille du caisson soit suffisante pour permettre une bonne ventilation...
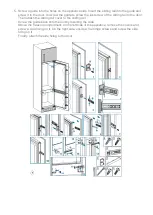
Page 18: ...4 Ne branchez pas le produit Fixez le support de fixation et les pieds au caisson...
Page 45: ...Installation Kits for installation Depending on models Tools needed...
Page 46: ...Installation instructions...
Page 47: ...1 Ensure the size of cabinet is enough for proper ventilation...
Page 50: ...4 Do not plug in the appliance Fix the top cover bracket and feet to the cabinet...


