

Quick Start Guide
MI-Q-ECO4/E1-0
Viewing The Menu Pages Remotely (or Locally
with a USB Mouse)
Navigate the menus by clicking the tabs displayed on the left of the menu headings
(on the menu tree). The first option is highlighted with a red tab. Select a main menu
heading to open a drop down list of further sub-options.
Highlight an editable field by clicking on it directly.
If viewing pages locally, enter alpha numeric data via the Arrow Key Editor (see
above). If viewing remotely, enter via the PC keyboard. If available, click on the drop
down menus to select settings.
Note:
A selected item in the drop down list will appear highlighted.
Navigating away from a page (clicking on a different option on the menu tree) will
automatically save any changed settings. To undo changes made to any menu,
select the Refresh (Purple) option.
Entering Alpha-Numeric Data via a Local Monitor
Numeric or text data is entered using the on-screen Virtual Keyboard (Arrow
Key Editor).
To display the Virtual Keyboard, navigate to the relevant text input box using the
Directional buttons and double press the OK button on the IR Remote Control. The
Virtual Keyboard is displayed.
Use the Directional buttons to move between characters, use the OK button to
select a character. Select ‘Submit’ to enter details, press ‘Cancel’ to exit without
entering any text.
Alpha-numeric data can also be entered in either upper or lower case format by
‘multi-tapping’ a relevant button. For example, with the cursor located in the text
entry window of the Virtual Keyboard, repeatedly tap button ‘2’ to cycle through the
following characters: 2,A,a,B,b,C,c,2 etc.
To select one of these characters, simply stop tapping the button when the chosen
character is displayed. The cursor will then progress, ready for the next character
entry.
Note:
A USB Keyboard (not supplied) can be connected via one of the
USB ports on the unit. The USB Keyboard can then be used to
enter alpha-numeric data via the local menus.
Video Timeline
The Timeline Navigation page and the accompanying Video Timeline feature allows
quick and easy investigation of recorded video data. Selecting the Goto option from
Viewer menus will display the Video Timeline
To aid navigation, the timeline can be set to display periods ranging from 15 seconds
to four weeks. The timeline can be clicked anywhere in the scale to instantly play
recorded images from that point.
The Date/Time Display (Grey) shows the currently selected date/time.
Note:
The Date/Time Display shows the last time selected via the
timeline. During playback, the Date/Time Display remains static
while the ‘running’ time is shown in the bottom left corner of the
playback image.
The timeline allows navigation from the time and date currently shown in the Date/
Time Display window. The scale changes to correspond to the time period chosen
for investigation i.e. if a scale of one hour is selected it will be possible to move up
to one hour prior, or one hour in advance of the displayed time (unless that selected
time has not been recorded yet). For example, with a scale of one hour, click ‘10’
on the left side of the timeline to play video from 10 minutes prior to the Date/Time
Display. To advance in time, click on the right side of the timeline.
Basic Archive Selection
Images and events can be marked and added to the Copy menu. Archive selection
can be undertaken either from a local monitor or remotely via the webpages.
For ease of use, video can be marked for archive in a number of ways. The simplest
method is via the Video Timeline:
Selecting Video for Archiving Via The Video Timeline
Access the Video Timeline menu via the ‘GoTo’ option.
Using the Timeline, navigate to the required start point of the footage you wish
to archive.
Select the ‘Mark’ option.
When the footage reaches the end point you wish the archive to stop, select the
‘Mark’ option again.
This marked footage will now be added to the Copy menu for download purposes.
The Copy menu can be accessed directly via the ‘Archive’ option.
Any marked start point can be deleted via the ‘Clear’ option.
Note:
For detailed guidance on additional advanced methods for
searching and marking images and events for archiving, refer to
the enclosed Installation & Operation Guide.
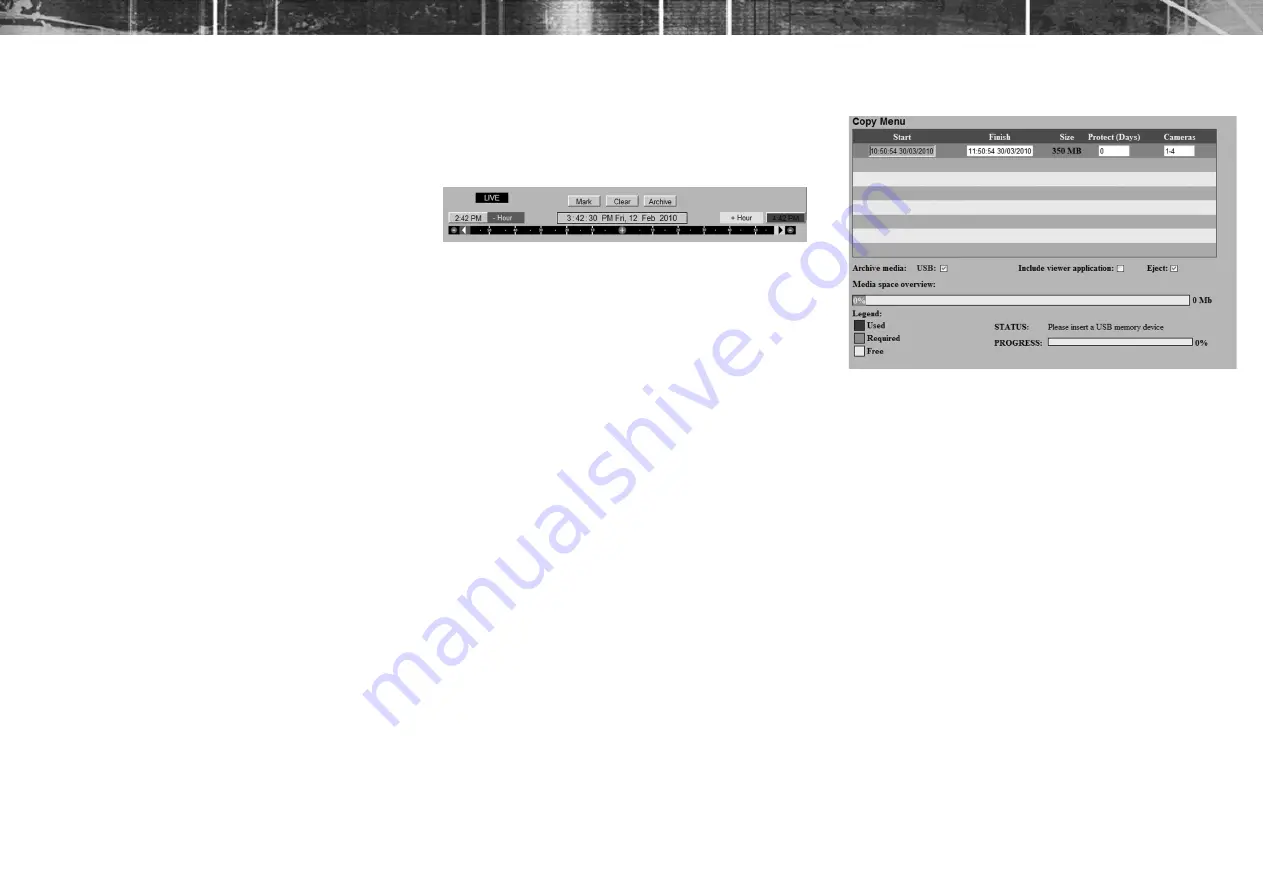
Copy Menu
Images and events can be copied to a USB Media device for remote reviewing i.e.
for evidential or monitoring purposes. To access the Copy menu, select the Archive
(Yellow) option from the Viewer menus.
The Copy menu will display all video images marked for archiving. The Start and
Finish date/times will be shown along with the estimated size of the download plus
the period the images are protected for and the camera channels to be included in
the download.
To Edit an archive within the Copy menu, click on it directly.
The textboxes within the ‘Start’, ‘Finish’, ‘Protect (Days)’ and ‘Cameras’ fields can be
edited as required.
Selecting a blank Archive line will allow direct entry of data i.e. start/end time and
date plus protection period and the camera channels to be included in the Archive.
To Transfer Events/Images From the Copy Menu to a USB Device
•
Insert a USB Device into a USB port on the unit.
•
Select USB from the Archive Media checkbox.
•
Select the Copy option (Red) to start archive.
•
Selected items are then saved to the USB device.
•
The USB export progress is displayed as a %. On
completion the status will read ‘Archive Complete’.
Note:
It is recommended that the ‘Include viewer application’ checkbox
is selected when downloading events to USB device.


