


MANUALE D’USO - IMPASTATRICE PLANETARIA 12 LITRI - KM1512
1. Installare il paraschizzi sul braccio orientabile,
come indicato nella figura, assicurandosi che sia
fissato correttamente.
2. Installare l’accessorio desiderato (9, 10 o 11)
sull’albero motore (6) che si trova sotto il braccio
orientabile (1).
3. A. Il gancio (11) si usa per impasti solidi, carne trita
o altre operazioni che richiedono una lavorazione
importante.
B. La frusta a foglia (10) si usa per mescolare impasti
più leggeri.
C. La frusta (9) si usa per montare panna, albumi ecc.
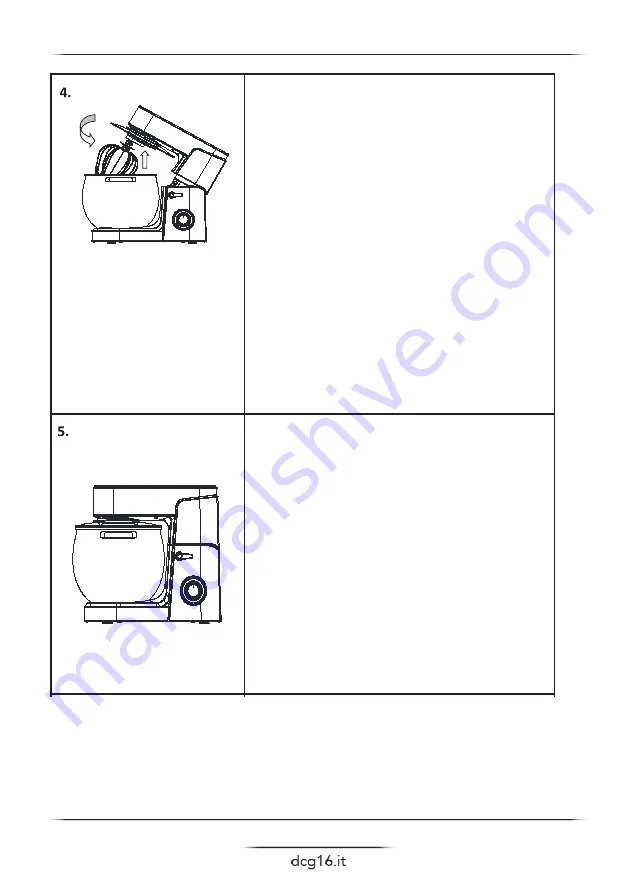
4. Ruotare l’accessorio, in modo che le parti sporgenti
dell’albero motore si allineino con le scanalature
sul bordo superiore dell’accessorio stesso.
Premere l’accessorio contro il braccio orientabile e,
contemporaneamente, ruotarlo in senso antiorario
finché le parti sporgenti si innestano e l’accessorio
risulta fissato saldamente in posizione. L’accessorio
non deve essere allentato e non deve risultare
possibile staccarlo tirando.
1. Abbassare il braccio orientabile in modo che si
fissi in posizione con un clic. Il coperchio (8) deve
innestarsi precisamente sulla ciotola (12), altrimenti
significa che è installato in modo scorretto. A questo
punto l’apparecchio è pronto per l’uso.
2. Collegare la spina alla presa di corrente.
L’apparecchio si accende. Portare la manopola della
velocità su 1 (o su un’altra regolazione). La spia sul
pannello dei comandi si accende.
3. Selezionare la velocità desiderata, da 1 a 6. Per
conoscere le velocità, le capacità e i tempi consigliati,
consultare la tabella nelle pagine precedenti.
4. Se si ha la necessità di recuperare l’impasto dalla
ciotola, aspettare che l’accessorio si sia fermato
completamente. Usare la spatola, mai le dita.
- 6 -
3.
1. Place the food in the mixing bowl(12).
2.Fit the mixing bowl in the recess on
the motor house(4).
3.Turn the mixing bowl slightly
clockwise, so it locks into position.
4.
1.Put the splash guard to swivel
arm,as shown picture. and ensure it fix
well.
2.Fit the required accessory (10 with
9,or 11) onto the motor spindle (6) on
the underside of the swivel arm(1).
3. A. The kneading hook (11) is used
for heavy dough,minced meat or other
demanding kneading jobs.
B. The flat beater (10) is used to mix
lighter types of dough.
C. The whisk (9) is used for
whisking cream, egg whites, etc.
4. Turn the accessory, so the pins on the
spindle are aligned with the depressions
on the accessory top edge. Press the
accessory against the swivel arm and
turn it anti-clockwise at the same time
until the pins engage and the accessory
locks into position
securely. The accessory must not be
loose nor should you be able to pull it
free.
5.
1.Lower the swivel arm so that it locks
into place with a click. The lid(8) must
fit tightly with the mixing bowl(12),
otherwise it is fitted incorrectly. The
appliance is now ready for use.
2. Plug the power cord into main power
outlet and switches it ON. Turn
Speed
control knob
to speed1(or any speed
setting)
indicator light on the control
panel will now be illuminated.
3. Select the speed you want using
.
Speed button 1 is the slowest and speed
button 6 is the fastest speed.
Recommended speeds, time and capacity
Summary of Contents for KM1512
Page 1: ......
Page 20: ...DCG SRL Via G Garibaldi 68 20861 Brugherio MB MADE IN CHINA...


