background image


12 

Chapter 3 

    Basic Installation  

The router can be configured with your web browser. A web browser is included as a standard application in the 
following operating systems: Windows XP/Vista/Win7/8, Linux, Mac OS, etc. The product provides an easy and 
user-friendly interface for configuration. 


3.1 Before Configuration 

PCs must have an Ethernet interface installed properly and be connected to the router either directly or through 
an external repeater hub, and have TCP/IP installed and configured to obtain an IP address through a DHCP 
server or a fixed IP address that must be in the same subnet as the router. The default IP address of the router 
is 

192.168.1.254

 and the subnet mask is 

255.255.255.0

 (i.e. any attached PC must be in the same subnet, and 

have an IP address in the range of 192.168.1.1 to 192.168.1.253). The best and easiest way is to configure the 
PC to get an IP address automatically from the router using DHCP. If you encounter any problems accessing the 
router’s web interface it may also be advisable to 

uninstall

 any kind of software firewall on your PCs, as they 

can  cause  problems  accessing  the  192.168.1.254  IP  address  of  the  router.  Users  should  make  their  own 
decisions on how to best protect their network. 
 
Please follow the steps below for your PC’s network environment installation. First of all, please check your PC’s 
network components. The TCP/IP protocol stack and Ethernet network adapter must be installed. If not, please 
refer to your Windows-related or other operating system manuals. 


Any  TCP/IP  capable  workstation  can  be  used  to  communicate  with  or 
through the Router

.

 To configure other types of workstations, please consult 

the manufacturer’s documentation. 

Summary of Contents for 7204A-NRD

Page 1: ...Wireless N ADSL2 Firewall Router User Manual Last Revised Date March 20 2015...

Page 2: ...ware Specifications 5 Physical Interface 5 1 4 Applications for the Router 6 Chapter 2 7 Installing the Router 7 2 1 Important note for using the Router 7 2 2 Package Contents 8 2 3 The Front LEDs 9 2...

Page 3: ...2 7 Interface Grouping 72 4 4 2 8 Time Schedule 74 4 4 2 9 Remote System Log 75 4 4 3 Access Management 76 4 4 3 1 Device Management 77 4 4 3 2 SNMP 78 4 4 3 3 Universal Plug Play 79 4 4 3 4 Dynamic...

Page 4: ...d real time audios that run faster and easier than ever Firewall Security and Smooth Traffic With the built in NAT default firewall the advanced anti hacker pattern filtering protection features autom...

Page 5: ...to install this device quickly With this wizard end users can enter the information easily which they get from ISP then surf the Internet immediately Firmware Upgradeable Device can be upgraded to th...

Page 6: ...uick Installation Wizard TR 069 2 for remote management Ideal for SOHO office and home users ADSL Compliance Compliant with ADSL2 standards G dmt bis plus ITU G 992 5 ADSL2 Annex M ITU G 992 5 Annex M...

Page 7: ...wireless Up to 150 Mbps wireless operation rate 64 128 bits WEP supported for encryption WPS Wi Fi Protected Setup for easy setup Wireless Security with WPA PSK WPA2 PSK support Multiple wireless SSI...

Page 8: ...odification for certain ADSL2 2 Annex M DSLAMs 2 On request for Telco ISP projects 3 IPTV application may require subscription to IPTV services from a Telco ISP 4 Specifications on this datasheet are...

Page 9: ...ware Specifications Physical Interface WLAN 1 detachable antenna DSL ADSL port Ethernet 4 port 10 100 auto crossover MDI MDI X Switch Factory default reset button WPS Wi Fi ON OFF button Power jack Po...

Page 10: ...6 1 4 Applications for the Router Diagram on how to connect your router...

Page 11: ...e rating power adaptor may damage the router Attention Do not use the Router in high humidity or high temperatures Do not use the same power source for the Router as other equipment Do not open or rep...

Page 12: ...8 2 2 Package Contents Wireless N ADSL2 Firewall Router One detachable antenna Quick Start Guide CD containing user manual Ethernet RJ 45 CAT 5 cable RJ 11 ADSL telephone cable Power adapter...

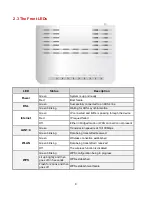
Page 13: ...quest failed Off Either in bridged mode or WAN connection not present LAN1 4 Green Transmission speed is at 10 100Mbps Green blinking Data being transmitted received WLAN Green Wireless connection est...

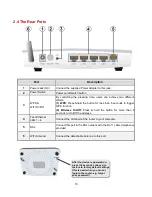
Page 14: ...gger WPS function 2 Wireless On Off Press hold the button for more than 6 seconds to On Off the wireless 4 Fast Ethernet LAN 1 4 Connect the LAN port of the router to your computer 5 DSL Connect this...

Page 15: ...all other devices e g telephones fax machines analogue modems connected to the same telephone line as your router have a line filter connected between them and the wall socket unless you are using a...

Page 16: ...et and have an IP address in the range of 192 168 1 1 to 192 168 1 253 The best and easiest way is to configure the PC to get an IP address automatically from the router using DHCP If you encounter an...

Page 17: ...ck on Control Panel Then click on Network and Internet 2 When the Network and Sharing Center window pops up select and click on Change adapter settings on the left window panel 3 Select the Local Area...

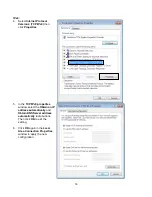
Page 18: ...ies 5 In the TCP IPv4 properties window select the Obtain an IP address automatically and Obtain DNS Server address automatically radio buttons Then click OK to exit the setting 6 Click OK again in th...

Page 19: ...es 5 In the TCP IPv6 properties window select the Obtain an IPv6 address automatically and Obtain DNS Server address automatically radio buttons Then click OK to exit the setting 6 Click OK again in t...

Page 20: ...etwork Then click on Network and Sharing Center at the top bar 2 When the Network and Sharing Center window pops up select and click on Manage network connections on the left window pane 3 Select the...

Page 21: ...ies 5 In the TCP IPv4 properties window select the Obtain an IP address automatically and Obtain DNS Server address automatically radio buttons Then click OK to exit the setting 6 Click OK again in th...

Page 22: ...n Network Connections 2 Double click Local Area Connection 3 In the Local Area Connection Status window click Properties 4 Select Internet Protocol TCP IP and click Properties 5 Select the Obtain an I...

Page 23: ...you should install it first Act as shown below 1 On the desktop Click Start Run type cmd then press Enter key in the keyboard the following screen appears 2 Key in command ipv6 install Configuration...

Page 24: ...IP Address 192 168 1 254 Subnet Mask 255 255 255 0 DHCP server DHCP server is enabled Start IP Address 192 168 1 100 IP pool counts 20 3 2 1 Username and Password The default username and password are...

Page 25: ...SP when you connect or be set manually PPPoA VPI VCI VC based LLC based multiplexing Username Password and Domain Name System DNS IP address it can be automatically assigned by your ISP when you conne...

Page 26: ...Open your web browser enter the IP address of your router which by default is 192 168 1 254 and click OK a user name and password window prompt will appear The default username and password are admin...

Page 27: ...he desired setup page including Status Device Info System Log Statistics DHCP Table ADSL Status Quick Start Wizard Setup Configuration Interface Setup Advanced Setup Access Management Maintenance Lang...

Page 28: ...24 4 2 Status In this section you can check the router working status including Device Info System Log Statistics DHCP Table ADSL Status...

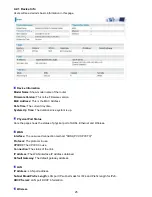
Page 29: ...al Port Status Here the page shows the status of physical port of ADSL Ethernet and Wireless WAN Interface The now used connection method ADSL PVC0 PVC70 Protocol The protocol in use VPI VCI The VPI V...

Page 30: ...26 Mode The wireless mode in use SSID The SSID Channel The current channel Security The wireless security setting authentication type...

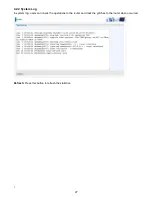
Page 31: ...27 4 2 2 System Log In system log users can check the operations to the router and track the glitches to the router when occurred Refresh Press this button to refresh the statistics...

Page 32: ...r Counts This field displays the number of total error transmitted until the latest second Receive total PDUs This field displays the number of total PDU received until the latest second Receive total...

Page 33: ...port Transmit Error Frames This field displays the number of error packets on this port Receive Frames This field displays the number of frames received until the latest second Receive Multicast Frame...

Page 34: ...mes This field displays the number of drop frames transmitted until the latest second Receive Frames This field displays the number of frames received until the latest second Receive Error Frames This...

Page 35: ...uter with clear information The index identifying the connected devices Host Name Show the hostname of the PC IP Address The IP allocated to the device MAC Address The MAC of the connected device Expi...

Page 36: ...32 4 2 5 ADSL Status The ADSL Status section displays the ADSL synchronization status...

Page 37: ...It will guide you step by step to configure the password time zone and WAN settings of your device The Quick Start Wizard is a helpful guide for first time users to the device Click NEXT to enter step...

Page 38: ...des ADSL 1 Enter the PPPoE PPPoA account VPI VCI information provided to you by your ISP Click NEXT to continue 2 The Setup Wizard has completed Click on BACK to modify changes or mistakes Click NEXT...

Page 39: ...35...

Page 40: ...36 4 4 Configuration Click this item to access the following sub items that configure the router Interface Setup Advanced Setup Access Management and Maintenance...

Page 41: ...Interface Setup First let us take a look at the Interface Setup There are four items contained in this section namely Internet LAN Wireless and Wireless MAC Filter Each is described in the following...

Page 42: ...38 4 4 1 1 Internet...

Page 43: ...ied Bit Rate These QoS types are all controlled by the parameters specified below including PCR SCR and MBS Select CBR to specify fixed always on bandwidth for voice or data traffic Select UBR for app...

Page 44: ...CP client in this mode the device acts as a NAT router while if you dial up with the account within your PC the device will then work as a bridge forwarding the PPPoE information to the PPPoE server a...

Page 45: ...Multicast group Choose whether enable IGMP proxy IPv6 options only when choose IPv4 IPv6 or just IPv6 in IP version field above IPv6 Address Type the WAN IPv6 address from your ISP Obtain IPv6 DNS Cho...

Page 46: ...a DHCPv6 server The Server maintains a database that keeps track of which addresses have been assigned to which hosts The second way is stateless configuration Stateless auto configuration requires n...

Page 47: ...ce Specify an IP address on this virtual interface Alias IP Subnet Mask Specify a subnet mask on this virtual interface IGMP Snooping Select Activated to enable IGMP Snooping function Without IGMP sno...

Page 48: ...r some specific MAC and this information can be listed in the following table IP Address Enter the specific IP For example 192 168 1 110 MAC Address Enter the responding MAC For example 00 0A F7 45 6D...

Page 49: ...issue Router Advertisement feature It is to send Router Advertisement messages periodically Router will multicast the v6 Prefix information similar to v4 network number 192 168 1 0 to all LAN devices...

Page 50: ...e network traffic to the wired LAN Access Point Settings Access Point Default setting is set to Activated If you want to close the wireless interface select Deactivated AP MAC Address The MAC address...

Page 51: ...ormance will be Guard Interval Select either 400nsec or 800nsec for the guard interval The guard interval is here to ensure that data transmission do not interfere with each other It also prevents pro...

Page 52: ...code To future understand the two modes of configuration please refer to the following Wi Fi Protected Setup Wi Fi Protected Setup PIN Method Configure AP as Registrar 1 Jot down the client s Pin eg 0...

Page 53: ...ient s WPS utility eg Ralink Utility Set the Config Mode as Enrollee press the WPS button on the top bar select the AP from the WPS AP List column Then press the PIN button located on the middle left...

Page 54: ...50 4 The client s SSID and security setting will now be configured to match the SSID and security setting of the registrar router...

Page 55: ...51 PIN Method Configure AP as Enrollee 1 Jot down the WPS PIN eg 03454435 Press Start WPS...

Page 56: ...reless client s WPS utility eg Ralink Utility Set the Config Mode as Registrar Enter the PIN number in the PIN Code column then choose the correct AP from the WPS AP List before pressing the PIN butto...

Page 57: ...SID and security setting of the registrar client 4 Now to make sure that the setup is correctly done cross check to see if the SSID and the security setting of the registrar setting match with the par...

Page 58: ...ton Then Start WPS 2 Launch the wireless client s WPS Utility eg Ralink Utility Set the Config Mode as Enrollee Then press the WPS button and choose the correct AP from the WPS AP List section before...

Page 59: ...PBC button is pushed a wireless communication will be established between your router and the PC The client s SSID and security setting will now be configured to match the SSID and security setting o...

Page 60: ...ely If you chose WEP 64 bit then enter any 5 ASCII characters or 10 hexadecimal characters 0 9 A F If you chose WEP 128 bit then enter 13 ASCII characters or 26 hexadecimal characters 0 9 A F You must...

Page 61: ...ress of the devices to configure this screen SSID Index Select the targeted SSID you want the MAC filter rules to apply to Active Select Activated to enable MAC address filtering Action Define the fil...

Page 62: ...ides some advanced features including Firewall Routing NAT Static DNS ADSL QoS Internet Grouping Time Schedule and Remote System Log for all advanced users Please move on to have a picture of what the...

Page 63: ...t cannot be directly accessed from the Internet Firewall To automatically detect and block Denial of Service DoS attacks such as Ping of Death SYN Flood Port Scan and Land Attack Enabled It activates...

Page 64: ...P address of the destination network Subnet Mask The subnet mask of destination network Gateway IP Address IP address of the gateway or existing interface that this route uses Metric It represents the...

Page 65: ...t Mask The subnet mask of destination network Gateway IP Address Interface This is the gateway IP address or existing interface to which packets are to be forwarded Metric It represents the cost of tr...

Page 66: ...NAT to accept incoming communications In this session there are VPN Passthrough DMZ Virtual Server provided to solve these nasty problems NAT Status Enabled It depends on ISP Connection Type in Inter...

Page 67: ...l Server entries DMZ for Indicate the related WAN interface which allows outside network to connect in and communicate Note Here you can see the Single IPs Account PVC0 It is the interface set in the...

Page 68: ...orward these incoming connection attempts using specific ports to the PC on your network running the application You will also need to use port forwarding if you want to host an online game server The...

Page 69: ...ice Examples of well known and registered port numbers are shown below For further information please see IANA s website at http www iana org assignments port numbers Well known and Registered Ports P...

Page 70: ...specified If you have disabled the NAT option in the WAN ISP section the Virtual Server function will hence be invalid If the DHCP server option is enabled you have to be very careful in assigning th...

Page 71: ...pment for the purpose of locating and addressing these devices worldwide An often used analogy to explain the Domain Name System is that it serves as the phone book for the Internet by translating hum...

Page 72: ...e Adaptation is a technology used to adapt the rate seamlessly without any influence to the working system to assure of the quality of the DSL system ADSL Mode The default setting is Auto Sync Up This...

Page 73: ...given higher priority than Web data packets The main goal of QoS is prioritizing incoming data preventing data loss due to factors such as jitter delay and dropping Another important aspect of QoS is...

Page 74: ...activated or deactivated Application Select the different applications IGMP SIP H 323 MGCP SNMP DNS DHCP RIP RSTP RTCP RTP Physical Ports This option is to allow you to decide which physical port you...

Page 75: ...at IP Precedence Remarking Select the value to remark IP precedence Type of Service Remarking Select the value to remark Type of Service DSCP Remarking Set the value to remark DSCP 802 1p Remarking Se...

Page 76: ...different groups even if they are on the same switch Each group will perform as an independent network To support this feature you must create mapping groups with appropriate LAN and WAN interfaces us...

Page 77: ...You are going to group the ports and services into two working group as shown below Group Index Group Port 0 PVC0 LAN1 LAN2 WLAN1 1 PVC2 LAN3 LAN4 Click Group Summary to show the configuration result...

Page 78: ...closely with router s time since router does not have a real time clock on board it uses the Simple Network Time Protocol SNTP to get the current time from an SNTP server from the Internet Time Index...

Page 79: ...nistrator can set up a remote system log server for receiving and monitoring the system information by enabling remote system log feature on the router Remote System Log Select whether to activate Rem...

Page 80: ...76 4 4 3 Access Management...

Page 81: ...77 4 4 3 1 Device Management Device management offers users a way to change the embeded web server accessing port default 80 User can change the http port to 8080 or something else here...

Page 82: ...he management station Trap Manager IP Enter the IP of the server receiving the trap message when some exception occurs sent by this SNMP agent SNMPv3 Enable to activate the SNMPv3 User Name Enter the...

Page 83: ...vanced configuration of their device UPnP Select this checkbox to activate UPnP Be aware that anyone could use a UPnP application to open the web configuration s login screen without entering the Rout...

Page 84: ...WAN interfaces with different DNS es But note that first users have to go to the Dynamic DNS registration service provider to register an account Dynamic DNS Select this check box to activate Dynamic...

Page 85: ...irst users have to go to the Dynamic DNS registration service provider to register an account User test1 register a Dynamic Domain Names in DDNS provider http www dyndns org DDNS myhome dyndns org usi...

Page 86: ...es below The maximum number of entries is 16 Access Control Select whether to make Access Control function available Rule Index This is item number Active Select to activate the rule Secure IP Address...

Page 87: ...rules 1 Rule 1 Index 1 a rule to allow only clients from LAN to have access to all embedded applications Web FTP etc Under this situation clients from WAN can not access the router even from Ping 2 Ru...

Page 88: ...er Editing Rule Index This is item number Individual Active Select Yes to activate the rule Action This is how to deal with the packets matching the rule Allow please select White List or block select...

Page 89: ...mmended that this option be configured by an advanced user or keep 0 0 means Don t care Protocol Specify the packet type TCP UDP ICMP ICMPv6 that the rule applies to IP MAC Filter Listing Item number...

Page 90: ...to Activated Deactivated the Application filter ICQ Select this option to Allow Deny ICQ MSN Select this option to Allow Deny MSN YMSG Select this option to Allow Deny Yahoo messenger Real Audio Video...

Page 91: ...le you want to prohibit access to www yahoo com please first press Activated in URL Filter field and also Yes in Individual Active field if some time you want to allow access to this URL you simply se...

Page 92: ...et top box VoIP phones At the same time the configuration of this equipment became more complicated too complicated for end users For this reason TR 069 was developed It provides the possibility of au...

Page 93: ...nform message to automatically connect to ACS Interval s Specify the inform interval time sec which CPE used to periodically send inform message to automatically connect to ACS When the inform interva...

Page 94: ...rol Select Activated to enable this feature MAC Address Type the MAC address es you want to block to access the internet access to the router is sustained The format of MAC address could be xx xx xx x...

Page 95: ...the ability of maintaining the device as well as examining the connectivity of the WAN connections including User Management Time Zone Firmware Configuration System Restart Diagnostic Tool Usage of e...

Page 96: ...ke user account need to be specified admin admin admin admin is the root account provided by our router User Setup Index User account index total is 8 User Name Users can create account s to give it t...

Page 97: ...93...

Page 98: ...ting granted with Interface Setup Advanced Setup Access Management access Enable to have access to Interface Setup Advanced Setup and Access Management or disable to set the specifics yourself Interfa...

Page 99: ...95...

Page 100: ...shown above Your ISP may provide an SNTP server for you to use Synchronize time with Select the methods to synchronize the time NTP Server automatically To synchronize time with the NTP server PC s Cl...

Page 101: ...new firmware work Upgrade Choose Firmware or Configuration you want to update System Restart with Current Settings Restart the device with the current settings automatically when finishing upgrading F...

Page 102: ...n the router or interrupt the firmware upgrading while it is still in process Improper operation could damage the router Warning UPGRADE Click UPGRADE to begin the upload process This process may take...

Page 103: ...ault settings for example after a firmware upgrade or if you have saved an incorrect configuration select Factory Default Settings to restore to factory default settings You may also restore your rout...

Page 104: ...4 5 Diagnostics Tool The Diagnostic Test page shows the test results for the connectivity of the physical layer and protocol layer for both LAN and WAN sides Click Start to begin to diagnose the conn...

Page 105: ...sword Try the default username Admin and password CalVxePV1 If this fails you can restore your router to its factory settings by holding the Reset button on the back of your router more than 6 seconds...

Page 106: ...oubleshooting section in the User s Manual If you cannot resolve the problem with the Troubleshooting chapter please contact the dealer where you purchased this product MAC OS is a registered Trademar...

Reviews: