


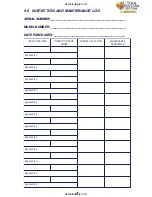
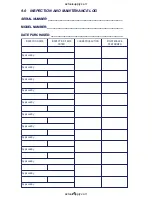


19
sectional area of the rope damaged. Damaged or questionable rope
should be replaced by an authorized service center.
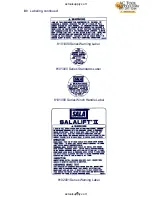
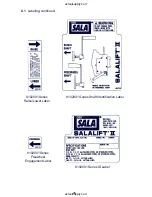
Step 5. Inspect all identification and warning labels, ensuring that they
are legible and securely attached. See Figure 1 (8101000
series), Figure 2 (8102001 series) and section 8.0.
Step 6. Inspect each system component (support structure, back-up
fall arrest system, body support, connectors, etc.) according to
manufacturer's instructions.
Step 7. See additional inspection steps for the winch in sections 5.3,
5.4, and 5.5.
5.3 INSPECTION OF SALALIFT WINCH (8101000 SERIES): The following
steps are additional inspection procedures to those in section 5.2 that
must be performed on the 8101000 series winch. See Figure 1.
Step 1. Check operation of the winch in high and low speed positions; it
must crank up and down freely. Stiff or rough operation may
indicate a worn gear or bearing.
Step 2. Inspect the ratchet brake. With the brake engaged, the drum
should be prevented from paying off cable. The spring must be
in place and undamaged. The ratchet brake lever must fully
engage the teeth on the drum, the drum teeth must be in good
condition.
Step 3. Inspect for oil in the gearbox by removing plug on top and tilting
unit so oil can be seen through hole. Inspect for oil leaks.
Step 4. Check operation of the handle over speed brake as follows:
A. Over level ground set up support structure and winch as it will be
used.
B. By raising or lowering the winch cable, position the lifting hook to
approximately chest height.
C. Remove the winch crank handle and have someone hold the ratchet
brake lever in its disengaged position, such as when lowering a
load.
D. Pull down sharply on the lifting hook to engage the over speed
brake.
actoolsupply.com
actoolsupply.com