background image

Materials and Tools required for installation:

 Electronic stud finder (optional)

 Measuring tape & pencil marker

  Drill and drill bit (to suit your particular  

attachment method)

 Socket set and socket wrench

 Hammer

 Spirit level

 Scissors

  Fixings (if the supplied ones are not suitable 

to your application)

WALL MOUNTING INSTALLATION

Location:

Ensure your selected location has sufficient clearance 
either side of and below the clothesline to safely fold up 
and down without obstruction. 
Consider user height and reach when determining mounting 
height and position. 
Recommended wall area required is 1260mm x 660mm 
(when folded down).
The width of your clothesline can be adjusted if necessary.

IMPORTANT!

Incorrect installation could damage your wall or cause injury.
Daytek bears no responsibility for improper mounting that results in accident, injury or damage.
Always choose screws or fittings which are suitable for your wall material and have sufficient holding power. 
Ensure your fixing surface is structurally sound.
If you are unsure of how to mount your Laundry Quick Lock Clothesline, please consult your local hardware 
specialist or contact Daytek directly.

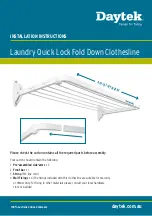
Figure 1. Laundry Quick Lock Fold Down

WALL BRACKET CENTRES 1200mm (Standard)

Important:

 Tension lines with light hand pull

GROUND LEVEL

FRONT BAR

LINE END

LINE START

170mm 

(Distance 

between 

mounting 

holes)

660mm

Consider  

user height 

and reach 

when 

determining 

mounting 

height.

Summary of Contents for Laundry Quick Lock Fold Down Clothesline

Page 1: ...l the required parts before assembly Your carton should contain the following 1 Pre assembled side arms x 2 2 Front bar x 1 3 String PVC line cord 4 Wall Fixings x 4 The fixings included with this clothesline are suitable for masonry or timber only For fixing to other materials please consult your local hardware store or builder ADJUST MY WIDTH ...

Page 2: ...lded down The width of your clothesline can be adjusted if necessary IMPORTANT Incorrect installation could damage your wall or cause injury Daytek bears no responsibility for improper mounting that results in accident injury or damage Always choose screws or fittings which are suitable for your wall material and have sufficient holding power Ensure your fixing surface is structurally sound If you...

Page 3: ...t off the FRONT BAR Example If your required width is 900mm then you will need to reduce the overall length of the FRONT BAR by 300mm 1200mm 900mm 300mm File the end of the tube to remove any sharp edges or burrs Trial fit the SIDE ARMS to the FRONT BAR to confirm the new mounting width before marking up and securing to the wall Note Warranty will not cover any damage caused to the clothesline as ...

Page 4: ...epaired or replaced if the goods fail to be acceptable quality and the failure does not amount to a major failure If any part of this clothesline fails to operate correctly due to faulty workmanship or defective material Daytek Manufactured Supplied by Daytek Australia Pty Ltd 77 81 Gower Street Preston Victoria 3072 Australia T 61 3 9470 1755 F 61 3 9470 5381 E enquiry daytek com au daytek com au...

Reviews: