


Days Healthcare Link Wheelchair
User Manual
Safety Guidelines
Do not use on the road, except when crossing between pavements. When
crossing the carriageway of a public road always take extra care and observe
the Highway code
Do not ride over deep, soft terrain (soft dirt, loose gravel, deep grass)
Do not attempt to mount a kerb without assistance
Do not carry passengers
We recommend that you do not sit on your wheelchair when in a vehicle, but
transfer to a vehicle seat
Always engage a slow speed when going down gradients
Do not ride in reverse down a slope or kerb
Always keep your feet on the footplate when moving
Do not stand on the footplate when getting in or out of the chair
We recommend the use of safety belt
Always keep your pneumatic tyres to the correct pressures
Do not use parts, accessories or adapters other then those authorised by Days
Healthcare Ltd
Keep the wheelchair away from children. It is not intended to be used as a toy
The manual parking brakes are not designed for slowing-down
Rear Wheel Setup
This product is supplied as standard with the rear axle bracket in the forward
position giving a more active driving position. If the user needs to have a more
stable position the rear axle fixing plate can be re-located to give a longer
wheelbase and provide a more stable driving position.
To Change Axle Position on Rear Wheel Setup
1.Remove wheels TR versions are bolted, For the SP please refer to page 10
2. Unbolt axle brackets and re-locate to the required position. Repeat the process
for the opposite side ensuring both axles are correctly located and all fixings are
secure.
3. Refit wheels ensuring that the two inner ball bearings lock the wheels in place.
4. Slacken off the brake fixing bolts and re-align brakes to approximately 20mm
from the tyre in the unlocked position. Tighten bolts and check function of
brakes.
- 6 -
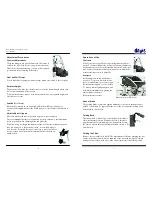
Transferring to and from the Chair
Circumstances and individual needs will vary from person to person, but if there
are difficulties we advise you to consult your therapeutic advisor who will help
you to develop your skill for appropriate transfer method that suits you.
During transfer always make sure that the brakes are in a locked position and the
wheelchair is manoeuvred as close as possible to the transfer seat
Tyres
Regularly check the condition of front & rear tyres for wear and tear. Contact
your supplier for replacements.
If you have pneumatic tyres fitted, the pressure indicated on the side of the tyre
wall should not be exceeded.
Slopes and Gradients
Do not attempt to climb or descend beyond your limitations
to avoid tipping over.
Climbing Upwards
Lean the upper body forward and move the wheelchair for-
wards with short quick pushes on the Handrims.
Downward Travel
Lean backwards in the chair and let the handrim slide gently
through your hands to control downward speed and direction.
Note: - When travelling down or up a slope, avoid sharp
turns, zigzag movements or moving across the slope
BE CAREFUL
- 11 -