


14
GB
Introduction
To get the most out of your new coff ee
maker, please read through these
instructions before use.
We also recommend that you save the
instructions in case you need to refer to them
at a later date.
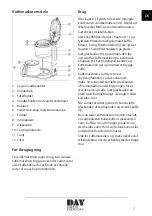
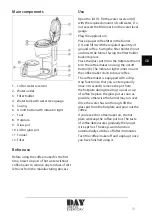
Technical data
Voltage/frequency: 220-240 V ~ 50/60 Hz
Power rating:
1000 W
Capacity:
1.5 litres (12 cups)
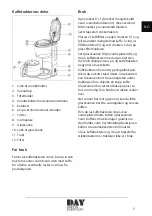
With drip stop, swivel fi lter, water level gauge
and keep-warm function
Special safety instructions
The coff ee maker is not intended for use by
children or persons with a physical, sensory
or mental disability or any person unable
to operate the coff ee maker unless they are
supervised or have been instructed in how to
use the appliance by a person responsible for
their safety.
Children must not play with the coff ee
maker. The coff ee maker must not be cleaned
by children under 8 years of age, unless
supervised by an adult.
Never leave the coff ee maker unattended
while in operation. Make sure that it is placed
out of the reach of children and that the cord
does not hang over the table or worktop.
Do not use the coff ee maker if the cord has
been damaged. Get the parts replaced by an
expert.
Make sure the supply voltage at the
connection point matches the voltage
specifi ed on the coff ee maker’s rating plate.
The coff ee maker must not be placed on a
hot surface or near heat sources.
The coff ee maker should only be used to
brew coff ee.
Fill the coff ee maker with fresh, cold water
only.
Never use the coff ee maker without the
coff ee fi lter.
Do not switch the coff ee maker on if there
is no water in it. Never place an empty glass
pot on the hotplate, as it may crack. Never
place a hot glass pot on a cold surface.
Do not expose the glass pot to heavy blows
or knocks as they may cause it to break. Do
not use the coff ee maker if the glass pot is
broken or if the handle is loose.
Be aware of the risk of scalding when using
the coff ee maker.
Unplug the coff ee maker when it is not in
use. Never pull by the cord, but instead grasp
the plug and pull it out.
The coff ee maker is only intended for use in
private households.
Not for outdoor use.
COFFEE MAKER