background image

ENGLISH 

4


Power
Supply

UTP


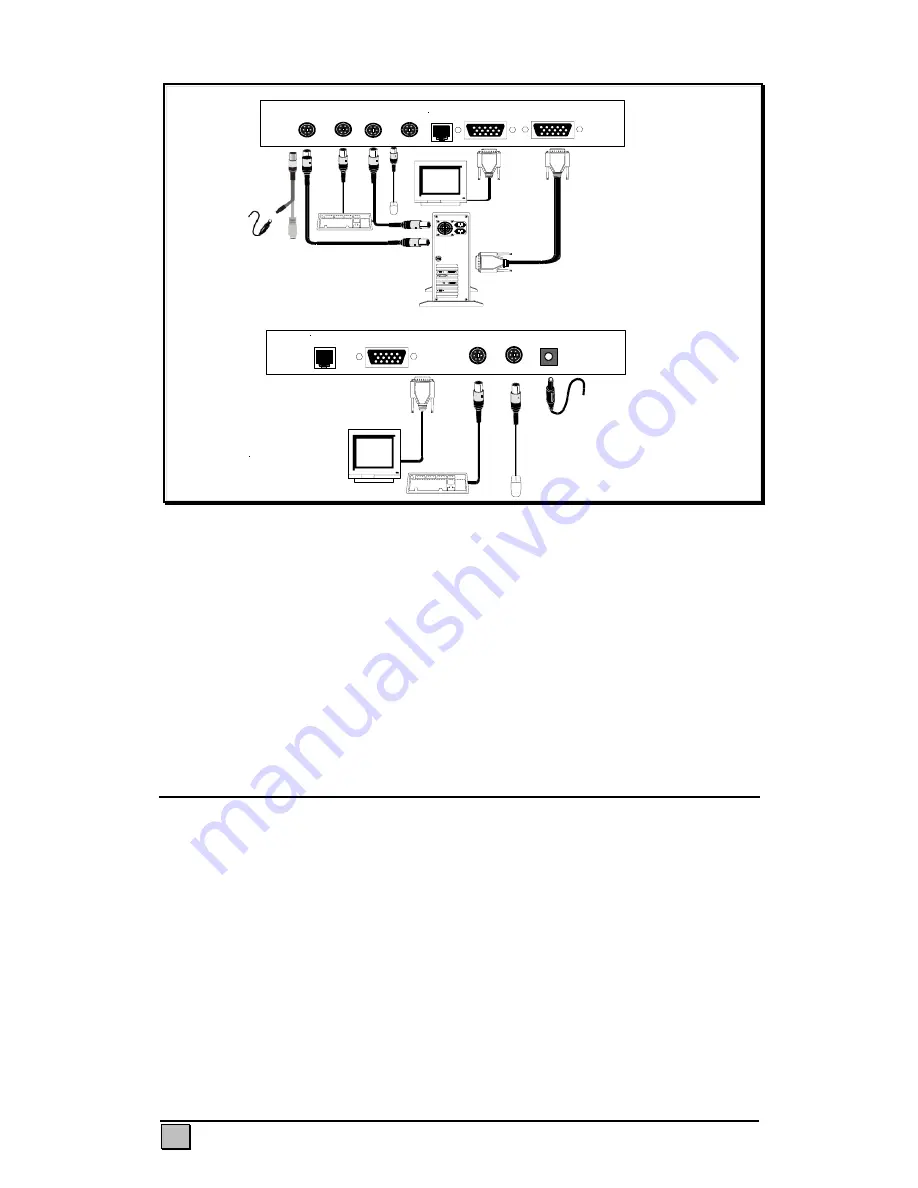
Rear View of Remote Unit

Monitor

Keyboard Mouse

9 –12V DC

Remote

Rear View of Local Unit

Keyboard 

 (CPU)


Keyboard


Mouse 

 (CPU)


Mouse

UTP

Monitor

VGA Output

(CPU)

Local

Optional 5VDC power supply 
and adaptor


cable


Voyager 300 

Figure 3 Connecting the Voyager 300 

Note—Voyager 125H does not have the dipswitches; it is not necessary to adjust 

for cable length on these models, only gain and equalizaton.


Important note on power supplies/mains adapters-- 

The local unit (all Voyager models) is normally powered from the keyboard connector.  
Some PC’s do not supply enough power from the keyboard connector; this necessitates 
the use of a 5vdc mains adapter on the local unit.  The Voyager 60 is equipped with a 
DC jack for this purpose; this jack is normally not used, since most PC-s supply enough 
power through the keyboard connector.  The Voyager 125H/300 must be connected 
with a special PS2/DC adapter Y- cable which allows connection of both mains adapter 
and keyboard cable through the local unit’s PC keyboard connector. 
 

Procedure 

We recommend that the complete system be tested in one room 

before

 permanent 

installation. If a long interconnect cable is not available, use a patch lead to test 
basic unit operation with your PC. 
 
Step 1: Setting the Cable Length Dipswitches


The Voyager 60 has three gain controls to adjust gain, brightness and cable length 
located on the underside of the device. The Voyager 125H use only the 
equalization/gain controls and brightness on the front panel. The Voyager 300 
compensates the cable length through the dipswitches on the underside of the device. 
The Voyager 300 also has two rotary controls on the front panel to precisely alter the 
compensation level and so ‘tunes in’ the image precisely for the cable length used. 
 
  
The three cable length dipswitch sets should be set as follows: 

Summary of Contents for Voyager 60

Page 1: ...Voyager 60 Voyager 125H Voyager 300 Keyboard Video Mouse Extender Tastatur Monitor Maus Extender Installation and Operation Manual Installations und Benutzerhandbuch...

Page 2: ...S SO THE ABOVE LIMITATION MAY NOT APPLY TO YOU IF THIS PRODUCT IS NOT IN GOOD WORKING ORDER AS WARRANTED ABOVE YOUR SOLE REMEDY SHALL BE REPLACEMENT OR REPAIR AS PROVIDED ABOVE IN NO EVENT WILL DAXTEN...

Page 3: ...allowing Plug Play initialisation of the remote keyboard and mouse Dual Access allows for an additional keyboard monitor and PS 2 mouse through the local unit Operation The Voyager is simple to use no...

Page 4: ...UTP or STP cable fitted at you site please consult your dealer The Local and Remote Units are connected by industry standard structured cabling Category 5 5E or 6 UTP STP 4 pair terminated with RJ45 c...

Page 5: ...r Local Optional 5VDC power supply and adaptor cable Voyager 60 Figure 1 Connecting the Voyager 60 Voyager 60 Remote Unit 5V DC RJ45 VGA Keyboard Mouse All three gain controls should be set identicall...

Page 6: ...ough the keyboard connector The Voyager 125H 300 must be connected with a special PS2 DC adapter Y cable which allows connection of both mains adapter and keyboard cable through the local unit s PC ke...

Page 7: ...the Remote Unit by connecting the mains adapter and switching it on Only use the mains adapter supplied 4 Power on your PC and check that the keyboard operates correctly Note The video image quality...

Page 8: ...ngth range Keyboard Mouse Emulation The Voyager uses a microprocessor to emulate the keyboard and mouse A keyboard and mouse must be plugged into the remote unit at boot up It is not necessary to have...

Page 9: ...ng cable plugged in keyboard and mouse cables reversed c Try a different keyboard model If the new keyboard works then the original one may be incompatible some older auto sensing units may not work w...

Page 10: ...to KB Video The picture is not sharp is very smeary a Video compensation incorrectly set See installation section Each character has separated into overlapping red green blue pixels the effect is like...

Page 11: ...eo over long distances because it has less capacitance per unit length However STP may be a better choice in electrically noisy environments The Voyager 125H is optimized for both UTP and STP When usi...

Page 12: ...port Department of Daxten Technical support If you cannot determine the nature of a problem please call Daxten and ask for Technical Support If possible call from a phone located near the unit we may...

Page 13: ...3dB Local Unit 150MHz Remote Unit 60 300 MHz Maximum Resolution Skew compensation may be required with CAT5E or CAT6 cables for comparable quality 1280 x 1024 Voyager 60 1600 x 1200 Voyager 125H 1280...

Page 14: ...ollen Alle ausdr cklichen und impliziten Garantien einschlie lich die Gew hrleistung der Handelsf higkeit und die Eignung f r einen speziellen Zweck sind auf den Gew hrleistungszeitraum von zwei Jahen...

Page 15: ...ug Play Initialisierung Ihrer entfernten Tastatur und Maus Dual Access Funktion Sie haben zus tzlich die M glichkeit einen Monitor eine Tastatur und eine Maus an der Lokalkomponente anzuschlie en und...

Page 16: ...4 Paar mit einem RJ45 Anschlu verbunden Dieses Kabel wird nicht mitgeliefert Sofern Sie nicht im Besitz eines passenden CAT 5 UTP oder STP Kabels sind das unseren Anforderungen der entspricht setzen S...

Page 17: ...Benutzer Lokal Optional 5VDC Netzkabel und Adapter Voyager 60 Abbildung 1 Verkabelung des Voyager 60 Voyager 60 Remote Einheit 5V DC RJ45 VGA Tastatur Maus Die drei Drehregler sollten identisch einges...

Page 18: ...estattet Diese Buchse wird normalerweise nicht ben tigt da die meisten PC s ber eine ausreichende Stromversorgung von der Tastaturverbindung verf gen Der Voyager 125H 300 muss mit einem speziellen Y P...

Page 19: ...Switches auf die der Kabell nge entsprechende Einstellung Schritt 2 Verkabelung Die Abbildungen 1 und 3 zeigen Ihnen wie Sie die Komponenten untereinander verkabeln m ssen 1 Schalten Sie Ihren PC aus...

Page 20: ...werden k nnen Ger te zur Skew Compensation erhalten Sie bei Daxten oder Ihrem H ndler Hinweis Aus naheliegenden Gr nden ist der Videoabgleich niemals ganz exakt deshalb kann das Fernbild nie so schar...

Page 21: ...onente bleibt aktiviert Tastatur und Maus werden jedoch blockiert Hierzu dr cken Sie gleichzeitig CTRL ALT F11 Diese Befehle k nnen wie folgt gel scht werden CTRL ALT F12 Kabelanschlussbelegung der UT...

Page 22: ...Ger t wird das Videosignal beeintr chtigt 1 Verwenden Sie eine neuere Tastatur Einige ltere Tastaturen haben einen zu hohen Stromverbrauch PS 2 Maus Der Mauszeiger wird am Bildschirm dargestellt die M...

Page 23: ...e korrekt gesetzt sind Der Monitor synchronisiert manchmal falsch und wird dadurch f r eine oder zwei Sekunden blind 1 Dieser Effekt tritt auf wenn die Netzspannung stark verrauscht ist Es wird nur de...

Page 24: ...erferenzpotential weiter zu reduzieren beachten Sie folgendes 1 Vergewissern Sie sich da der Computer und der entfernte Monitor beide am selben Hauptstromkreis Phasenlage beachten angeschlossen sind 2...

Page 25: ...mit Daxten in Verbindung und fragen nach technischer Unterst tzung Wenn es m glich ist rufen Sie von einem Telefon aus an das m glichst nahe am Ger t steht und wir k nnen Ihr Problem m glicherweise so...

Page 26: ...v EIA TIA 568 Wiring RJ45 Connectors Video Bandbreite 3dB Lokalkomponente 150MHz Fernkomponente 60 300 MHz Maximale Aufl sung 1280 x 1024 Voyager 60 1600 x 1200 Voyager 125H 1280 x 1024 bis 150 m Voya...

Page 27: ...es daxten com www daxten com Tel 34 9 762 10 256 Fax 34 9 762 19 943 Salzufer 16 Geb B 10587 Berlin Deutschland info de daxten com www daxten de Tel 49 0 30 8595 37 0 Fax 49 0 30 8595 37 99 Udviklings...

Reviews: