background image


Moving the label – F6 

Position the OSD label anywhere on the screen. 
To position the OSD label from the Main window, navigate to the desired computer using the Up and 
Down arrow keys. Press 

F6 

. The selected screen image and Identification label will appear. Use the 

arrow keys to move the label to the desired position. Press 

Esc

 to save and exit. 


Using the Control software 

As an alternative to the OSD you can operate the SCOUTutp system with the Control software located 
on the Documentation CD. With the OSD you operate the system and view the computer screens on 
the same monitor. The Control software requires 2 monitors 1 for the software and 1 to view the 
computer screens. 
With the Control software you can: 
-View computers 
-Edit OSD Settings 
-Save configurations for future use  
-Read and write configurations to the SCOUTutp Switch 
 

Control software system requirements 

Pentium 166 or higher computer, 16Mb RAM, Windows 98 and later, a free Serial port 
 

Connecting the serial download cable 

To run the software, connect the serial cable to the computer containing the software, and to the 
SCOUTutp. 
 

Note!

 The system must be fully connected BEFORE running the Control software. 

Failure to connect the system first will lead to the software working in demo mode. 


To install the software: 

Insert and start the Documentation CD. 

¾


Choose SCOUTutp RS232 Control. The SCOUTutp RS232 Control window appears.  

¾


Choose Install SCOUTutp Control Software. Once installed, a shortcut icon appears on the 
Desktop.  

¾


Double-click the icon to run the software. Or choose Start / Programs / SCOUTutp Control / 
SCOUTutp Control. 

¾


To run the software from the CD: 

¾


Choose Run SCOUTutp switch Control Software from CD. 

If the Security feature is activated, the software requires a password. 
 

Selecting a Com port (Serial port) 

During the Setup process you will be prompted to choose a Com port. Choose the Com port to which 
the serial download cable is connected. Failure to select the correct Com port will result in the 
software running in demo mode. Once Setup is complete the Control window appears.  
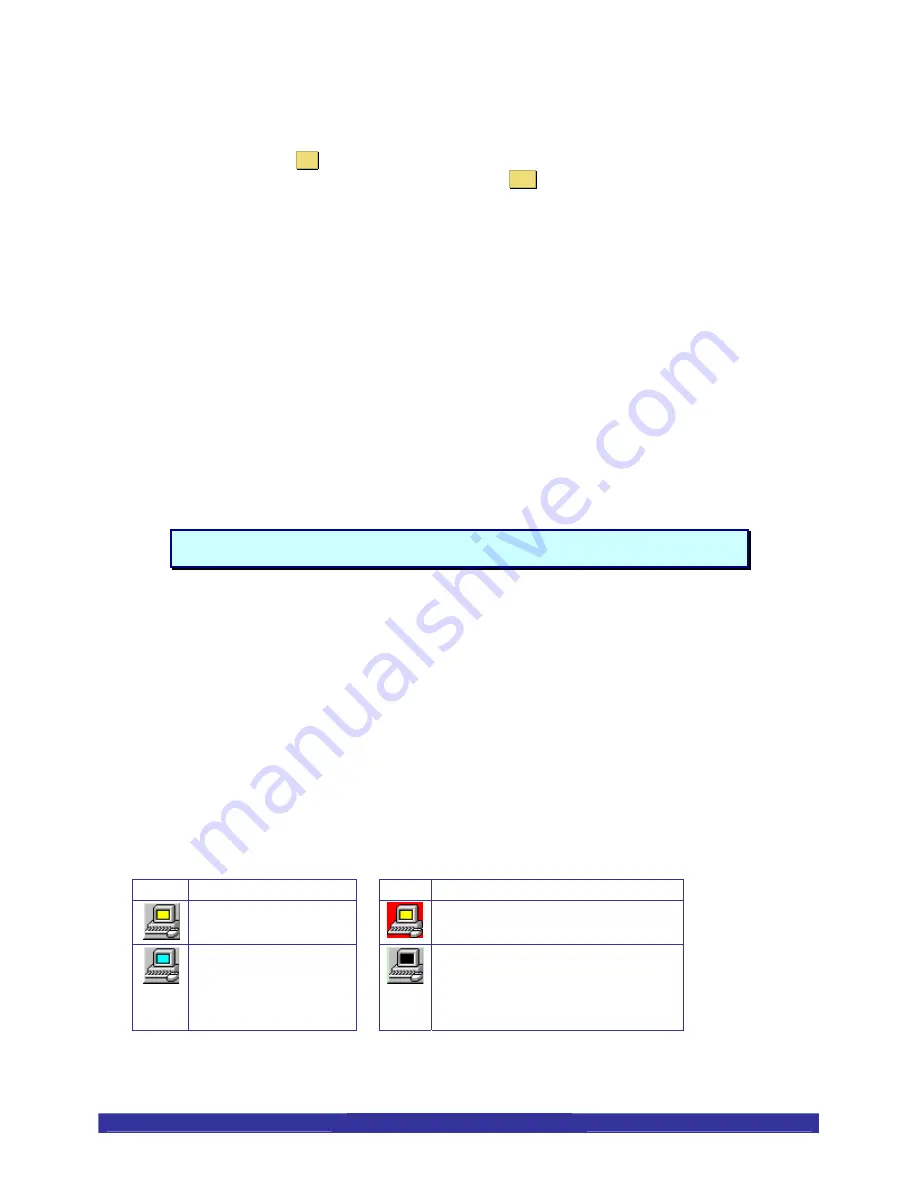
 

Computer icons 

Icon Meaning  

Icon 

Meaning 


Computer is connected 
and switched on 


Computer that you are presently 
connected to 


Computer is switched 
off or unconnected 


Connected and switched on 
computer with a Local Workstation 
attached and presently being used 
locally. After remaining idle for the 
Timeout period, it changes to 

yellow

 
When you first open the Control window the software automatically gets the status of the system, 
including the security access Settings.  


RackAccess i Series 

12


User Guide


Summary of Contents for RACKACCESS 16I -

Page 1: ...RackAccess 8i RackAccess 16i Installation guide...

Page 2: ...SCOUTutp 16 port kvm Switch IP Access xx represents country specific keyboard layouts Part Numbers 2364 01P SCOUTutp CPU Adaptor PS 2 2364 01U SCOUTutp CPU Adaptor USB 2364 01S SCOUTutp CPU Adaptor S...

Page 3: ...y DDC 2B DDC 2B DDC 2B Keyboard Keys 88 key keyboard 17 key numeric keypad Travel 3mm 0 11 Typing force 60g 20g 2 11oz 0 70oz Life cycle 10 million key presses Touchpad Compatibility Industrial standa...

Page 4: ...ital device pursuant to Part 15 of the FCC Rules These limits are designed to provide reasonable protection against harmful interference when the equipment is operated in a commercial environment This...

Page 5: ...GA resolution 1024x768 on the 15 model 1280x1024 on the 17 and 19 models 88key keyboard 17key numeric keypad Standard 19 Rack mounting accessories High Video Quality The RackAccess built in TFT LCD mo...

Page 6: ...en as below Figure 1 The OSD Screen Pressing the OSD Menu button causes the OSD menu screen to appear Use the keys to select desired group of options Use key for sub menus or select item to change Use...

Page 7: ...Sets the colour temperature to 9300K Return to the previous Menu OSD Adjustment Set the graphic mode or text mode Restores settings to factory default values Enable 720x400 text mode OSD parameter set...

Page 8: ...ale connector to the VGA port on your computer 1 2 Connect the purple PS 2 6 pin Mini DIN keyboard connector to the PS 2 keyboard port on your computer 1 3 Connect the green PS 2 6 pin Mini DIN mouse...

Page 9: ...own on the monitor will automatically switch to the next computer The delay is user definable Port No Computer Name No C computer S switch 01 SUN 01 C blue 02 PS 2 1 02 C grey 03 SCOUT 03 S grey 04 SU...

Page 10: ...n On and Off 2 The password box appears Type the Administrators password default password is admin 3 Press Enter Hot Key Press the Hot Key and the OSD appears To change the Hot Key to Ctrl Ctrl CL on...

Page 11: ...HOT KEYS for the new OSD When you cascade these hotkeys must be different for the top and bottom layers To add change a hotkey 1 On the line to which the Switch is connected press Tab to jump to the...

Page 12: ...the type of the password To change a user name or password you have to navigate to the desired line and column Type a new user name or password User authentication is done solely via the password The...

Page 13: ...e to connect the system first will lead to the software working in demo mode To install the software Insert and start the Documentation CD Choose SCOUTutp RS232 Control The SCOUTutp RS232 Control wind...

Page 14: ...dates the status before every switch Read Configuration To see the current Settings of the entire system names scan Settings etc click Read Configuration All current Settings are received You view the...

Page 15: ...l to different computers There are 3 different access levels These are Y Full access to a particular computer V Viewing access only to a particular computer No keyboard mouse functionality N No access...

Page 16: ...rt of the SCOUTutp system The SCOUTutp Update software and latest firmware is on the Documentation CD and on the Daxten website www daxten com System requirements for the SCOUTutp Update software Pent...

Page 17: ...ears after the ADAPTOR number When Not responding appears there is no computer connected or it is switched off Updating the firmware To update the firmware 1 Open the SCOUTutp Switch Update program 2...

Page 18: ...keys The connected PS 2 keyboard does not have a special SUN keypad to perform special functions in the SUN Operating System environment So when a USB or SUN ADAPTOR is connected to a SUN computer th...

Page 19: ...c A Resets USB ADAPTOR to Mac default QP Esc E Stops the normal USB power off feature Set this if you want to use the attached mouse and keyboard to wake up the computer After executing the Esc E comm...

Page 20: ...than intended 3 If unauthorized modifications were made to product 4 If unreported damages occurred in any shipment of the product 5 If damages were due to or caused by equipment or software not provi...

Page 21: ...o at daxten com www daxten at Tel 43 0 1 879 77 65 Fax 43 0 1 879 77 65 30 Deutschland Salzufer 16 Geb B 10587 Berlin info de daxten com www daxten de Tel 49 0 30 8595 37 0 Fax 49 0 30 8595 37 99 Schw...

Reviews: