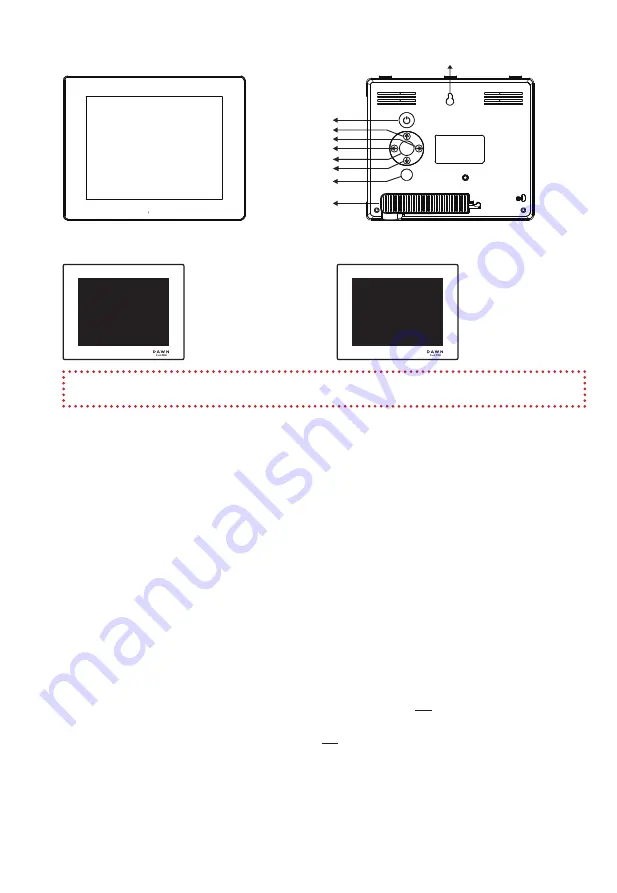
Product Diagram
Dimensions
SCREEN
160mm w x 120mm h
CLOCK FRAME
215mm w x 170mm h
“Calendar” Screen
(UI-1 Mode)
Displays
the day,
time and date.
“Now it’s” Screen
(UI-2 Mode)
Displays
“Now It’s”
UI 1 Mode
Time of Day set to “ON”
THURSDAY
MORNING
10 : 57
AM
14
MAY
2020
UI 1 Mode with
Time of Day set to “OFF”
Clock Mode Options
THURSDAY
10 : 57
AM
MAY
2017
11,
UI 2 Mode
NOW IT’S
THURSDAY
MORNING
UI 1 Mode
Time of Day set to “ON”
THURSDAY
MORNING
10 : 57
AM
14
MAY
2020
UI 1 Mode with
Time of Day set to “OFF”
Clock Mode Options
THURSDAY
10 : 57
AM
MAY
2017
11,
UI 2 Mode
NOW IT’S
THURSDAY
MORNING
How to set
To access the settings menu press the
MENU
button, to exit the settings at
anytime press the
MENU
button again.
Please Note: Settings can only be amended when the corresponding line is
high-lighted, which will be in brackets and underlined. Press the
LEFT
or
RIGHT
or
OK
button to highlight the line to apply changes. Press the
LEFT
or
RIGHT
or
OK
buttons to underline the text for any changes. When underlined, press the
LEFT
or
RIGHT
or
OK
button to change.
Getting Started
Remove the protective film covering the LCD.
Plug one end of the included AC adapter into a standard 100-240V AC electrical
outlet and the other end into the DC in of the Day Clock, at which time it will
automatically poweron.After turning on the unit, it will show the startup picture.
What does the Day Clock do?
People living with memory problems can have trouble telling whether its day or
night, morning or afternoon or may simply need reassurance about what day
and time it is.
These instructions will tell you about how to use your Day Clock as well as how
to look after it.
The Day Clock will show Morning, Afternoon, Evening and Night for each day
of the week as well as the time.
Once the Day Clock has been setup think about where to position it – perhaps
try putting it in the living room, maybe the kitchen or possibly the bedroom. Some
people may benefit from placing the Day Clock next to a calendar or diary to
help with keeping appointments and planning activities.
Set Time:
Press
LEFT
or
RIGHT
buttons to underline the hour <
07
: 10 > change the
hour by pressing
UP
or
DOWN
buttons. Then press the
LEFT
or
RIGHT
buttons
to highlight the minutes < 07 :
10
> press the
UP
or
DOWN
buttons to adjust.
To exit press the
MENU
button.
Set Date:
Press buttons
LEFT
or
RIGHT
to highlight the Day: < 02 - 23 - 2017 > or
< 23 - 02- 2017 > press
UP
or
DOWN
button to adjust. Changing Month/Year
when underlined. To exit press the
MENU
button.
Time Mode: 12 hr or 24 hr
Select by pressing the
LEFT
or
RIGHT
or
OK
buttons. To exit press the
MENU
button.
Date Mode: < Day - Month - Year > or < Month - Day- Year >
Select by pressing the
LEFT
or
RIGHT
or
OK
buttons. To exit press the
MENU
button.
Language:
Select preferred language to display by pressing the
LEFT
or
RIGHT
or
OK
buttons.To exit press the
MENU
button.
UI 1 Time or Day ON/Off:
If you prefer the Day Clock not to show the words 'Before Dawn, Morning,
Afternoon,Evening, Night', then please set it to OFF.
The following settings are for 'Now it's' (UI-2).
Predawn Time Set
Select by pressing the
LEFT
or
RIGHT
or
OK
buttons. Press
DOWN
to next
time set.
Morning Time Set:
Select by pressing the
LEFT
or
RIGHT
or
OK
buttons. Press
DOWN
to next
time set.
Afternoon Time Set:
Select by pressing the
LEFT
or
RIGHT
or
OK
buttons. Press
DOWN
to next
time set.To exit press the
MENU
button.
Product Diagram
WALL MOUNT HOLE
ON/OFF
UP
LEFT
RIGHT
OK
DOWN
MENU
STAND
MENU
OK
Getting Started
Remove the protective film covering the LCD.
Plug one end of the included AC adapter into a standard 100-240V AC
electrical outlet and the other end into the DC in of the Dawn Clock, at
which time it will automatically power on. After a few seconds the startup
picture will show and then the calendar screen.
How to set
To access the settings menu press the MENU button, to exit the settings at
anytime press the MENU button again.
Please Note: Settings can only be amended when the corresponding line is
high-lighted, which will be underlined.
Press the LEFT or RIGHT or OK button to highlight the line to apply
changes. Press the LEFT or RIGHT or OK buttons to underline the text for
any changes. When underlined, press the LEFT or RIGHT or OK button to
change.
SET TIME:
Press LEFT or RIGHT buttons to underline the hour < 07 : 10 > change the
hour by pressing UP or DOWN buttons. Then press the LEFT or RIGHT
buttons to highlight the minutes < 07 : 10 > press the UP or DOWN buttons
to adjust. To exit press the MENU button.
SET DATE:
Press buttons LEFT or RIGHT to highlight the Day: e.g < 02 - 23 - 2020> or <
23 - 02- 2020 > press UP or DOWN button to adjust. Changing Month/Year
when underlined. To exit press the MENU button.
Need a quick answer?
Visit www.dawn-clocks.com/pages/troubleshooting
TIP: Press the “OK” button to swap between the modes below:
2.


