Davis & Shirtliff DAYLIFF Ultrasun UVT VacTube Installation & Operating Manual Download Page 9

7

Ÿ

Ensure that the roof structure is strong enough to take the weight of the 
filled tank.

Ÿ

Care should be taken when maneuvering the stand. It is preferably 
done by two or more people.  

Ÿ

It  is  advised  that  the  installer  stands  over  the  main  roof  support 
structure.

Ÿ

Extra  care  should  be  taken  when  mounting  and  dismounting  iron 
ladders.

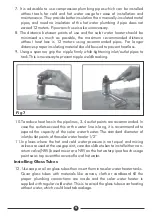
3. Fix the stand securely on the roof, ensuring that any fixings used that 

penetrate the roof outer surface are fully sealed on completion of the job. 
Set the tank in its cradle and secure loosely to the frame with the bolts 
provided.

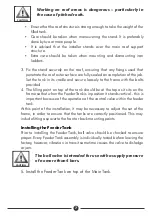
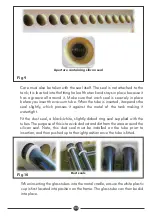
4. The filling point on top of the tank should be at the top as it sits on the 

frame so that when the Feeder Tank is in position it stands vertical - this is 
important because of the operation of the control valve within the feeder 
tank

Working on roof areas is dangerous – particularly in 
the case of pitched roofs.  

CAUTION

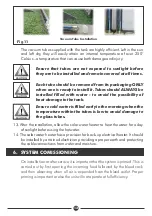
At this point of the installation, it may be necessary to adjust the set of the 
frame, in order to ensure that the tanks are correctly positioned. This may 
include fitting a spacer to the front or back mounting points.

Installing the Feeder Tank

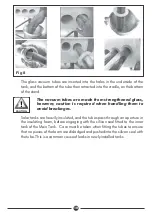
Prior to installing the Feeder Tank, ball valve should be checked to ensure 
proper. Every Feeder Tank assembly is individually tested before leaving the 
factory, however, vibration in transit sometime causes the valve to dislodge 
or jam. 

The ball valve is intended for use with a supply pressure 
of no more than 4 bars.  

CAUTION

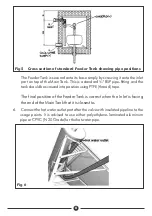
5. Install the Feeder Tank on top of the Main Tank.

Summary of Contents for DAYLIFF Ultrasun UVT VacTube

Page 1: ...Installation Operating Manual UVT VacTubes Solar Systems...

Page 2: ...EQUIPMENT SPECIFICATIONS 3 INDEX Davis Shirtliff Ltd 2020 Contents herein are not warranted 8 TROUBLE SHOOTING 15 9 TERMS OF WARRANTY 17 3 SYMBOLS WARNINGS 4 4 SITING 5 5 INSTALLATION 6 6 SYSTEM COMMI...

Page 3: ...be and glass heating elements Storage tank comprising a stainless steel inner cylinder plastic painted insulated galvanised external casing and 1 5kW heating element Separate 8L cold water header tank...

Page 4: ...3 28m Feeder Tank Tube bracket Outer tank Inner tank Air vent Cold water inlet Support structure For grouting Feeder Tank Support Front horizontal stay channel Front diagonal stay channel Cradle Main...

Page 5: ...er Out Drain Plug Ball Valve Cold Water In Non return Valve For grouting Left lower main load channel Left tile channel Left diagonal load channel Right lower main load channel Tail Stock Back right l...

Page 6: ...be collector out of reach of children WARNING WARNING Installers must adhere to the valid work protection regulations in particular when working on the roof Anti fall protection must be employed whene...

Page 7: ...t connect any pressure relief device to the vent pipe of this solar water heater 4 SITING Correct siting is critical for the effective operating of a solar water heater the following being important g...

Page 8: ...or installation South of the Equator Installation with feeder tank Feeder Tank Fig 2 Fig 3 The frame supplied with the Solar Tank is a dual purpose frame that can be used either on a flat roof or on a...

Page 9: ...that when the Feeder Tank is in position it stands vertical this is important because of the operation of the control valve within the feeder tank Working on roof areas is dangerous particularly in th...

Page 10: ...and the tank should be screwed into position using PTFE thread tape The final position of the Feeder Tank is correct when the inlet is facing the end of the Main Tank that it is closest to Fig 5 6 Co...

Page 11: ...le weld breaking Fig 7 10 To reduce heat loss in the pipelines 3 4 outlet points are recommended In case the outlets exceed this or the water line is long it is recommended to expand the capacity of t...

Page 12: ...tion is required when handling them to avoid breakages CAUTION Solar tanks are heavily insulated and the tubes pass through an aperture in the insulating foam before engaging with the silicon seal fit...

Page 13: ...of the tank making it watertight Fit the dust seal a black white slightly dished ring seal supplied with the tubes The purpose of this is to exclude dust and dirt from the area around the silicon seal...

Page 14: ...r is filled early in the morning when the temperature within the tubes is low to avoid damage to the glass tubes CAUTION 13 After the installation allow the solar water heater to heat the water for a...

Page 15: ...will help to improve the overall efficiency of the solar water heater Hot water will flow from usage point only after unheated water in pipeline flows out first Plan the consumption of hot water in q...

Page 16: ...k to make sure it s not damaged and that no rainwater runs into the tank insulation Also check for any rusting in the plumbing lines To drain the water from solar water heater for cleaning or repair d...

Page 17: ...er to sunlight Excessive water consumption undersized Plan water usage as per installed c a p a c i t y I n c a s e o f h i g h consumption use the electric back up Not getting hot water Incorrect con...

Page 18: ...the controller The solar water heater or plumbing line has a leak Determine the source of the leakage and fix If the problem persists call authorised service provider The solar water h e a t e r i s...

Page 19: ...cludes defects caused by fair wear and tear the effects of careless handling lack of maintenance faulty installation incompetence on the part of the equipment user Acts of God or any other cause beyon...

Page 20: ...INS465A 09 20...

Reviews: