background image

C O N T R O L   M O D U L E


F E A T U R E S


6


WWW.DAVIDCLARK.COM


WWW.DAVIDCLARK.COM


7

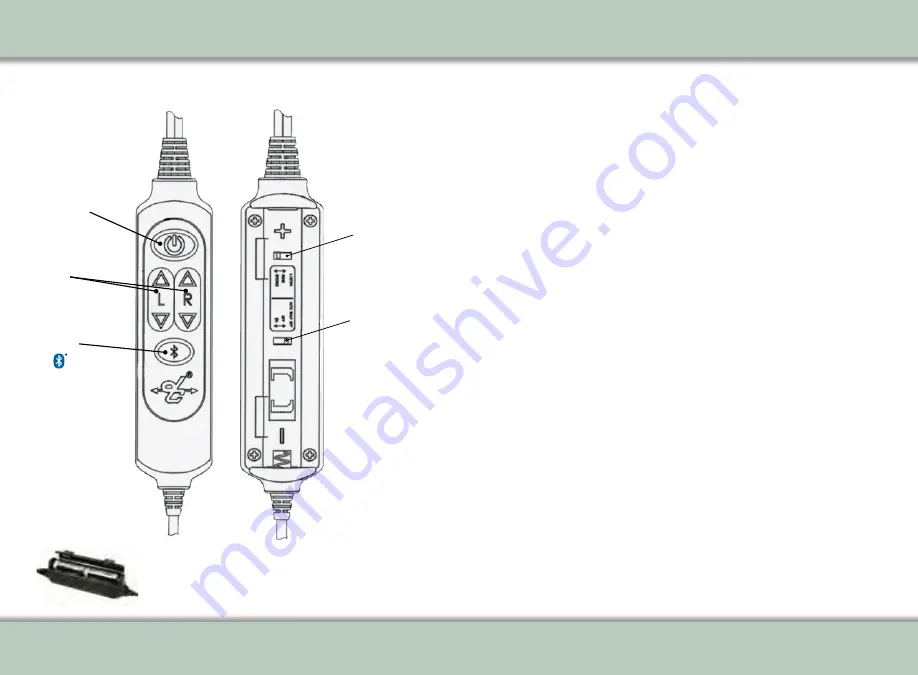
Control Module - Quick Reference Guide

Power On/Off

Volume 

Controls

Bluetooth

Mono/Stereo 

Switch

Auto Shutoff 

Switch

The Control Module is powered by two 
(2) ‘AA’ batteries for up to 50 hours of 

continuous use.

Power

Press and hold for 2 seconds to turn 

unit on or off:

 Solid Yellow: Initializing

 Flashing Green: On

 Flashing Red: On, Low Batteries


Power (LED 'Dark' Mode)

  First, press and hold Bluetooth

®


button, then press and hold the 

Power button

  Power and Bluetooth

®

 LED will turn 

ON yellow

  Release the Power ON button

  Continue to hold Bluetooth

®

 button 

until yellow Power ON LED turns 

OFF

   Release Bluetooth

®

 button

   Control Module is now in 'Dark' 

mode (no flashing Power LED). 

Note that 'Low Batteries' red flashing LED  
will still function in 'Dark' mode.


Volume Up/Down


  Adjust listen level volume up 

or down

Left/right adjustments are 

independent

  Only usable when power is ON; 

Levels default to max when unit 

is OFF

Mono/Stereo

  Set per type of intercom/audio 

panel (factory default is “Mono”)

Enhanced Auto Shutoff

The factory default Auto Shutoff 

position is 

“OFF”

 (

See page 8, "Control 

Module Operation" for Enhanced Auto 

Shutoff details

).

Bluetooth

®

 Wireless Technology


Press and hold for 2 seconds to turn on 

Bluetooth

®

 Wireless Technology:


Flashing Purple: Initializing/Mute 

Disabled

Flashing Green: On, Not Connected

Flashing Yellow: Pairing Mode

Flashing Blue: Paired and 

Connected/Mute Enabled

To Pair:

Turn 

Bluetooth

®

 Wireless 

Technology on (flashing green)

Press 

Bluetooth

®

 Wireless 

Technology button to enter  

pairing mode (flashing yellow)

Search for devices from your 

phone/device

Select 

DC PRO-X2

 and initiate 

pairing on your device

If prompted for PIN code, 

enter 0 0 0 0

Control Module - Quick Reference Guide

NOTE: Bluetooth wireless technology  

is not available on Model Part Numbers 

43105G-07

 and 

43105G-10


Summary of Contents for DC PRO-X2 Series

Page 1: ...on and communication systems as well as to determine if the portable device is suitable for use with the headset Do NOT attempt to repair this headset Contact David Clark Company for specific care ret...

Page 2: ...wer is available at pin 5 or when the headset is disconnected from the aircraft panel Aircraft Powered 6 Pin Replaceable Parts Removal Installation M 5B Microphone P N 09168P 85 To remove microphone G...

Page 3: ...IDCLARK COM 3 Anti Noise Signal HYBRID Proper Fitting The advanced suspension system of the DC PRO X2 Series is designed for a simple and comfortable fit Proper fit is necessary for maximum effectiven...

Page 4: ...6 Hybrid ENC technology for best in class active noise attenuation 7 Digital Signal Processing DSP Technology provides high fidelity audio for supe rior communications and music listening 8 M 5B Elect...

Page 5: ...wn Adjust listen level volume up or down Left right adjustments are independent Only usable when power is ON Levels default to max when unit is OFF Mono Stereo Set per type of intercom audio panel fac...

Page 6: ...io but cell phone recipient s voice is heard only by the headset connected paired to the cell phone Sidetone is always present Briefly pressing the Bluetooth wireless technology button will answer or...

Page 7: ...entering this mode Flashing purple Music will not mute when transmission is received from ATC or intercom A rising two tone chime is heard when entering this mode Each time the DC PRO X2 is powered O...

Page 8: ...IDCLARK COM 3 Anti Noise Signal HYBRID Proper Fitting The advanced suspension system of the DC PRO X2 Series is designed for a simple and comfortable fit Proper fit is necessary for maximum effectiven...

Page 9: ...wer is available at pin 5 or when the headset is disconnected from the aircraft panel Aircraft Powered 6 Pin Replaceable Parts Removal Installation M 5B Microphone P N 09168P 85 To remove microphone G...

Page 10: ...wer is available at pin 5 or when the headset is disconnected from the aircraft panel Aircraft Powered 6 Pin Replaceable Parts Removal Installation M 5B Microphone P N 09168P 85 To remove microphone G...

Page 11: ...re with the aircraft s navigation and communication systems as well as to determine if the portable device is suitable for use with the headset Do NOT attempt to repair this headset Contact David Clar...

Page 12: ...re with the aircraft s navigation and communication systems as well as to determine if the portable device is suitable for use with the headset Do NOT attempt to repair this headset Contact David Clar...

Reviews: