background image


DV8 Owner’s Manual 

23 

File name: DV8OwnersManual10_23.doc 

Page: 23 / 48 

Printed date: 2003/10/23 

Paper size: 128 mm x 182 mm 

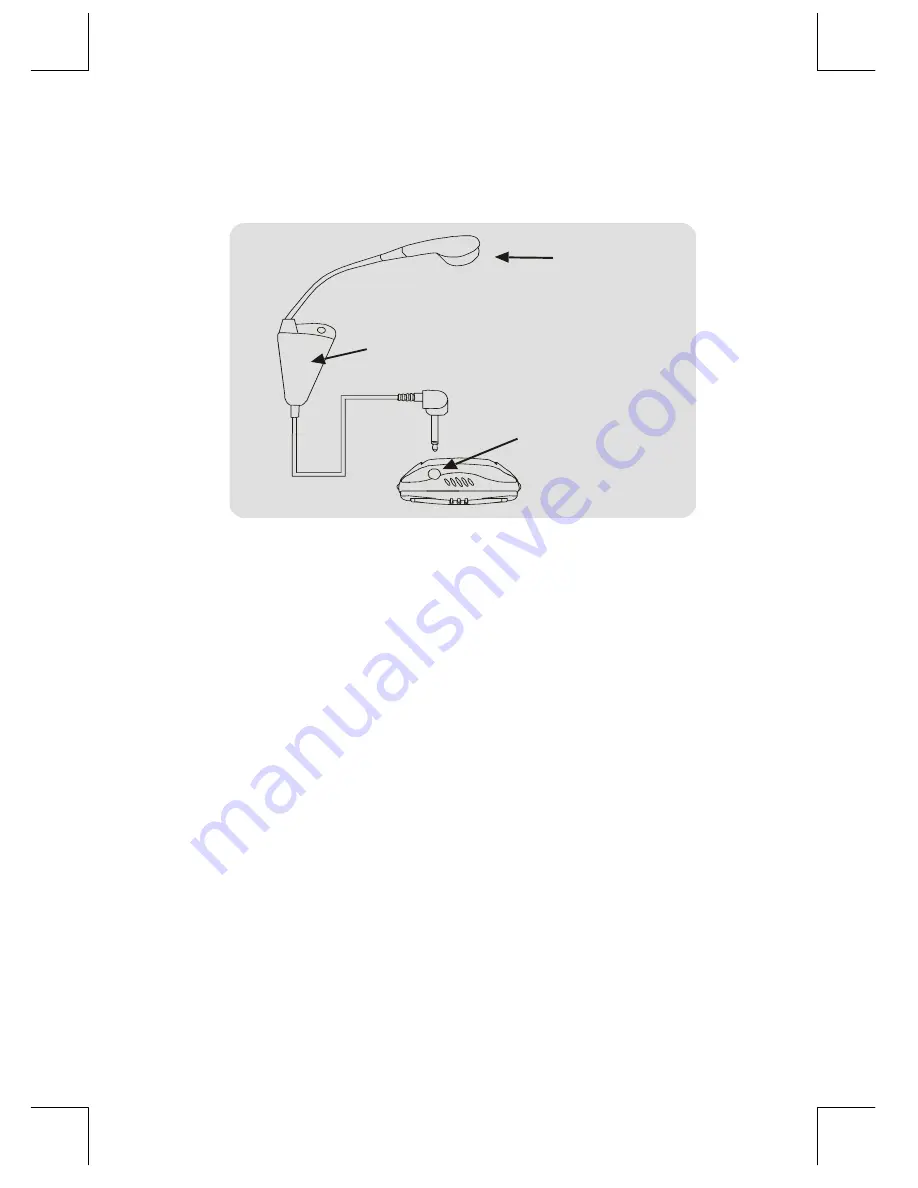
5.2.4.  Recording through an External Microphone 

Connect the earphone/microphone line into the EAR/MIC JACK as 
follow picture. 

EAR/MIC JACK

Earphone

Microphone


When you connect an external microphone, the built-in microphone 
is automatically cut off. 

5.2.5.  Performing a Recording 

5.2.5.1.  Selecting Recording Folder  

You can record Up To 4 Folder/ 396 Messages.  The 4 file folders of 
A, B, C, and D can be selected with up to 99 messages recorded in 
each of the four folders. 

Tip: 

You need not select a folder to begin recording.  Simply 

pressing the 

REC/PAUSE

 button will start the recording process, 

and by default, the recording will be placed in the active folder.  In 
most cases, this will be folder A. 

Summary of Contents for DV8

Page 1: ...File name DV8OwnersManual10_23 doc Page 0 48 Printed date 2003 10 23 Paper size 128 mm x 182 mm Teledex Inc DV8 Owner s Manual ...

Page 2: ...8 LINK SOFTWARE 7 2 3 3 1 AUTO LAUNCH 8 2 3 3 2 MANUAL INSTALL 8 3 STARTING WITH THE BASICS 10 3 1 SAY IT 10 3 2 TRANSFER IT 11 3 3 SEND IT VIA EMAIL 12 3 4 A WORD ABOUT FILE FORMATS 13 4 DV8 LINK SOFTWARE 14 4 1 TRANSFERING FILES TO YOUR PC 14 4 2 PLAYING AND EDITING FILES ON YOUR PC 15 4 3 SENDING FILES VIA EMAIL 17 5 BASIC AND ADVANCED FEATURES IN DETAIL 18 5 1 GETTING AROUND 18 5 1 1 DISPLAY 1...

Page 3: ... 2 5 4 STOP RECORDING 25 5 2 5 5 CHECKING THE RECORDING DATE 25 5 2 5 6 CHECKING AVAILABLE RECORDING TIME 26 5 3 PLAYING A RECORDED MESSAGE 26 5 3 1 BEGINNING PLAYBACK 26 5 3 2 PAUSING PLAYBACK 27 5 3 3 ADJUSTING VOLUME 27 5 3 4 REPEATING PLAYBACK 28 5 3 5 CONTINUOUS PLAYBACK 28 5 3 6 SKIPPING A FILE DURING PLAYBACK 29 5 3 7 FAST PLAYBACK 29 5 3 8 SCAN PLAYBACK 29 5 3 9 A B REPEAT FUNCTION 30 5 3 ...

Page 4: ...5 4 2 TO CANCEL THE ACTIVITY 40 5 5 5 SCHEDULE ALARM B ONLY 40 5 5 5 1 AT THE PRESET TIME 41 5 5 5 2 TO CANCEL THE ACTIVITY 41 5 6 SPORT TIMER FUNCTION 41 5 6 1 STOPWATCH MEASURING ELAPSED TIME 42 5 6 1 1 TO SAVE AND STOP THE STOPWATCH 42 5 6 2 COUNT DOWN 43 5 6 2 1 TO START COUNT DOWN TIME 43 5 6 2 2 TO START ACTUAL COUNT DOWN 44 5 6 3 COUNT DOWN FROM THE LATEST HOUR 44 5 6 4 USING THE BUILT IN C...

Page 5: ...ystems We are pleased that you have chosen the DV8 VoiceEmail for your digital recordings and we congratulate you for joining the Email Revolution 2 Quick Start Before you start using your DV8 check the items in your package with the list below 2 1 Package Contents Voice recorder Batteries CD ROM USB cable Owners manual Quick Start Guide Earphone Microphone Line option Telephone recording adapter ...

Page 6: ...age 5 48 Printed date 2003 10 23 Paper size 128 mm x 182 mm 2 2 Identification of Parts EAR MIC JACK SPEAKER BUILT IN MICROPHONE DISPLAY PLAY STOP MODE BATTERY COVER STRAP ATTACHMENT REC PAUSE REWIND USB PORT ERASE HOLD A B REPEAT RECORDING INDICATOR FORWARD ...

Page 7: ...s Battery indicator Battery level Full Low Exhausted If the Exhausted indicator or BATTERY LOW message appears on the display you need to replace the batteries as soon as possible If abnormal conditions occur and further operations become impossible please re install the batteries to release the problem 2 3 2 Setting Time Date Press MODE key 3 times till it shows CLOCK blinking Press PLAY to start...

Page 8: ... 98 SE Me 2000 XP CPU Intel Pentium MMX or better based compatible PC RAM 32MB or more Hard Disk 3 5MB for DV8 Link software or more Sound board Microsoft Windows compatible Display 800 x 600 pixels 256 colors CD ROM 2X or better Interface port 1 USB port Audio Output Speaker Earphone Your DV8 comes with software that allows you to easily transfer review edit send your voice recordings The install...

Page 9: ... this package The system should recognize the CD and take you through the DV8 Link software installation steps All you have to do is to follow the on screen prompts When installation is complete you will be asked to restart your computer 2 3 3 2 Manual Install 1 If the program does not auto launch right click on your START button lower left of your screen and choose Explore Then navigate to your C...

Page 10: ...8 mm x 182 mm 2 Next navigate to the DV8Link folder on the DV8 Link Software CD and double click to open that folder 3 Find Setup exe and double click on that file to launch installation 4 Follow the on screen installation prompts 5 When installation is complete you will be asked to restart your computer ...

Page 11: ...ent right from the software interface screen For outboard email clients the process requires launching the client E g Yahoo and attaching the email voice file 3 1 Say it Recording with DV8 is as easy as 1 2 3 Use the following simple steps 1 To record a message press the REC PAUSE button See Parts Diagram NOTE If the unit is not on this will turn the unit on Press it once again when you are ready ...

Page 12: ...ansfer it Plug the unit into your computer and you can transfer the file easily to your PC via USB Once connected the preinstalled DV8 Link software will help you transfer the files to your PC and convert the DV8 machine language into a MP3 file or WAV files Use the supplied USB cord plug the DV8 unit into your computer Note that the connecting cable has a special connector for the DV8 on one end ...

Page 13: ...to the desired file and hold the left mouse button down and then drag it down to My Computer Next the program will ask you which audio format you would like for this file MP3 compressed file or a WAV file See audio format descriptions elsewhere in these instructions Once you choose a format the program automatically converts the file to that format Once the file is converted and stored on your har...

Page 14: ... button lights up Click on that button and it launches the familiar email screen Congratulations You have joined the Voice email Revolution 3 4 A Word about File Formats The DV8 compresses the files in its own machine language This is essentially a holding file as it cannot be edited or manipulated in any way Your software will automatically convert these files into MP3 or WAV formatted files This...

Page 15: ...ty of features to organize and manage your digital recordings 4 1 Transfering files to your PC You have two ways to copy files from the DV8 to my computer The first one is highlighting the file s on the DV8 section of the software and then clicking the Down Transfer button and the second one is to highlight the file s hold the left mouse button down and then drag it down to My Computer ...

Page 16: ...n your computer you have a variety of options to play edit and send via Email 4 2 Playing and Editing files on your PC The DV8 software comes with a built in tool to play and edit the digital recordings that you transferred to WAV format and its own machine language The following pictures shows you the features that are available to WAV and its own machine language files Play Edit Merge and Save A...

Page 17: ...nersManual10_23 doc Page 16 48 Printed date 2003 10 23 Paper size 128 mm x 182 mm Once you select a file and click the Play Edit button you have the ability to play the file Split it in two or to Cut a portion of the file into another file ...

Page 18: ...tton Then your email client such as Outlook Express will automatically attach the file to a blank email ready to be sent out The above procedure works easily with popular inboard email clients such as Microsoft Outlook and also works well with outboard clients such as Yahoo For inboard Voice Email the file can be sent right from the software interface screen For outboard email clients the process ...

Page 19: ...y Recording time Playback time Remaining time Repeat Playback Folder Remaining time Battery level Volume level Schedule an activity Alarm Voice Operating Sensitivity Voice Operation Recording Date Recorded Hold A B Section Repeat Recording File number 5 1 2 Mode Menu Structure Your voice recorder offers many functions that are grouped in menus Press the MODE button and the or buttons to access the...

Page 20: ...28 VOS Voice operating sensitivity setting Page 22 VOR Voice operation recording setting Page 21 VOL Volume setting Page 27 To cancel the setting back to MODE menu press MODE To cancel MODE menu back to time standby mode press STOP NOTE In MODE menu if no button is pressed within 10 seconds the setting will be canceled and the display will go back to standby 5 1 3 Hold Function You can lock the co...

Page 21: ... Quality You can set from among three recording modes HQ mode MQ mode LQ mode Recording Mode Available Recording Time HQ mode High quality Approx 63 minutes MQ mode Middle quality Approx 126 minutes LQ mode Low quality Approx 422 minutes The recording time shown above is for one continuous file The available recording time may be shorter than specified if several files are recorded 1 Select the RE...

Page 22: ...es This is especially useful to save valuable recording time VOR ON Pauses recording when no sound is detected VOR OFF Cancels the VOR setting 1 Use MODE to page through and select the VOR menu Press MODE several times until the VOR menu flashes on the display or press MODE then press or 2 Set the VOR to ON or OFF Press PLAY to display ON and OFF Press or to select ON then press PLAY 1 X VOR indic...

Page 23: ...peration Sensitivity function can automatically enhance microphone sensitivity to meet recording conditions VOS ON Meets for a spacious place or important meeting VOS OFF Meets for a closest sound source or dictation 1 Select the VOS menu Press MODE several times until the VOS menu flashes on the display or press MODE then press or 2 Set the VOS to ON Press PLAY to display ON and OFF Press or to s...

Page 24: ...nal microphone the built in microphone is automatically cut off 5 2 5 Performing a Recording 5 2 5 1 Selecting Recording Folder You can record Up To 4 Folder 396 Messages The 4 file folders of A B C and D can be selected with up to 99 messages recorded in each of the four folders Tip You need not select a folder to begin recording Simply pressing the REC PAUSE button will start the recording proce...

Page 25: ...m the microphone at the top of the unit at the sound source Press the REC PAUSE button to start recording The recording LED lights The first line will show the current recording time The second line shows the remaining recording time 1 2 2 2 3 X Current recording time Y Remaining recording time Z REC indicator is on 5 2 5 3 Pausing the Recording MQ To pause recording press REC PAUSE again and the ...

Page 26: ...er folders if necessary before recording any further The number of recorded files in the current folder reaches 99 recording is not possible FOLDER FULL appears The remaining recording time reaches 00 05 00 the system memory is low MEMORY LOW appears The remaining recording time reaches 00 00 00 all remaining recording time has been made MEMORY FULL appears 5 2 5 5 Checking the Recording Date 1 2 ...

Page 27: ...e recording time on the display is calculated based on your current recording mode quality setting 5 3 Playing a Recorded Message 5 3 1 Beginning playback 1 Select the FOLDER menu Press MODE several times until the FOLDER menu flashes on the display or press MODE then press or 2 Choose the folder Press PLAY to display A B C D Press or to select a folder then press PLAY 3 Return to standby Press ST...

Page 28: ...e NO FILE appears on the display Please select another folder 5 3 2 Pausing playback To pause playback press PLAY again and PAUSE will flash on the display To resume playback press PLAY again Playback continues from the point where it was paused NOTE If the recorder has been left paused for 15 minutes or longer it will go back to standby 5 3 3 Adjusting volume The volume level can be adjusted from...

Page 29: ... press or to adjust the volume 5 3 4 Repeating playback You can repeat all files or individual file as many times as you like Press PLAY more than 2 seconds during playback the repeat indicator changes as shown below Repeats one file Repeats all files in current folder Repeats all files Blank Normal playback 5 3 5 Continuous playback CONTINUE ON Continues playback next message in current folder wi...

Page 30: ... to the beginning of the next file and start playing it press the to skip to the beginning of the current file and start playing it 5 3 7 Fast Playback During playback you can fast rewind or forward the message while pressing or button for 2 seconds or longer To cancel fast playback press PLAY or for 1 second or longer to interrupt fast playback and resume normal playback speed When fast playback ...

Page 31: ... of the section indicators is shown on the display and the A B section is played repeatedly To interrupt A B section repeat press STOP Playback continues normally from the stopped point 5 3 10 Learning function Any section of recording between A B section can be looped and listened to over and over In this function you can record further your own voice and compare it to the voice recorder s Your v...

Page 32: ...AY to start comparing your voice with the A B section To interrupt the two compared message press STOP 5 4 Erasing functions Recorded message can be erased one by one all files in a folder at once or delete everything by Formatting the recorder 5 4 1 Erasing one file Press or to select a file you want to erase 1 Select the ERASE ONE menu Press ERASE more than 2 seconds or longer Press or to select...

Page 33: ...ess ERASE more than 2 seconds or longer Press or to select FOLDER menu 2 Select a folder Press PLAY and use or to select a folder 3 Erase all files in the folder Press ERASE again ERASE OK appears on the display when all files are erased File numbers are returned to zero To cancel erase operation press STOP 5 4 3 Formatting the recorder C 1 Select the ALL FORMAT menu Press ERASE more than 2 second...

Page 34: ...d File numbers are returned to zero 5 5 Scheduling Functions The scheduling function has three options Schedule recording PRE REC Schedule playback BF PLAY Schedule Alarm B ONLY Before using this function you need to set the Date Time Please see page 6 Press MODE several times until the SCHEDULE menu flashes on the display or press MODE then press or Press PLAY to enter the schedule function inclu...

Page 35: ...1 Scheduling Function Menu Map Y X Z ALL OFF ALL ACTV DATE1 DATE2 DAILY SUN MON TUE WED THU OFF ON FRI SAT Date Start time setting B ONLY End time setting Recording mode setting VOR setting VOS setting Snooze setting Change setting Snooze setting BF PLAY PRE REC OFF ON OFF ON OFF ON OFF ON ON OFF ON OFF ON OFF ON OFF OFF ON ...

Page 36: ...FF ON Turn an activity ON OFF Turn an activity OFF Start time For DATE1 DATE2 Time format setting MM DD YY AM or PM HH MM For DAILY MON SUN Time format setting AM or PM HH MM Customized setting PRE REC Schedule recording End time setting Recording mode setting VOR setting VOS setting BF PLAY Schedule playback Snooze Sleep alarm setting 1 Change setting 2 B ONLY Schedule alarm Snooze Sleep alarm se...

Page 37: ...Recording PRE REC Recording can be set to start and end at specified times This requires current date and time to be set on the recorder Example Schedule a recording session Schedule Date Start time End time REC MODE VOR VOS September 26 2003 AM 07 30 AM 08 30 MQ ON OFF In SCHEDULE menu press PLAY 1 Select the ALL ACTIVITY menu Press or to access to ACTV menu then press PLAY 2 Set the schedule rec...

Page 38: ... menu then press PLAY 1 X Time setting 12 hour format AM or PM HH MM 6 Set the end recording time Press or to AM or PM and then press PLAY to save it Continue to set the hour and minute Time setting is 12 hour system 7 Select REC MODE to MQ Press or to access to MQ menu then press PLAY 8 Select the VOR to ON Press or to access to ON menu then press PLAY 9 Select the VOS to OFF Press or to access t...

Page 39: ...er then the start date and time the schedule recording is regard as to expand two days If you try to set the schedule date and time of DATE 1 is the same as DATE 2 TIME SET appears on the display and you need re enter appropriate values 5 5 4 Schedule File Playback BF PLAY Playback can be set to start at set times Example Schedule playback setting Playback file Schedule Date Start time SLEEP CHANG...

Page 40: ...start playback time Press or to AM or PM and then press PLAY to save it Continue to set the hour and minute Time setting is 12 hour system 5 Select BF PLAY menu Press or to access to BF PLAY menu then press PLAY 6 Select SLEEP AL to OFF Press or to access to OFF menu then press PLAY 7 Select CHANGE to NO Press or to access to NO menu then press PLAY 8 Complete the setting operation Press STOP back...

Page 41: ...e canceled 5 5 5 Schedule Alarm B ONLY Alarm can be set to remind you at set times Example Schedule alarm setting Schedule Date Start time SLEEP Daily PM 03 00 OFF In SCHEDULE menu press PLAY 1 Select the ALL ACTIVITY menu Press or to access to ACTV menu then press PLAY 2 Set the schedule alarm Press or several times until the DAILY menu is flashing then press PLAY 3 Turn the schedule date on Pres...

Page 42: ...cess to B ONLY menu then press PLAY 6 Select the SLEEP AL to OFF Press or to access to OFF menu then press PLAY 7 Complete the setting operation Press STOP back to time standby 5 5 5 1 At the Preset Time The activity sounds for approximately 10 seconds To interrupt alarm press any key 5 5 5 2 To Cancel the Activity Select OFF in step 3 5 6 Sport Timer Function The sport timer function can be used ...

Page 43: ...menu press PLAY 1 Select the ST menu Press or to access to ST menu 1 2 X Measure time HH MM SS Y Measure time Fractions of a second 2 Start measuring time Press PLAY to enter stopwatch function Press PLAY again to start the stopwatch The running time appears on the display The Stopwatch shows time in hours minutes seconds fractions of a second and ST indicator 5 6 1 1 To Save and Stop the Stopwatc...

Page 44: ... can record up to five measure times You can press or to view each measuring time If you try to save next measure time STFULL appears on the display In this case before measuring a new record you need press ERASE to erase the number of stopwatch to zero 5 6 2 Count Down 5 6 2 1 To Start Count Down Time In TIMER menu press PLAY 1 Select the CONT D menu Press or to access to CONT D menu 1 X Count Do...

Page 45: ...ONT D menu Press or to access to H CONT D menu 1 X Remaining time HH MM SS 2 Start count down Press PLAY to start count down The function counts down from the latest hour of the current time To interrupt the countdown press STOP twice back to time standby 5 6 4 Using the Built In Counter In TIMER menu press PLAY 1 Select the CONNTER menu Press or to access to COUNTER menu 2 Start counting Press PL...

Page 46: ...rding time in the selected folder reached 00 00 00 Memory is full You must erase some files to make room for the new recordings Unable to record Is the file number in the selected folder reached 99 Recording stops Is the Voice activated Recording VOR is set to ON Unable to Playback No messages recorded in the recorder Unable to erase a folder Have you selected an empty folder Is the volume set to ...

Page 47: ...n 16MB Flash Memory Frequency Response 300 4000HZ Output Medium Earphone Speaker Input Medium Built in microphone Line for connecting to external source Speaker Approx 20mm diameter Dimension 108 8 mm x 40 7 mm x 19 8 mm Weight Approx 62 0 g batteries included Power Source AAA x 2 Auto Power off 3 minutes Battery life 14 hr Recording mode 8 hr Playback mode 2 Years OFF standby mode It is not recom...

Page 48: ...an 9 Product Registration In order to receive information on new products and special promotions on our web store register your DV8 online today at www datexx com 10 Need Assistance 1 Visit us at www datexx com 2 Review on line the Frequently Asked Questions on this product or email to sales datexx com us describing your problem for prompt assistance Please include your telephone number We will re...

Reviews: