


DT9102 I4
14
20220103-V0
5. Connecting
5.1. Preparing the connection
Select and prepare
connection cable
How to use the push in
direct connectors
Always observe the following safety instructions:
•
When you are going to install instruments in hazardous
area or install instruments which are connecting to
instruments are working in hazardous area you should take
note of the appropriate regulations, conformity and type
approval certificates of the DT9102 I4 and the other
instruments (e.g. isolator, Zener barrier). The connection
must be carried out by trained and authorized personnel
only!
Take note of the corresponding installation regulations for
Ex applications. In particular, make sure that no potential
equalization currents flow over the cable screen. Ground
only one side the cable screen.
•
Use only a screwdriver with appropriate head.
Take note the suitability of the connecting cable
(wire cross-section, insulation, cable screen, etc.).
The wire cross-section should be 0.25–1.5 mm
2
.
You may use either solid conductor or flexible conductor.
In case of using flexible conductor use crimped wire end.
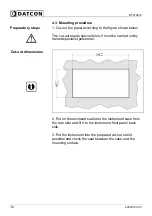
1. Remove approx. 30 mm of cable mantle, strip
approx. 8 mm insulation.
2. Remove the instrument front cover (see chapter
4.3.).
3. Loosen compression nut of the cable entry.
4. Insert the cable into the instrument through the cable
entry.
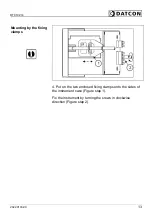
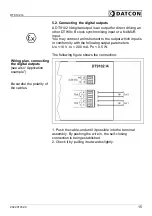
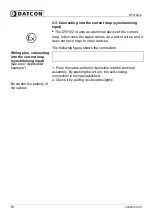
1. Push the cable-end until it possible into the terminal
assembly.
2. By pushing the wire in, the self-closing connection is
being established. Check it by pulling it outwards slightly.
(3. When you disassemble the cable, push down the white
button by a screwdriver, and pull the cable-end out.)
There is no need to use great force for pushing the cable in,
neither for removal. The button can be pushed down easily.
Please do not exercise forces higher than necessary, as it
may cause damages to the terminal assembly.
Summary of Contents for DT9102 I4
Page 1: ...DT9102 I4 Intrinsically Safe Digital Clock Operating Instructions ...
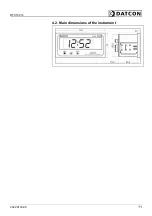
Page 11: ...DT9102 I4 20220103 V0 11 4 2 Main dimensions of the instrument ...
Page 41: ...DT9102 I4 20220103 V0 41 10 2 Application example ...
Page 50: ...DT9102 I4 50 20220103 V0 10 8 ATEX Certification ...
Page 51: ...DT9102 I4 20220103 V0 51 ...
Page 52: ...DT9102 I4 52 20220103 V0 ...
Page 53: ...DT9102 I4 20220103 V0 53 ...
Page 54: ...DT9102 I4 54 20220103 V0 ...
Page 55: ...DT9102 I4 20220103 V0 55 ...
Page 56: ...DT9102 I4 56 20220103 V0 ...
Page 57: ...DT9102 I4 20220103 V0 57 ...
Page 58: ...DT9102 I4 58 20220103 V0 ...
Page 59: ...DT9102 I4 20220103 V0 59 ...
Page 60: ...DT9102 I4 60 20220103 V0 ...
Page 61: ...DT9102 I4 20220103 V0 61 ...
Page 62: ...DT9102 I4 62 20220103 V0 ...
Page 63: ...DT9102 I4 20220103 V0 63 ...
Page 64: ......


