background image


11 

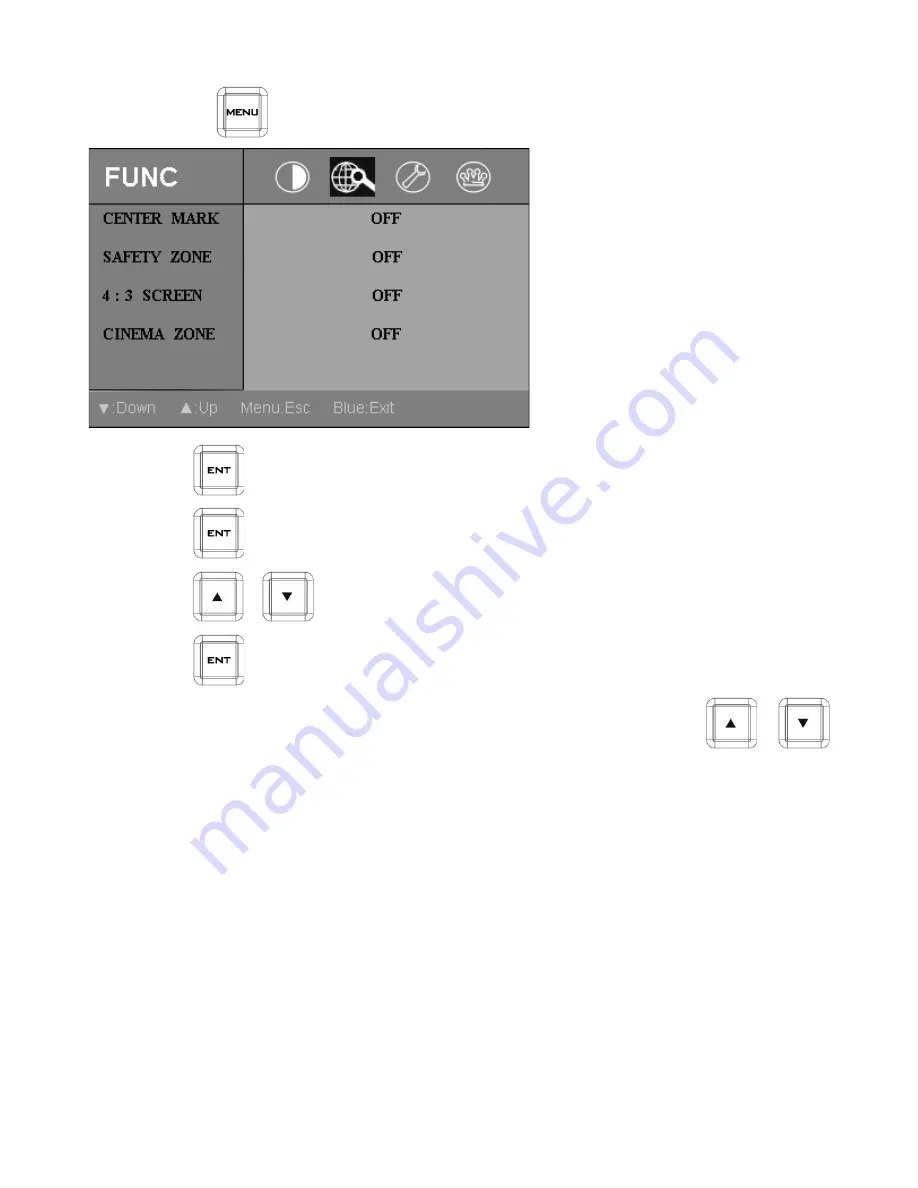
FUNC 


Step 1.  

Press the 

  button two times move to the monitor 

FUNC

 setting mode. 


Step 2.  

Press 

  button into the 

FUNC

 setting position. 

Step 3.  

Press 

  button again to setting the 

CENTER MARK 

ON/OFF on the screen. 

Step 4.  

Press 

  / 

  button moving to the 

SAFETY ZONE 

setting. 

Step 6.  

Press 

  button to setting the 

SAFETY ZONE

 range (80, 90 or OFF). 

Note:  To select a different setting (4:3 SCREEN,  CINEMA  ZONE) use the 

  / 


buttons. Follow the same procedure to set the others status. 


Summary of Contents for HRS-30

Page 1: ...w w w d a t a v i d e o c o m HRS 30 FIELDSIDE HAND CARRY RECORDER Instruction Manual...

Page 2: ...ay Panel Status 16 Recorder Menu Key Options 17 TOOL 17 FIRMWARE REVISION 17 ERASE THIS BIN 18 FORMAT MEDIA 19 UPRGRADE FIRMWARE 20 UN LOCK MEDIA 21 SETUP 22 RECORD SETUP 22 PLAY SETUP 25 SYSTEM SETUP...

Page 3: ...plete This manual may contain typing errors omissions or incorrect information Datavideo Technologies always recommend that you double check the information in this document for accuracy before making...

Page 4: ...this unit where the power cord will be walked on rolled over or otherwise stressed 9 If an extension cord must be used with this unit make sure that the total of the ampere ratings on the products pl...

Page 5: ...rchase Certain parts with limited lifetime expectancy such as LCD panels DVD drives Hard Drive Solid State Drive SD Card USB Thumb Drive Lighting Camera module PCIe Card are covered for 1 year The thr...

Page 6: ...de facing the operator s position To open the HRS 30 monitor lid slide the thumb catches in the direction shown to their outer most position Then lift the monitor lid upwards away from the keyboard an...

Page 7: ...HRS 30 Battery The HRS 30 can be powered from a standard V Mount battery connection or mains power This enables you to power the HRS 30 using an existing camera battery HRS 30 with V mount Battery Pla...

Page 8: ...oard When this phone jack connect earphone the HRS 30 speaker function still working Mini USB This is for Recorder Operation keyboard firmware upgrade purpose HDMI OUT HDMI output ports for connecting...

Page 9: ...pect ratio to 4 3 16 10 or 16 9 PATTERN The PATTERN button will generate colour bars on the screen Press the PATTERN button again to return normal output BLUE Press this button to eliminate the red an...

Page 10: ...ing and return to the PICTURE setting menu Note 1 To select a different setting CONTRAST SATURATION TINT COLOR TEMP use the buttons follow the same procedure to set the others values Note 2 BRIGHTNESS...

Page 11: ...ition Step 3 Press button again to setting the CENTER MARK ON OFF on the screen Step 4 Press button moving to the SAFETY ZONE setting Step 6 Press button to setting the SAFETY ZONE range 80 90 or OFF...

Page 12: ...s button to setting the OSD display on screen time value from 5 60 SECONDS Step 5 Press button to save your setting and return to the SETUP setting menu Step 6 Press button move to the OSD BLENDING se...

Page 13: ...g position Step 3 Press button again which will return all the settings of the monitor to the factory defaults Step 4 Press button into the ADVANCED setting mode Step 5 Press button move to the VERSIO...

Page 14: ...Play Back In order to activate Slow Motion Playback while HRS 30 is playing a video clip press key and then press Soft Keys to slow forward slow rewind of 1 3X 1 6X 1 9X 1 12X Note IF the format of t...

Page 15: ...Fast Rewind Button During Fast Rewind press Soft Keys to select rewind speed x1 x3 x6 x9 and x12 Record Button To start recording press the Record Button and Play Button simultaneously Note1 Unit wil...

Page 16: ...or total length of CLIP Eight channel audio meters 1357 Channels 1 3 5 7 8642 Channels 2 4 6 8 Record Pause FWD REV Play and Stop indication 1X 3X 6X 9X 12X 1 2X 1 3X 1 6X 1 9X 1 12X Fast Forward or...

Page 17: ...n into the TOOL menu Step 3 Press the ENTER button again to see the FIRMWARE VRESION Step 4 Press the MENU button exit the FIRMWARE VERSION mode MENU TOOL SETUP STATUS UP DOWN TOOL FIRMWARE VERSION ER...

Page 18: ...to the ERASE THIS BIN menu Step 4 Press the ENTER button into the ERASE THIS BIN menu Step 5 Press the UP button move to the ERASE options position Step 6 Press the ENTER button to erase the selected...

Page 19: ...ress the UP button move to the FORMAT options position Step 6 Press the ENTER button to format the selected bin The bin duration will return to 00 00 00 00 After a few seconds the HRS 30 will return t...

Page 20: ...Step 3 Move out the 2 5 HDD from HRS 30 Step 4 Connect it to your computer Step 5 Copy the firmware update file flash bin to the root directory of 2 5 HDD Step 6 Safe remove the 2 5 HDD cable Step 7...

Page 21: ...ress the MENU button into the menu mode Step 2 Press the ENTER button into the TOOL menu Step 3 Press the UP button DOWN button select to the UN LOCK MEDIA menu Step 4 Press the ENTER button to unlock...

Page 22: ...ENTER button into the SETUP menu Step 4 Press the ENTER button into the REC SETUP menu MENU TOOL SETUP STATUS UP DOWN SETUP REC SETUP PLAY SETUP SYSTEM SETUP SAVE SETUP RECALL SETUP UP DOWN RECORD SE...

Page 23: ...RATIO TIME LAPSE PWR ON AUTO REC menu HD ENCODE FORMAT Setting the HD video encode format to 100M I FRAME ONLY or 125M I FRAME ONLY encode Intra frame only SD ENCODE FORMAT Setting the SD video encod...

Page 24: ...E LAPSE Setting the TIME LAPSE ON OFF Setting the TIME LAPSE FRAME RATE 1 frame 1 sec Setting the TIME LAPSE CYCLE y frame per x sec PWR ON AUTO RECORD Setting the POWER ON AUTO RECORDS mode on off NU...

Page 25: ...AY SETUP menu Step 6 Press the UP button DOWN button to select the LOOP PLAY POWER ON AUTO PLAY GEN LOCK PLAY CENTRIC menu Step 7 Press the ENTER button into the LOOP PLAY POWER ON AUTO PLAY GEN LOCK...

Page 26: ...OP PLAY mode is on HRS 30 will loop play CLIP file When LOOP PLAY mode is off HRS 30 will pause at the end of the CLIP BIN When LOOP PLAY mode is on HRS 30 will play all CLIPs of BIN file until it rea...

Page 27: ...enu Step 5 Press the ENTER button into the SYSTEM SETUP menu Step 6 Press the UP button DOWN button to select the TIMECODE REMOTE CONTROL BUZZER LONG TIME STOP DATE TIME SETUP menu Step 7 Press the EN...

Page 28: ...the REMOTE CONTROL rear panel RJ 45 connector function on off Note When this function enable other button function will disable BUZZER Setting the BUZZER function on off This buzzer will be activated...

Page 29: ...the HOLD 1 SECONDS TO STOP function on off DATE TIME SETUP Into the DATE TIME SETUP mode use the UP DOWN Fwd Rew buttons to setting the DATE TIME LONG TIME STOP ON OFF UP DOWN DATE TIME DATE 2013 01 0...

Page 30: ...nu Step 4 Press the UP button DOWN button select to the SAVE SETUP menu Step 5 Press the ENTER button into the SAVE ETUP menu Step 6 Press the UP button DOWN button to select save the USER 1 or USER 2...

Page 31: ...enu Step 5 Press the ENTER button into the RECALL SETUP menu Step 6 Press the UP button DOWN button to select recall USER 1 USER 2 or FACTORY DEFAULT file Step 7 Press the ENTER button to confirm your...

Page 32: ...button to see the FILE FORMAT BIN FILE LENGTH RECORD SETUP INPUT TIME CODE GENLOCK status MENU TOOL SETUP STATUS UP DOWN FILE FORMAT 1080 59 94I MXF 50M 4 2 2 LONG GOP 4 CHANNEL AUDIO BIN FILE LENGTH...

Page 33: ...ble Rack Step 1 Put the 2 5 HDD into the rack Step 2 Assemble four screws to fasten 2 5 HDD on the rack Step 3 Push the button to Left side and then push the rack into HRS 30 Step 4 Push the button to...

Page 34: ...its rear this can provide power to the HDD as well as allow the exchange of data Step 4 Connect the supplied SATA USB cable to the HDD drive caddy and connect the double lead to your PC or Laptop Plea...

Page 35: ...le to the HDD drive caddy and connect the double lead to your MAC Please connect two USB to your MAC Step 2 A Datavideo drive will appear on the desktop Step 3 If you access the drive you will see the...

Page 36: ...t source and make sure the signal is normal Q 6 Why buttons on the recorder panel are not operational when HRS 30 REMOTE CONTROL function is enabled Ans REMOTE CONTROL function and Recorder Operation...

Page 37: ...ommand SETUP_DMA_MODE timeout 7C receive status error after sending ATA command then retry sending ATA command 3 times and still receive status error 7F DISK keep busy more than 3 seconds after sendin...

Page 38: ...HD 10h 01h 11h LGOP 10 25 35 50 65 120 10h 01h 11h I only 100 125 10h 01h 11h 02h F3h 07h xx csum Bit Rate Select SD 10h 01h 11h LGOP 8 15 30 50 10h 01h 11h I only 25 50 10h 01h 11h 02h F3h 09h xx csu...

Page 39: ...8h F5h 17h 7 bytes Set Real Time Clock 08 F5 17 Year 1 Year 0 Month Day Hour Min Sec GMT csum 3 Return Data 10h 01h ACK 10h 01h csum When a command from the CONTROLLER is received normally the DEVICE...

Page 40: ...3h 1Dh 51h 21h 23h 1Dh 51h Note 1 2X is for I frame only 5 Vender Unique System Control 21h F1h 02h 14h Next Clip 21h F2h 02h 15h Previous Clip Note Only can do clip change at play pause 6 Firmware Re...

Page 41: ...4 Bit 3 Bit 2 Bit 1 Bit 0 0 Busy 0 Cartridge Out 0 0 Wrong Media 0 Local enable 1 0 0 Stop Rewind Fast Forward Record Play 2 0 0 0 0 Reverse Still Pause 0 3 0 0 0 0 0 0 Video in 0 4 1 0 0 0 1 0 0 0 5...

Page 42: ...42 Example HRS 30 Set Up Type A...

Page 43: ...43 Type B...

Page 44: ...44 RJ 45 Pin Define This pin define is use for RJ 45 connect to RS 232 connector Dimensions All measurements in millimetres mm...

Page 45: ...80x720 2 25Mbps 4 2 0 1440x1080 1280x720 3 35Mbps 4 2 2 1920x1080 1280x720 4 50Mbps 4 2 2 1920x1080 1280x720 5 65Mbps 4 2 2 1920x1080 1280x720 6 120Mbps 4 2 2 1920x1080 1280x720 MPEG2 Long GOP SD 1 8M...

Page 46: ...5mm jack for external speaker Speakers 2 x 3W Earphone 3 5mm standard interface Embedded Audio SDI Input Output 8CH HDMI Output 8CH Time Code 1 x Input BNC 1 x Output BNC Sync Reference 1 x Input BNC...

Page 47: ...47 Notes...

Page 48: ...48 Notes...

Page 49: ...49 Notes...

Page 50: ...91 0120 2427338 E mail sales datavideo in Tel 91 0120 2427337 A 132 Sec 63 Noida 201307 India India Noida Datavideo India Kochi Tel 91 4844 025336 Fax 91 4844 047696 2nd Floor North Wing Govardhan Bui...

Reviews: