background image

Connections & Controls


Front Panel 


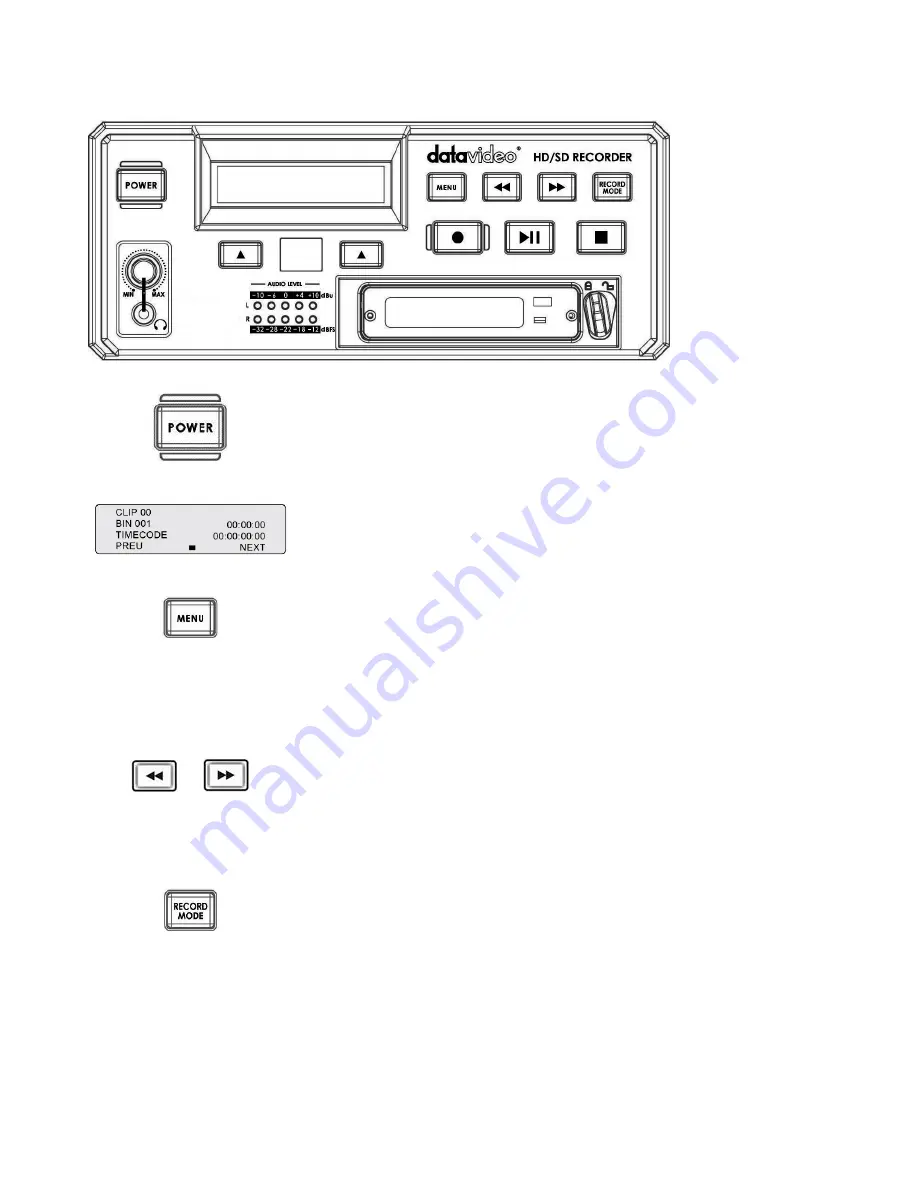
Power On / Off Button. This is a soft power on / off button which powers the unit 
on from standby; the main power on / off switch is on the rear. 


Display Panel. Shows bin number, time code, audio meters or the Menu Display. 


Menu Button. This calls up the menu display which is navigated using the 
Previous / Next Buttons. 


Note1:

 In play state, press MENU button, the display panel will show the 

information of the playing file. 


Note2:

 In record 

state

, press MENU button, display panel will show the 

information of recording file. 


Fwd / Rew Buttons. In playback 

state

, these buttons will operate as Fast Forward 

and Rewind Buttons. 
 
While the unit is playing, press Fwd or Rew button and then press Previous / Next 
Buttons; If pressed multiple times, HDR-60 will fast play forward or rewind in x1, 
x3, x6, x9, and x12. 


Record Mode Button. When you want to record press the Record Mode button 
first. 
 
In 

Record Mode

 (Record Mode button light on), press play button, HDR-60 must 

be 

internal conversion

 to play state; wait 3~5 seconds.


In 

Play Mode 

(Record Mode button light off), press play button, HDR-60 is in play 

state, HDR-60 can play the file immediately. 

 
Note:

 In Record Mode playing file, if HDR-60 SDI source lost signal, the playing 

file’s video and audio will be not synchronized, so please play file in the 
Play Mode.


Summary of Contents for HDR-60

Page 1: ......

Page 2: ...FIRMWARE REVISION 7 ERASE THIS BIN 7 FORMAT MEDIA 7 UPRGRADE FIRMWARE 7 UN LOCK MEDIA 8 SETUP 9 RECORD SETUP 9 PLAY SETUP 10 SYSTEM SETUP 11 SAVE SETUP 12 RECALL SETUP 12 STATUS 12 How to Assemble 2 5...

Page 3: ...th Datavideo within 30 days of purchase For information on how to register please visit www datavideo tek com or contact your local Datavideo office or authorized Distributors Certain parts with limit...

Page 4: ...ons In playback state these buttons will operate as Fast Forward and Rewind Buttons While the unit is playing press Fwd or Rew button and then press Previous Next Buttons If pressed multiple times HDR...

Page 5: ...lips how can I get direct access to clip 3 or 4 without having to play clip 1 and 2 first You can do following 1 Play from clip 1 2 Pause and use combination keys to skip to next clip Press and hold p...

Page 6: ...de will through to output In PLAY state the output time code source is from the HDR 60 playing file HDMI Out Ports Ports for connecting to HDMI external devices HD SDI input output and pass through ou...

Page 7: ...THIS BIN menu Press the ENTER button into the ERASE THIS BIN menu Press the ENTER button to erase the selected bin The bin duration will return to 00 00 00 00 FORMAT MEDIA Format Media will remove al...

Page 8: ...NU button into the menu mode Press the ENTER button into the TOOL menu Press the NEXT button three times to select the UPRGRADE FIRMWARE menu Press the ENTER button to upgrade the HDR 60 firmware NB T...

Page 9: ...o encode format to LONG GOP or I FRAME ONLY encode Intra frame only SET SD ENCODE FORMAT Setting the SD video encode format to LONG GOP or I FRAME ONLY encode Intra frame only SET REC FILE TYPE Settin...

Page 10: ...f POWER ON AUTO PLAY Setting the POWER ON AUTO PLAY mode on off SET GEN LOCK Setting the GEN LOCK mode on off Note Genlock is only available in play mode SET PLAY CENTRIC Setting the PLAY CENTRIC mode...

Page 11: ...UDIO MONITOR display channel 1 2 3 4 5 6 or 7 8 SET AUDIO SOURCE Setting the AUDIO SOURCE CH1 2 from SDI or XLR analog input SET TIMECODE Setting the TIME CODE running at INTERNAL RCA RUN INTERNAL FRE...

Page 12: ...button into the menu mode Press the NEXT button into the SETUP menu Press the ENTER button into the SETUP menu Press the NEXT button four times to select the RECALL SETUP menu Press the ENTER button i...

Page 13: ...e 2 5 removable HDD rack rear cover then pull out the PCB 2 Assemble four screws to fasten 2 5 HDD on PCB 3 Push PCB into the HDD rack 4 Assemble two screws to fasten HD rack rear cover 5 Push 2 5 HDD...

Page 14: ...HDR 60 70 GPI Pin Define 14...

Page 15: ...2h F3h 02h 00h F7h Play Mode 10h 01h 11h 02h F3h 02h 01h F8h Recorder Mode 10h 01h 11h 02h F3h 04h xx csum Audio Input Select 10h 01h 11h 02h F3h 04h 00h F9h Audio Input SDI 10h 01h 11h 02h F3h 04h 01...

Page 16: ...ived normally the DEVICE returns this command as acknowledgment 11h 12h NAK 11h 12h Data byte csum When a communication error is detected or an undefined COMMAND is received the DEVICE returns this co...

Page 17: ...te 1 FW Minor Byte 2 Control CMD Major Byte 3 Control CMD Minor Byte 4 Bootloader Minor Byte 5 0x00 Byte 6 0x00 Firmware Revision Sense Codec Byte 0 Codec Bootloader Major Byte 1 Codec Bootloader Mino...

Page 18: ...6 BIN5 BIN4 BIN3 BIN2 BIN1 BIN0 11 File Length byte 0 FL0 FL0 FL0 FL0 FL0 FL0 FL0 12 Length Byte 1 FL1 FL1 FL1 FL1 FL1 FL1 FL1 13 Length Byte 2 FL2 FL2 FL2 FL2 FL2 FL2 FL2 14 Length Byte 3 FL3 FL3 FL3...

Page 19: ...Level signal Video Format SD 50 59 94 Hz HD 720P 50 59 94 60 1080i 50 59 94 60 1080P 23 976 24 Color Format 4 2 0 4 2 2 Codec MPEG2 Long GOP MPEG2 Long GOP HD 1 10Mbps 4 2 0 1440x1080 1280x720 2 25Mb...

Page 20: ...20...

Reviews: