background image


26

DV File Converter Software 


DV File Converter is an easy to use utility for converting native DV files to the file format best suited to your 
NLE system. You will find that it is quicker and more versatile than the on board utility in the DN-300, and 
can create the finished files directly on your PC, so it requires no additional disk space on the DN-300. 
  
It is a PC based program with minimum system requirements: 
 

Intel Pentium III 500 Mhz processor or faster  
Windows 98/ME/2000/XP  
DirectX  
128MB of RAM  

 
You can find more in-depth operating instructions for 

DV File Converter

 under the “About” tab of the program. 


Installation 


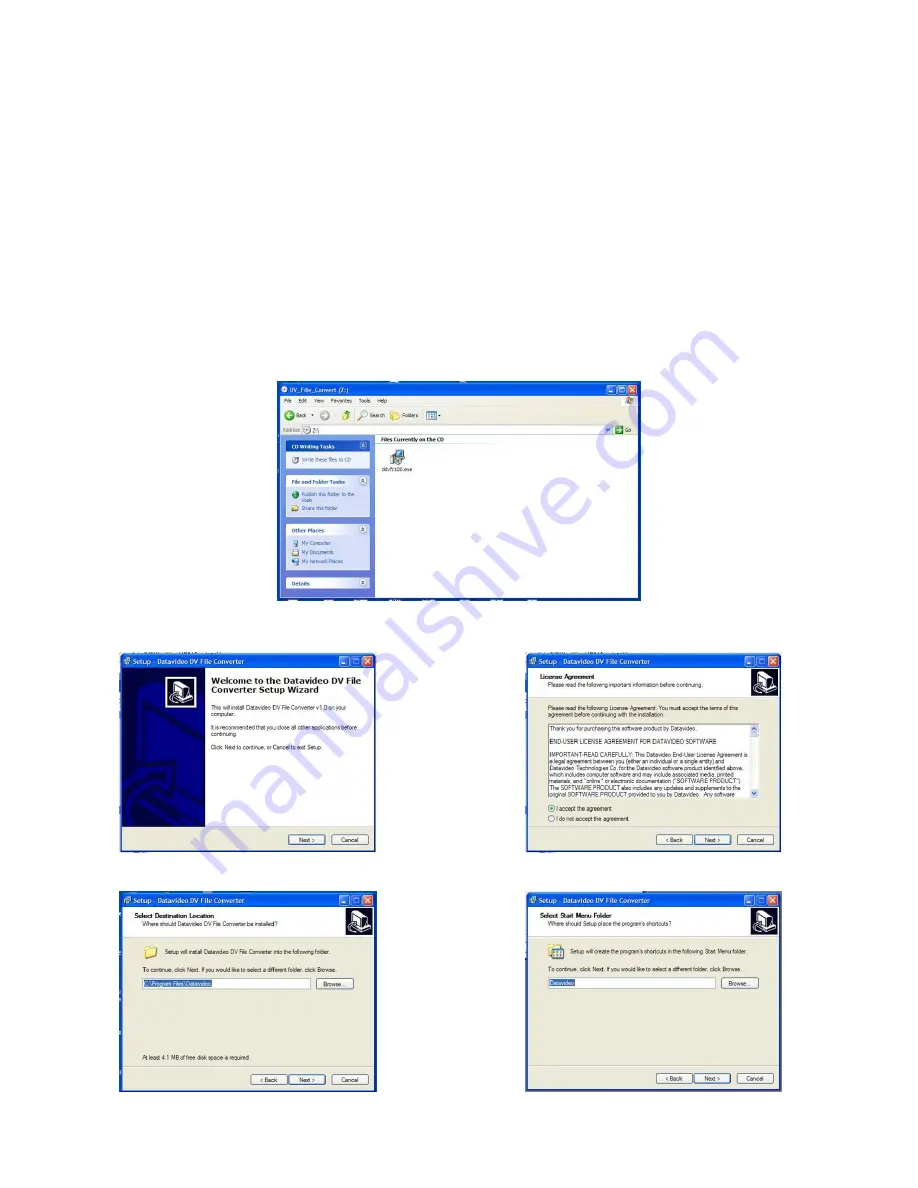
Insert the DV File Converter Disk into your PC and find the file ddvfc100.exe 


Double click on ddvfc100.exe and follow the on screen prompts to install the program.


Summary of Contents for DN-300

Page 1: ...DN 300 HDV DV Hard Disk Recorder Instruction Manual www datavideo tek com Rev 040909 ...

Page 2: ...DV Track 19 Operation with a HDV Camcorder Deck 20 Recording a HDV M2T track 20 Playing back an M2T HDV Track 21 Operation with an Analogue Video Source 21 Recording a DV track from an Analogue input 21 Connecting to a Computer 22 Connecting to a PC 23 Connecting to a MAC 25 DV File Converter Software 26 Installation 26 Registration 27 Operation 28 RS 422 Command Set Protocol 31 Interface Overview...

Page 3: ... cord do not exceed the extension cord s rating 10 Make sure that the total amperes of all the units that are plugged into a single wall outlet do not exceed 15 amperes 11 Never push objects of any kind into this unit through the cabinet ventilation slots as they may touch dangerous voltage points or short out parts that could result in risk of fire or electric shock Never spill liquid of any kind...

Page 4: ... manner other than that specified by Datavideo or has been subjected to abuse or modification will be repaired for time and material charges at the Buyer s expense This warranty does not affect your statutory rights within the Country of purchase Disposal For EU Customers only WEEE Marking This symbol on the product indicates that it will not be treated as household waste It must be handed over to...

Page 5: ...om HDV Camcorders m2t or DV25 from DV or Analogue video sources dv The DN 300 can be used as an external firewire drive from which files can be dragged and dropped to a PC or MAC The DN 300 has a built in utility to convert dv files to avi files and is also supplied with DV file converter software to create other file formats such Quicktime Features Stand Alone DV HDV Hard Drive Recorder Player Re...

Page 6: ... options Stop Button Stops playback or record Play Pause Button Starts playback of a track or pauses playback of a track status will be displayed on the Display Panel Also Starts Pauses a recording when unit is in Record mode Analog Input Button Switches the DN 300 to Analog Input Component YUV S Video Y C Composite CVBS Analog Inputs can only be recorded in DV formats See Operation with an analog...

Page 7: ... connected to the output for simple record playback monitoring of DV recordings See Video Input Source Menu for more details N B Analogue Inputs Outputs are only suitable for RAW DV DV operation It is not possible to record or playback M2T HDV files via the Analogue Inputs Outputs The GPI socket can be used for simple external control The DN 300 can accept pulse or level trigger inputs which can t...

Page 8: ...Y Sets the DN 300 to loop play a track the track will continuously loop until stopped RECORD FORMATS Sets the DN 300 record format to dv file for DV25 and Analogue input recordings or m2t for HDV recording See Record Formats Menu for more details FREE SPACE Displays how much HDD space is available on the DN 300 TOTAL SPACE Displays the total available HDD storage on the DN 300 INPUT VIDEO STANDARD...

Page 9: ...nly necessary if your DN 300 is not performing correctly or you install a new HDD A result txt file is created in the root directory of the HDD this can be viewed from a PC FIRMWARE VERSION Display the Rev No and Firmware Version of the DN 300 HDD Mode Menu NB Although your PC MAC may see the DN 300 as an AVC compliant DV Device it is not intended to be operated as such Connect the DN 300 IEEE 139...

Page 10: ...t your HDV Camcorder Deck to Recorder Mode then the DN 300 files can then be played back to the HDV Camcorder viewfinder monitor via an IEEE 1394 connection To select the Record Format Press the Menu Button to enter menu mode Press the FWD Button to navigate the menus until RECORD FORMATS is displayed Press the Next Button to enter the RECORD FORMAT set up menu Press the FWD Button to select eithe...

Page 11: ...only used in the U S A and Canada and 0 ire in far eastern countries such as Japan If you are unsure which to set please consult your dealer To select the NTSC Level Press the Menu Button to enter menu mode Press the FWD Button to navigate the menus until NTSC SETUP LEVEL is displayed Press the Next Button to enter the NTSC level set up menu Press the FWD Button to select either 0 IRE or 7 5 IRE T...

Page 12: ...PUT SOURCE is displayed Press the Next Button to enter the VIDEO INPUT SOURCE set up menu Press the FWD Button to select either Composite Component or S Video To confirm your selection and exit the menu press the Next button Then press the Menu Button to leave menu mode GPI Mode Functions Menus The DN 300 can be set to receive either pulse or level GPI triggers which can be set to activate Play Pa...

Page 13: ...ther Pulse Trigger or Level Trigger To confirm your selection and exit the menu press the Next button Then press the Menu Button to leave menu mode Set Date Time Menu To set the Date Time on the DN 300 Press the Menu Button to enter menu mode Press the REW Button to navigate the menus until SET DATE TIME is displayed Press the Next Button to enter the SET Date Time menu You will see a flashing cur...

Page 14: ...nu DV25 devices can sometimes conflict with one another it is not a common occurrence but it can happen When conflicts occur one DV device may not recognize the other or the output from one is switched off by the other Set Full Syt will overcome conflicts of this type so if you do have a conflict with another DV device switch Set Full Syt to Enable Press the Menu Button and use the REW Button to n...

Page 15: ... disk After a few seconds the DN 300 will reboot and the display will return to normal Erase Track Menu Erase Track is used for deleting individual tracks from the DN 300 Press the Menu Button to enter menu mode Press the REW Button to navigate the menus until ERASE TRACK is displayed Press the Next Button to enter the ERASE TRACK menu Use the FWD or REW Button to select the track that you want to...

Page 16: ...t 60 real time i e A 1 hour DV track will take around 36 minutes to convert to an AVI file N B You can convert DV files from the DN 300 faster using the DV File Converter program that is supplied on a CD with the DN 300 see page 27 for more details Press the Menu Button to enter menu mode Press the REW Button to navigate the menus until CONVERT DV TO AVI is displayed Press the Next Button to enter...

Page 17: ...nnel 63 you cannot playback a track through the DN 300 s analogue outputs until the connected external DV device is switched off or disconnected Press the Menu Button to enter menu mode Press the REW Button to navigate the menus until SET OUTPUT CHANNEL is displayed Press the Next Button to enter the SET OUTPUT CHANNEL menu Use FWD or REW to change the output channel number in this case we have se...

Page 18: ... the IEEE 1394 cable Rear Mounted DV 6 Pin Ports Front mounted DV 4 Pin Port Use the Next Previous Buttons to select an empty track from the DN 300 track list one that shows a duration of 00 00 00 00 in the LCD display Not suitable Track has been recorded Suitable Track is empty Press both the Record and Play Pause Buttons simultaneously and the DN 300 should start recording The counter should sta...

Page 19: ...r to recorder edit mode so that it receives a signal via the DV port Please consult your camcorder instruction manual for more details N B To play a track from the DN 300 to a DV Device the output channel must be set to 63 see pg17 Use the Previous Next Buttons to select the track you want to play and then press the Play II Button It is also possible to set the DN 300 to loop play In loop play the...

Page 20: ...l should appear If it does not start recording check the following There is a HDV signal from the HDV device Some camcorders have options to put out DV or HDV via their IEEE 1394 iLink ports make sure the output is set to HDV The Analogue Input Button on the DN 300 is not illuminated The DN 300 Record Format is set to M2T HDV See Record Formats Menu The track you have selected on the DN 300 is emp...

Page 21: ...utton to enter the setup loop play menu and then press the FWD Button to select ENABLE Press the Next Button to select SET and then press the Menu Button to return to track display When you press play the selected track will start playing and will loop until the Stop Button is pressed To cancel loop playback follow the above procedure but select disable instead of enable Operation with an Analogue...

Page 22: ...he same track release Pause by pressing the Play Pause button again The counter should start counting again and the REC symbol should return N B It is not possible to stop recording and then restart on the same track once a track has been stopped you must select a new empty track from the DN 300 to start recording again For details of playback please see Playing back a DV Track page 19 Connecting ...

Page 23: ...Next Button to select ENTER and the display will show the HDD Enable Confirmation Screen Press the Next Button again to confirm after a few seconds HDD Mode will be enabled The PC should recognise that an external IEEE 1394 Firewire HDD has been connected Select Open Folder to View Files The drive should also appear in My Computer as an internal HDD Once connected the DN 300 can be used just like ...

Page 24: ...BP2 Device and click on Stop A second dialog box will appear Select Datavideo HDD IEEE SBP2 Device and click on OK After a few seconds a Safe To Remove Hardware message should appear above the Taskbar You can then disconnect the DN 300 Once un mounted from the PC the DN 300 display will leave HDD Mode and return to Track Display ...

Page 25: ...e Next Button to select ENTER and the display will show the HDD Enable Confirmation Screen Press the Next Button again to confirm after a few seconds HDD Mode will be enabled The MAC should see the DN 300 as a HDD and the files will appear in the root directory of the drive You can select the required files and drag and drop them to the required destination To un mount the DN 300 from your MAC eit...

Page 26: ...n your PC so it requires no additional disk space on the DN 300 It is a PC based program with minimum system requirements Intel Pentium III 500 Mhz processor or faster Windows 98 ME 2000 XP DirectX 128MB of RAM You can find more in depth operating instructions for DV File Converter under the About tab of the program Installation Insert the DV File Converter Disk into your PC and find the file ddvf...

Page 27: ...27 Registration Once installed open the program and select the Registration Tab Enter your name organisation and key the key can be found on the disc or disc sleeve and then click on the Register button ...

Page 28: ... the operation button to select the required file type In this example we have chosen QuickTime Now click on Output Folder and select the destination to which you want the files to be delivered In this example we have chosen our F Media Folder ...

Page 29: ... it is drive G Use Shift Left Mouse Click to highlight all the files that you want to convert then click on Open The selected files will appear in the Files window Click on Start Processing to start the conversion You will see the progress in the Files Window The finished files will be delivered to your destination folder ...

Page 30: ...o convert them to a different file format in the future N B With certain file formats the flagging of 16 9 Widescreen Aspect Ratio needs to be manually corrected Although file converter delivers correctly proportioned 16 9 files some programs do not recognise that they are 16 9 and will display them as 4 3 Most NLE applications allow you to set the aspect ratio of a file manually and once set to 1...

Page 31: ... main groups which indicates the function and direction of commands as follows CMD 1 Function Initiator 0 System Control Controller 1 System Control Return Device DN 300 2 Transport Control Controller 4 Preset And Select Control Controller 6 Sense Request Controller 7 Sense Return Device DN 300 Data Count DATA COUNT indicates the number of data words attached to the command 0 to FH CMD 2 CMD 2 is ...

Page 32: ...OMMAND blocks to a DEVICE DN 300 prior to response to a previous COMMAND block 3 The CONTROLLER must transmit of bytes in a COMMAND block for with intervals less than 10 milliseconds If a DEVICE DN 300 detects an interruption of a byte in a COMMAND block that exceeds 10 milliseconds it executes a TIME OUT error sequence voids the receiving COMMAND block and transmit a NAK TIME OUT 4 When a DEVICE ...

Page 33: ...us Sense 7xh 20h Status Data Detailed Description of Commands without Checksum byte 00h 11h DEVICE TYPE REQUEST 20h 00h STOP 20h 01h PLAY 20h 02h RECORD 20h 10h FAST FORWARD 2xh 13h SHUTTLE FORWARD 21h 13h 00h PAUSE 20h 20h FAST REWIND 2xh 23h SHUTTLE REWIND 40h 50h INREASE TRACK NUMBER 40h 51h DECREASE TRACK NUMBER 41h 52h nnh SET TRACK NUMBER nn Track Number eg 41h 52h 01h 94h Select Track 1 eg ...

Page 34: ...ions of the DN 300 used as DEVICE When the DEVICE receives this command it attaches 2 bytes specification data to 12h 11h DEVICE TYPE and sends the information to the CONTROLLER NTSC 12h 11h 20h 41h PAL 12h 11h 21h 41h Status Return Data BIT 7 BIT 6 BIT 5 BIT 4 BIT 3 BIT 2 BIT 1 BIT 0 Data 0 Busy Local Enable Data 1 Standby On Stop Rewind Fast Forward Record Play Data 2 Shuttle Tape Reverse Still ...

Page 35: ...Component BNC Y R Y B Y 75Ω Bandwidth 5 0 mHz Noise Ratio 50dB DA DP 3 3 Digital Audio Embedded 2 Ch 16 bit 48 kHz or 4 Ch 12 bit 32 kHz via IEEE1394 2 Ch 16 bit 48 kHz via Analogue Input Analogue Audio Unbalanced Audio In Out 10 dB Maximum Phono RCA plugs Bandwidth 20 20 kHz Noise Ratio 65dB THD 0 3 RS 422 GPI Control Interface Sony Standard RS 422 Interface GPI via 3 5mm Jack Pulse or Level Oper...

Page 36: ...s Europe BV Tel 31 30 261 96 56 Fax 31 30 261 96 57 E Mail service datavideo nl Datavideo UK Limited Tel 44 1457 851 000 Fax 44 1457 850 964 E Mail sales datavideo co uk Datavideo Technologies Co Ltd Tel 886 2 8227 2888 Fax 886 2 8227 2777 E mail service datavideo com tw Datavideo Technologies China Co Ltd Tel 86 21 5603 6599 Fax 86 21 5603 6770 E mail service datavideo cn Datavideo Technologies S...

Reviews: