background image


Connecting BB-1 to dv Cloud


You must first you must connect each BB-1 unit to your dv Cloud server. 

1.


Connect the built in Ethernet port of the BB-1 into your network / router, by default the BB-1 will obtain it IP 
address automatically using DHCP. 

2.


Connect the USB to Ethernet adapter to the USB port of the BB-1 and connect your PC/MAC to the adapter 
via ethernet. 

3.


Power on the BB-1. 

4.


You PC/MAC will obtain an IP address in the 172.16.2.x range automatically. 

5.


Open a web browser and navigate to 172.16.2.1. 

6.


Login with the username ‘admin’ and password ‘admin’.  

Note: If you forget the “username” and “password” of the BB-1, please use a USB mouse to connect to the USB 
interface of the BB-1, and then please press the left button and the right button of your USB mouse 
simultaneously for 10 seconds to restore the BB-1 to its factory default settings. This reset to default function by 
using the USB mouse allows you to reset the “Auth Key”, “dv Cloud IP”, “username” and “password” to factory 
default values.    
7.


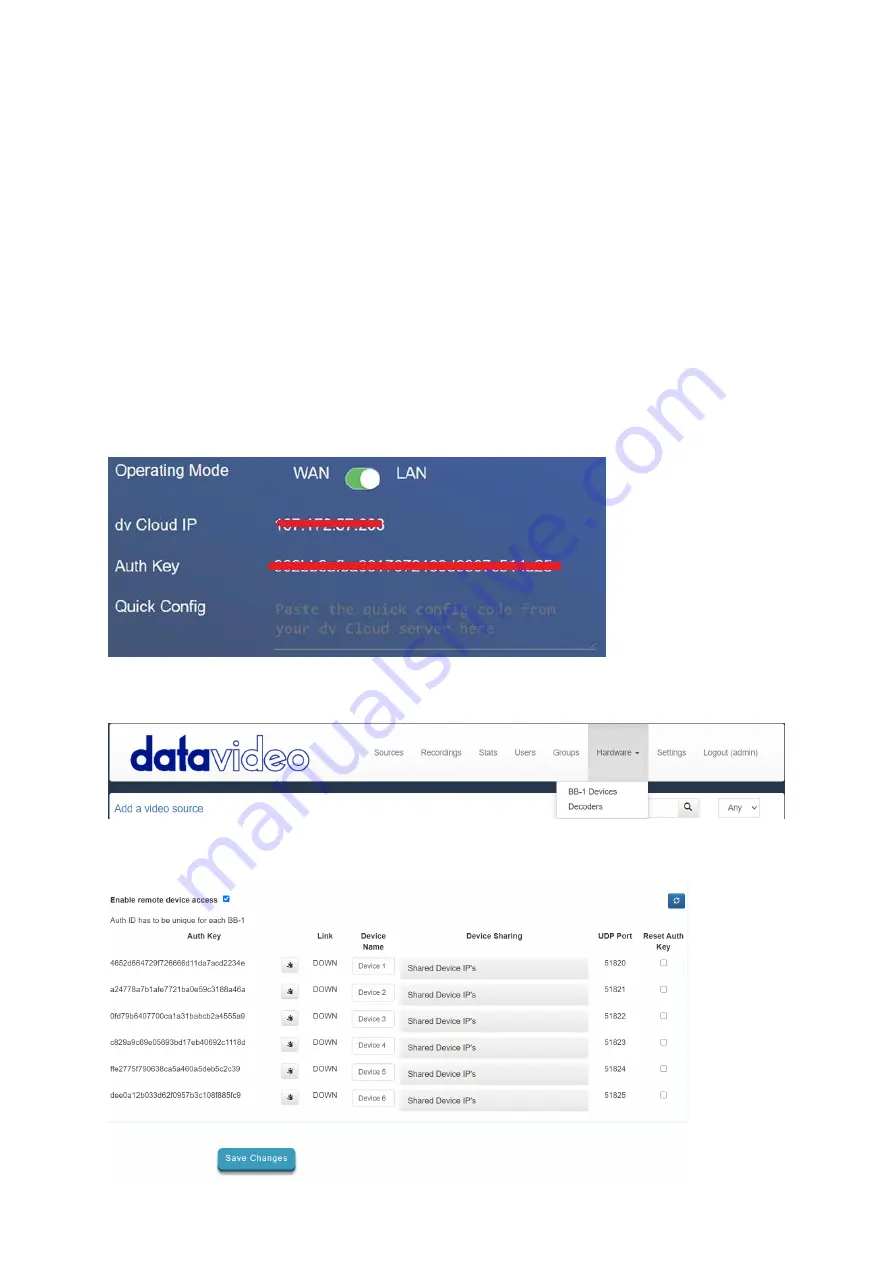
Click the ‘Cloud Setup’ tab, you will see the ‘Quick Config’ field shown below. 


8.


Open a new tab or web browser window and login to your dv Cloud server. 

9.


Select `BB-1 Devices’ from the hardware menu. 


10.


You will see the screen below, dv Cloud Professional supports up to six BB-1 units, while the Essentials plan 
supports two BB-1 units. Each BB-1 will connect to dv Cloud using a unique ‘Auth Key’. 


Summary of Contents for BB-1

Page 1: ...BB 1 DVCLOUD REMOTE DEVICE CONTROL Instruction Manual...

Page 2: ...l is intended as a guide only At all times Datavideo Technologies will try to give correct complete and suitable information However Datavideo Technologies cannot exclude that some information in this...

Page 3: ...this unit where the power cord will be walked on rolled over or otherwise stressed 9 If an extension cord must be used with this unit make sure that the total of the ampere ratings on the products pl...

Page 4: ...andard warranty providing the product is registered with Datavideo within 30 days of purchase Certain parts with limited lifetime expectancy such as LCD panels DVD drives Hard Drive Solid State Drive...

Page 5: ...dv Cloud A dv Cloud subscription is required in order for your BB 1 remote device control kit to work two BB 1 units can be connected to a single dv Cloud Essentials server six BB 1 units can be conn...

Page 6: ...button 8 Enter your Personal Information Billing Address and Account Security details or if you have an existing account click Already Registered 9 If creating a new account choose a password 10 Ente...

Page 7: ...f Service and click the Complete Order button 12 You order is complete 13 You will receive an order confirmation via email as shown below 14 Finally you will receive the email below confirming your st...

Page 8: ...8...

Page 9: ...me and password of the BB 1 please use a USB mouse to connect to the USB interface of the BB 1 and then please press the left button and the right button of your USB mouse simultaneously for 10 second...

Page 10: ...es it to use the auth key on another device you must reset it 12 13 Return to the BB 1 web UI and paste into the Quick Config field 14 Save the settings 15 After approximately 10 seconds the status on...

Page 11: ...OK This Auth key is already locked to another unit Each auth key is locked to the serial number of the first BB 1 that uses it to use the auth key on another device you must reset it on dvcloud UDP Po...

Page 12: ...ice simply use an Ethernet switch Each BB 1 device can control up to five devices This mode is ideal for new devices that will be setup for remote control for example portable flyaway kits Example con...

Page 13: ...ation one and the BB 1 called Device 2 is connected to the router at location two 1 At the location one connect the first BB 1 to your internet router using the built in Ethernet WAN port and to the l...

Page 14: ...ample we will assume the camera at location two has a local IP of 192 168 1 12 Enter the IP 192 168 1 12 as shown below 9 Optionally give the device a friendly name such as Location 2 PTZ 1 10 Once yo...

Page 15: ...sure the camera is to DHCP automatic IP mode 3 Ensure the second BB 1 at location two is set to LAN operation mode 4 Open a web browser and login to your dv Cloud server 5 Select BB 1 Devices from the...

Page 16: ...to the controller Using the PTZ View Assist app The procedure for using the PTZ View Assist app on IOS or Android is the same for both the LAN mode and WAN mode examples above You will need an Etherne...

Page 17: ...age displayed at the top of the screen to restart the service 7 We are now ready to configure the PTC 140 encoder Stream from the PTC 140 to dvCloud using SRT 1 Access the webUI of the PRC 140 camera...

Page 18: ...uilt in SRT server listening on port 9000 to pull the SRT stream into any SRT capable software player or decoder use the URL below replacing 10 34 1 1 with the remote IP of your PTC 140 SRT 10 34 1 1...

Page 19: ...der and dvCloud NOTE Most are recovered by retransmission at the source and so do not necessarily result in any artifacts Receive Rate The total received data rate Audio Video Total packets Received L...

Page 20: ...r distributor or the service center No Problems Solutions 1 How to restore the username and password for logging into the BB 1 web UI to the factory default values If you forget the username and passw...

Page 21: ...21 Note...

Page 22: ...22 Note...

Page 23: ...23 Note...

Page 24: ...Aug 23 2021 Version E1 Datavideo Technologies Co Ltd All rights reserved 2020 www datavideo com product BB 1...

Reviews: