Dataprobe iBoot-G2 Instructions Manual Download Page 6


V110120E 

iBoot-G2   

Page 6 


5. Initial 

Configuration 

 
The Device Management Utility (DMU), available 
online at 

http://dataprobe.com/support/iboot.html

provides the easiest means to find and configure 
your iBoot-G2 for use.  It can discover all the iBoots 
on your network, display the current IP address of 
each, and allow setting of any valid IP address.  

Install and run the Device Management Utility:  


1. Download 

DMUSetup.exe 

2. Run 

DMUSetup.exe 

3.  Run the DMU  


Note:  The IP address can only be set within the first 
two minutes of powering up the iBoot-G2.  The Setup 
Utility will only work with iBoots on the same local 
subnets as the PC. 
 
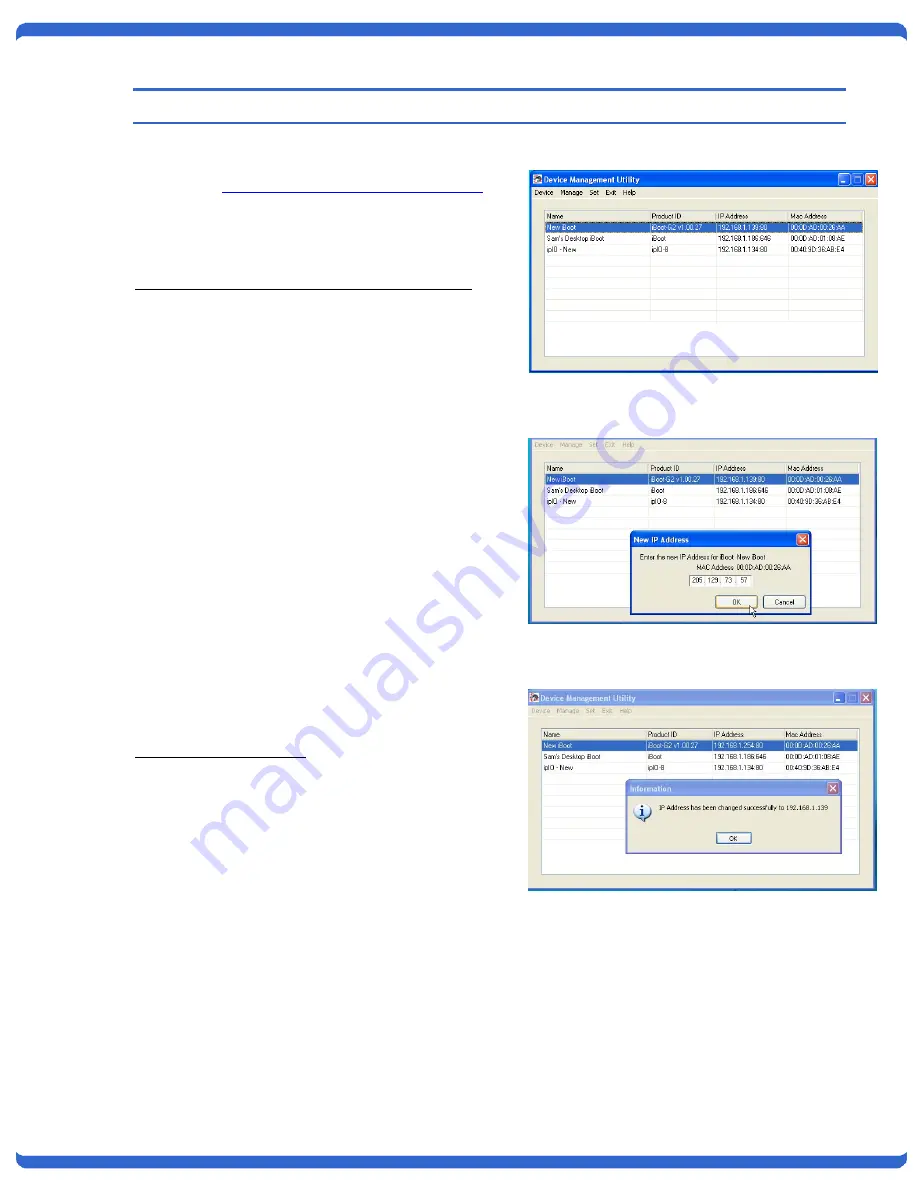
Once the DMU is run, click on Device | Discover to 
display all the iBoots on your network.  The DMU will 
display the Location Name of the iBoot, The product 
ID and Version Number, The current IP Address, and 
the MAC Address.  Factory defaulted iBoots will 
display with the name 

New iBoot-G2 

and have either 

the factory default IP address of 

192.168.1.254

 or an 

IP address that was automatically assigned by the 
DHCP server on your network.  If the IP address was 
assigned by a DHCP server, no changes to the IP 
Address are required. 
 
The IP address field also indicates the port for web 
access that is used by the iBoot.  The standard port 
for web browser control is factory default Port 80.   

Change the IP Address 


1.  Click on the row containing the iBoot-G2 to be 

set.  The row will become highlighted. 

2.  From the menu select Set | IP Address 
3.  Enter the new IP Address into the form. Click OK 

when done. 

4.  A confirmation box is displayed.  Click OK to 

clear the box. 

 
Once the IP Address is set, other all other operational 
features of the iBoot-G2 can be set up.  Click on 
Discover again to refresh the display, highlight the 
desired iBoot-G2 and click on Manage | Launch 
Browser.  Follow the instructions on Page 14 to 
configure the iBoot. 
 

The DMU can also be used to return an iBoot-G2 to its Factory Default condition.  This can be used to 
recover an iBoot-G2 with a lost password.  Highlight an iBoot-G2 from the display and select Set | Factory 
Defaults.  This must also be done within the first two minutes of powering up the iBoot.

DMU Discovers Dataprobe Devices  

on your Network 

Enter New IP Address for iBoot 

IP Address Successfully Set 

Summary of Contents for iBoot-G2

Page 1: ...ongratulations on purchasing the best network controlled power switch available The iBoot G2 provides you the ability to reboot crashed devices with the click of a mouse Be sure to read up on all the...

Page 2: ...2 prong adapter at the receptacle use of this type adapter may result in risk of electrical shock and or damage to this product 9 Do not allow anything to rest on the power cord Do not locate this pro...

Page 3: ...er down equipment when not needed for power savings and to save on wear and tear Power up alert devices like sirens lamps messages or control environmental system like heaters coolers pumps etc 3 2 Mu...

Page 4: ...d uses an IEC320 receptacle and detachable power cord an IEC to IEC extension cord can be used The iBoot G2 can be connected to a power strip to allow simultaneous control of multiple devices Make sur...

Page 5: ...nstalling the Wall Mounting Kit DIN Rail Mounting 1 Remove the four mounting screws from the underside of the unit Do not disassemble the unit 1 Install the Wall Mounting Kit as shown 2 Install the wa...

Page 6: ...ed by the DHCP server on your network If the IP address was assigned by a DHCP server no changes to the IP Address are required The IP address field also indicates the port for web access that is used...

Page 7: ...at address is assigned to the iBoot You can lock the iBoot G2 to the current address by selecting IP Mode Static without changing the addresses Set the IP Mode either by using the web setup page or vi...

Page 8: ...to the iBoot G2 at a time To control the power click on the appropriate button During power cycling the Power Status bar will indicate the temporary status with a blue background Once the cycle is co...

Page 9: ...e timeout feature When there is no activity for the set time in minutes the user is logged automatically logged out and the username and password will need to be entered again for access This is to pr...

Page 10: ...set if using DHCP HTTP Port This setting is used to allow access to iBoot G2 on a port other than the Web standard Port 80 If the port is changed you will need to identify the port number when you en...

Page 11: ...is installed with the device to be rebooted but pings a remote host to test the communication channel Ideal for DSL Cable Modem Verification iBoot G2 monitors network device and powers up alarm or red...

Page 12: ...ed the status will change to FAIL The Fail Counter will indicate the number of times the failure has occurred and the Trigger Counter indicates the number of times the AutoPing action has been trigger...

Page 13: ...he Googbye page is displayed with a link to re login 7 6 Passwords Two passwords are used by iBoot The User Password allows access to the control of iBoot but not to the Setup functions When this pass...

Page 14: ...nge to iBoot This indicates successful login Enter commands as needed When done enter the logout command 8 2 iBoot G2 CLI Syntax Command Description Factory Default Control Commands These commands are...

Page 15: ...n When set to 0 the Telnet server is disabled 23 set dxp port 0 65535 This command sets the port that the iBoot G2 s DxP protocol service listens for incoming connections on When set to 0 the Protocol...

Page 16: ...On 5 Event Name mm dd yyyy hh mm Annually Power On 6 Event Name mm dd yyyy hh mm Annually Power On 7 Event Name mm dd yyyy hh mm Annually Power On 8 Event Name mm dd yyyy hh mm Annually Power On set t...

Page 17: ...user is presented with Password This prompts the user to enter his password iBoot This is the prompt that will be displayed after the user has successfully logged in iBoot Reboot Required This is the...

Page 18: ...re making changes to you iBoot G2 1 Insure that the Upgrade Enable checkbox is checked in the Network Setup web page of the iBoot G2 2 Run the Device Management Utility available at the link above If...

Page 19: ...expected Use the pushbutton as follows Action Result Momentary Soft Reset Will not change outlet status 5 Seconds push Reset to Factory Defaults Hold the button in until the Outlet LED is blinking the...

Page 20: ...105 125 VAC 10 A Max at 210 240 VAC 12 3 Compliance UL cUL UL60950 Listed I T E File No E225914 CE Directives 89 336 EEC 92 31 EEC and 93 68 EEC EN 60950 3rd Edition EN 55022 1998 Class B FCC Part 15...

Page 21: ...at 201 934 5111 to receive a Return Materials Authorization RMA Number prior to sending any equipment back for repair Include all cables power supplies and proof of purchase with shipment THIS WARRAN...

Reviews: